Do we really need a new Tony?
I always find it hilarious when I hear:
“Do we really need a new kit of the [insert new kit] when the old [insert kit from ancient times] is perfectly fine?“
I have heard and read arguments in support of certain Monogram, Aurora and Revell kits from 40+ years ago. It is like it is an affront to these modelers that someone would be so bold as to offer them the option to buy a modern kit. Never mind the adulation over these older kits tends to overlook some real issues with engineering, fit, flash, steps, raised panel lines that get destroyed when filling in the ever present seams and gaps, and the need to build them with copious amounts of putty, CA and styrene sheet.
We have been well served with excellent Ki-61 models in 1/48. There are great kits by Otaki and Arii but up until now, the best one has been the Hasegawa kit. I built the Hasegawa version years ago when I got back into the hobby. Actually, this was more of a re-build of a started model with some paint issues. It was the first time I used Simple Green to strip enamel paint and the first time I attempted a natural metal finish. At the time I completed it I was happy with the results but I’ve definitely improved my skills over time. I also prefer the Tony with camouflage.


I have not attempted another Tony since. However, given the recent releases of very attractive and new mold Tony kits by RS Models and Tamiya I decided it was time to build another.
About the Ki-61 Hien
At the time of the introduction of the Tony, the Air Force was flying the Ki-43 Oscar. Think of the Oscar as a light weight Zero. They were designed to be nimble and to fly and fight at medium to low altitudes. Early in the war, Oscars flew circles around their obsolete adversaries. But they were outclassed by modern fighters. Their light construction made them vulnerable to heavier guns and heavier aircraft could easily disengage by just going into a dive.


The Tony was designed to make up for these deficiencies for the Imperial Japanese Army Air Force. As an aside: It seems to me that the Navy tried to squeeze as much performance as possible out of its A6M Zero airframe (some 8 variants of the Zero before a replacement was being tested), while the Air Force supplanted (but not replaced) its older fighters with better performing designs throughout the war.
The Ki-61 was also unique (for the Japanese) in that it used an inline engine. This was so unusual that the Allies initially believed it to be a license-built Me-109. That led it to be initially code-named “Mike”. Later on, this was changed to “Tony” because the Ki-61 looked like an Italian aircraft.
Ki-61s first entered combat in early 1943, during the New Guinea campaign where it did not do very well. It had been rushed into service and it suffered from teething problems, especially the liquid-cooled engines. However, when they did work, these new fighters caused some concern among Allied pilots. They could no longer go into a dive and break off engagements. The Tony could keep up and it packed a much bigger punch.
As with all other Air Force fighters the Tony was gradually improved until the end of the war. In its final days the Tony was used to intercept B-29s over Japan.
Tamiya’s Ki-61 Tony
I believe this model is the first Tony made by Tamiya. It is part of a series of excellent new mold models that Tamiya has recently released in 1/48. To say that the engineering and fit of these kits is excellent is severely underselling it. The Tony sets the standard for such things and I can only presume Tamiya’s new Lightning, Spitfire and 109 are as good or better. A sharp set of nippers or a blade and some liquid glue is all that is needed.
I had this kit together in record time without any filler or clamps needed. I kept things simple and did not build up the engine or leave the top cowl cover removable and that sped things up. If you want to avoid building the engine, you can but you have to use piece X to provide a post for the spinner later on in the build.
Cockpit
The cockpit is a gem. It is both simple and filled with detail. I first sprayed a dark brown and dry-brushed everything with white. I then sprayed a very thin coat of XF-49 Khaki to build up the khaki interior colour. I then glossed it and did a pin wash using Mig Ammo Modern Vehicles wash.


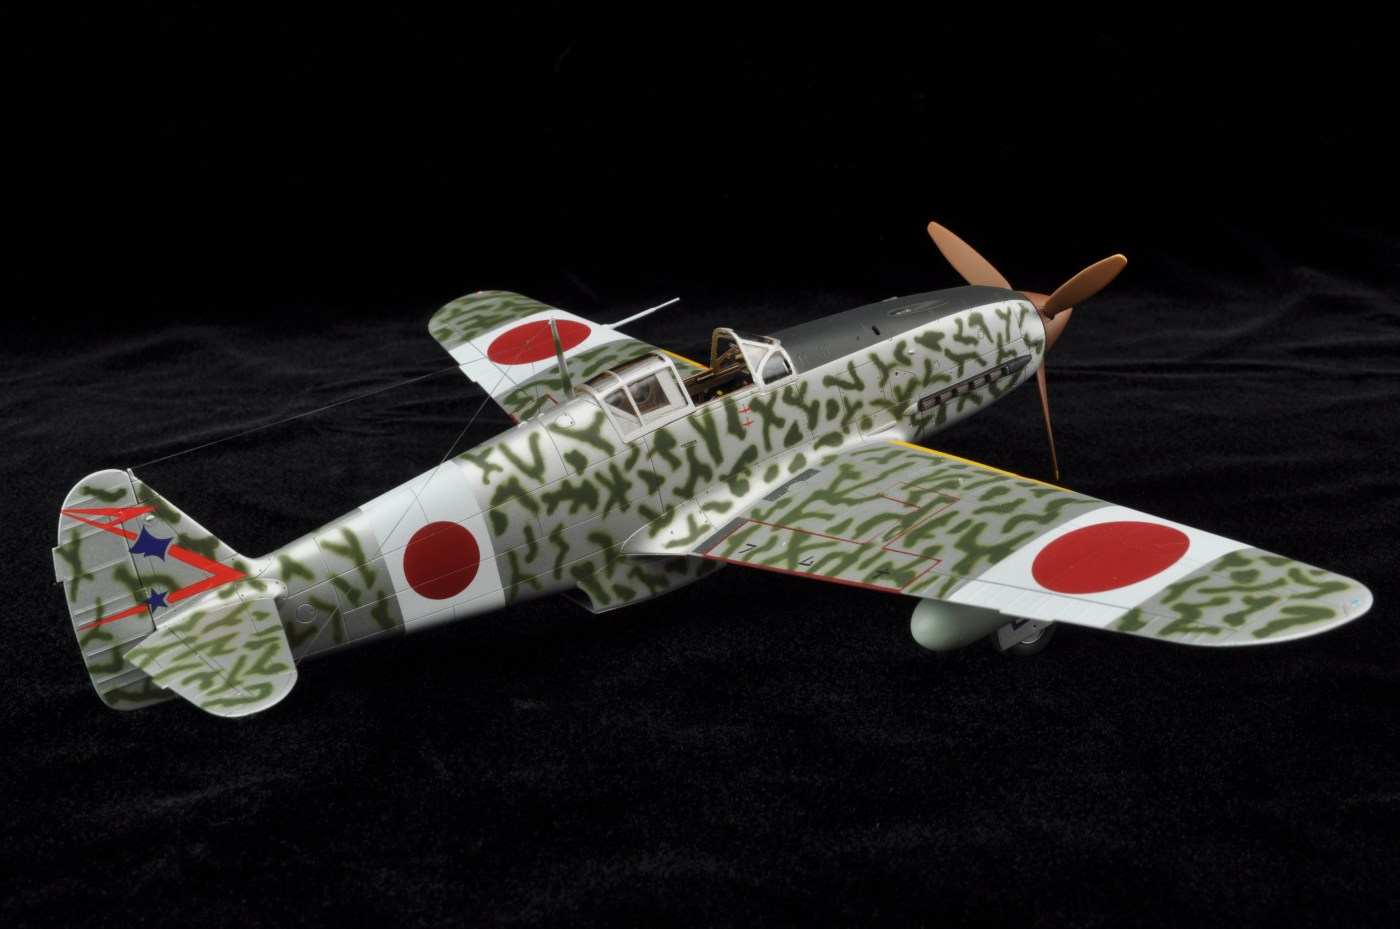
Painting and Liquid Decals
I knew I wanted to have the green camouflage squiggles on this plane and so I was less concerned about the natural metal process. I did not think it was worth the whole gloss black and multiple Alclad II paints process. I was even wondering whether it would be worth it to decant AS-12 and spray it with the airbrush like I did with the Babs. Instead, I went with the tried and true Tamiya AS-12 straight from the can which was slightly heated with warm water.


As some of you know, I have had my issues with kit decals. There is nothing more frustrating than getting a good build finished with a great paint job and then having the decals mess up the build. Sometimes the recovery is relatively painless but other times it involves sanding, stripping paint and refinishing. So, where I can, I paint on markings. I call these ‘liquid decals’.
I have gotten better at them over the years. My advice is to always start with a fresh blade. Any tape should have its edge trimmed as well to ensure a clean edge for painting. When it comes to painting, the secret is to use a slightly thinner mix of paint and to take your time. Also – don’t spray “into” or towards the masking tape – either spray straight on top of it or slightly towards the area to be painted
This time I masked off the red ‘walkways’ on the Tony and they worked out rather well. They sure took a long time to do though.
Decals
This is the second time I have used Lifelike Decals and, again, I was very happy with them. On this sheet for the “244th Sentai” there are markings for 8 different aircraft and if you paint on all the national markings and stripes, you could actually do all 8. More importantly, the decals work well. They are thin, they slip off the paper easily after a short dip in warm water. They also react well to Microset and Microsol.
I chose #21 flown by Lt. Yasuhiko Hiranuma of the 244th Sentai flying out of Chofu Airbase (west of Tokyo) in February 1945. At the time this air base was host to Ki-61 units whose mission was to engage B-29s. I was not able to find a lot of information about the pilot except that he joined the squadron in August of 1944, was recognized for damaging two B-29s and survived the war.


Final Thoughts
When I first started this build, I figured the Tamiya kit would be somewhat better than the Hasegawa one. Then I pulled the old Hasegawa Tony out of the cabinet and did a side by side. Up until recently, this was the best Tony kit available and it has been this way for over 20 years. However, there really is no comparison between the two. While the Hasegawa represents the best of the ‘2-sprue-wonders’ of the mid-1990s, the Tamiya Tony has the detail (and price) of a modern 1/32 kit.
Now, does the very existence of a new Tony kit mean you should immediately yank the Hasegawa, Arii and Otaki kits from your stash, stomp them and then burn them? Of course not. Certainly, the Hasegawa kit is an excellent one and builds without much fuss. However, we now have a much better option.

Beautiful
LikeLiked by 1 person
I get some of the frustration with Tamiya’s recent choices, it’s maddening when you’re hoping for something you think NEEDS an update and they offer something that we already had. If it ain’t broke… (Spitfire and 109 jump out!).
But no doubt these recent Tamiya kits are something extraordinary. I’ve built their P-38 and it just took my breath away.
This is a beautiful build too! It looks like a fun project.
LikeLiked by 1 person
I’ll have to see your writeup on the Lightning – its going to be my next build. Otherwise I’m keeping my fingers crossed for a Tamiya update to their 48th Corsair.
LikeLiked by 1 person
Very Informative review. You said it was a quick build for you. How long might it take for one not so experienced? (Not a novice but hasn’t built a model in at least a decade.)
Thanks again for the advice.
LikeLike
Hi Bill. This is an ideal kit to get back into the hobby. You could get the cockpit painted and assembled in a day and have the rest of the airframe done and primed before the end of the weekend. It falls together and no filler, putty or any nonsense. The Tony came out of the factory in natural metal so you don’t have to put on the cammo.
LikeLike
Nicely done! I’ve always had a soft spot for the Ki-61.
LikeLiked by 1 person
Nice! I built Tamiya’s 1/72 Ki-61 a year or so ago and enjoyed it. It sounds like the same kit except scaled up. Tamiya sells an interesting variant, possibly as an exclusive, at the Gifu-Kakamigahara Air & Space Museum. The museum is built over the old Kakamigahara airfield where the Zero made its first flight and the Hien was produced; its home to Japan’s only Ki-61 and also has a 1/1 replica of the 12-shi prototype that became the Zero. The gift shop has a model of their bare metal Ki-61, which i regret not buying. (I wasn’t modeling at the time) It depicts the museum’s aircraft as it looks on display on the box art.
LikeLiked by 1 person
Brilliant modeling! I can only recommend that you calibrate your camera (White Balance custom function or similar setting) for the photos with white background, as they show a slight blueish tint.
Cheers
LikeLike
You are correct. I’m still trying to figure out the white balance. I also need to let more light in somehow.
LikeLike
Bill, in genial defense of Arii and Otaki Nakajima Ki-43, 44, and 84 kits, to my admittedly old and poor eyes, these kits (really this kit, since the molds are the same), for all their lack of detail and some shape flaws, have one big advantage over the Hasegawa kits. The Arii riveting much better captures the surface texture of Nakajima’s production practices. This is less the case with the Kawanishi Ki-61 where the surface texture is less pronounced.
I really admire your build of the Tamiya Ki-61. I wish you would say more about how you applied the green squiggles (or reference another build where you have already described similar finishes). As frustrating as too many manufactures’ and aftermarket decals can be, at my age and skill level, they are still essential. At least modern printing techniques make misalignment problems a rarity. Now if those folks would only look at the color charts readily available on the web and do decent yellows for Japanese and other nations’ markings and ID wing panels instead of the pale mess that the printers seem to prefer at even the best of shops!
LikeLiked by 1 person