When I decided to go to the 2018 Nationals, I wanted to compete and not make a fool of myself. I figured the only way I could safely bring a model with me was as a carry-on. That meant something small that could be protected in a small box; something that could easily fit into a back pack, overhead compartment or under an airplane seat.
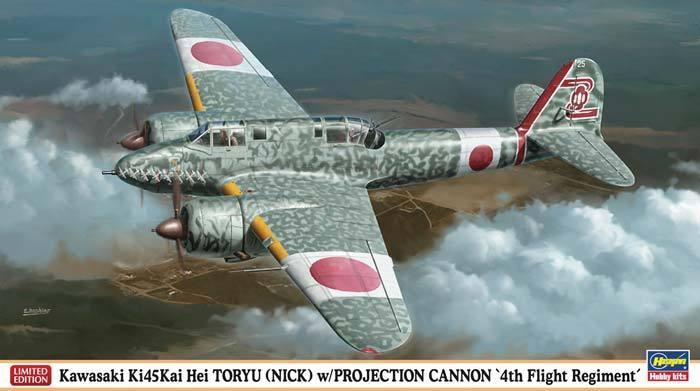
Practically speaking, this meant an aircraft in 72nd scale. My scale is 1/48 or 1/32 and I had only a couple models that would fit the bill. Knowing my fondness for all things Pacific War, a friend of mine bought this kit for me as a gift while he was in Japan. When he gave it to me, he challenged me to paint the model with the “squiggle” camouflage as pictured on the box.
So I grabbed this kit off the shelf and went through it. The size was right but there was a lot to be desired: It had a basic interior, no engines, no detail in the main gear bays, and thick glass. It would be a lot of work but that camouflage finish with the white bands and red hinomarus would make for an attractive model. Ultimately this kit took me about 6 months to complete during the spring of 2018.
The Build
The kit is a very good representation of a mid-1990s 1/72 kit: Engraved panel lines but a simplified approach to items like the cockpit, engines and any other interior detail. I figured I could work on these shortcomings and be able to compete this model:
Cockpit
Given the amount of glass on the Nick, I thought it would be wise to invest in the Pravla resin cockpit. This set is incredibly detailed and very easy to paint. I especially liked the chairs. I used a combination of techniques to get the cockpit to pop out such as highlighting some parts with a lighter shade of the base colour, drybrushing and washes using Mig Ammo products. I also had no issue getting the cockpit to fit into the fuselage once everything was painted. However, due to its size and dark colour, it was very difficult to get pictures that looked good.
Gear Bays
The gear bays were what could be charitably described as “devoid of any detail”. So I did some google searching for Ki-45 gear bays and I broke out my brass rod and evergreen plastic. I used brass wire to represent the plumbing in there as well as the brake lines going up the landing gear leg. I also replaced the struts with ones made from very thin evergreen styrene with holes drilled out.
")
")
")
")
Engines
I carved out the oil coolers from the cowl fronts and I stole some cylinders from a Minicraft Ventura kit I picked up at a show. A new crank case was made by placing laminated plastic stack into the spindle of a cutting bit for my dremel tool. The dremel was used at its lowest setting while I filed the plastic down to the cylindrical shape I was looking for. Each engine is built up, painted and wired but they are difficult to see.
The Rest
- I used certain bits of the Pravla vac canopy together with the kit canopy;
- I replaced the pitot with two sizes of hypodermic needle fit inside one another;
- I replaced the nose cannon with another hypodermic needle; and
- The wing tip anti-collision lights were cut out of the wings and replaced with red and blue clear coloured sprue from a sci-fi model kit. They were then shaped using a file and then various sanding sticks.
Painting & Weathering
I sure love building models but I find that painting is where the fun truly begins. I also avoid decals whenever I can so a bunch of techniques were going to be used to paint this aircraft.
I installed the canopy, masked it using tamiya tape, liquid mask and a lot of patience. Before priming the model I painted the canopy with the interior paint colour. Doing this will allow the interior colour to show through the canopy and it will match the rest of the cockpit.
When spraying multiple colours I like to start with the lightest and work my way darker. So I began with tamiya XF-2 white on the wings, rudder and fuselage. Once the white dried I masked the yellow leading edges of the wings and used an Olfa cutter to create masks for the hinomarus on the wings and fuselage.
There are a couple of strategies to avoid having the paint run under the masks – one is to spray the white before the colour. But given this is 1/72 I was concerned about layering paint. The other method is to use thin paint, low pressure and to take care of how you are spraying the paint. Spraying inwards from the mask is much better than spraying “against” the mask.
I then masked off the yellow and white painted areas for the base paint on the entire model.
The last step was the squiggle camouflage. Again there are a number of ways to do it but I felt a freehand method would look the best. To do it I went with a thin tip airbrush, thin paint and low pressure. I was almost touching the model and keeping a steady hand. I knew the tip would dry on me and block the flow of paint so I put a couple drops of paint retarder in the mix and I kept a paper towel soaked with lacquer thinner at the ready.
At this point I had already put in a lot with this finish so I really wanted to avoid any mistakes. So I decided to practice my technique on the wings of that Minicraft Ventura. When I painted the nick the base colour I also painted these wings so that I could prepare for the final step. I won’t lie to you – I did not get the feel for how to do the squiggle until I got onto the 3rd wing. By that time I had the right mix of paint and thinner and I knew how close to go and how to slowly build up the squiggles. I also had to keep the squiggles somewhat random but not make them too thick or thin.
I kept the weathering light because I really wanted to showcase the colours on this model. I rusted out the exhausts and I used a couple of different shades of panel line washes on the body. I used a dark grey on the camouflage and red hinomarus. On the white I used a very light gray wash to not overpower the white colour.
Finished!


Getting there
Once it was done, I had to find an easy way to transport it.


I used some pick and pack foam to create a simple padded box for the model. I sandwiched the model between two layers of foam to keep it from moving around. By carefully carving out troughs for the fuselage, landing gear and wings I was able to secure the model within a compact cardboard box. This easily accompanied me in my back pack and the model arrived to the show in once piece. I was only asked about it a few times before getting onto airplanes!
Final Thoughts
I don’t typically go into 1/72 but I think I pulled it off nicely. My choice of plane and finish meant there was a lot of work but it was fun and I think I made one of my better models. Ultimately I met my goals: To bring a model to an IPMS Nationals and not make a fool of myself!

Nicely done, bravo! I really like your idea for the transport box as well.
LikeLiked by 1 person
Nice job. Did you win any medals with your model?
LikeLiked by 1 person
Thank you! It was definitely a tough category but I managed to place second in 1/72 multi engines.
LikeLiked by 1 person
Nice work! I am relieved to see your transportation strategy worked out; I have heard a few horror stories of models not making it through TSA unscathed
LikeLiked by 2 people
I heard one story at Nationals – a group of guys made it all the way to the hotel lobby after a long trip. Unfortunately, while checking in, one of them backed into the stack of contest models and tipped it over. All that way…..
LikeLiked by 1 person