George Lewington over at Miniracing.com asked if he could post a ‘How-To’ article on the Model Airplane Maker website. Knowing how most of you dabble into other hobbies and areas of model building, I thought it would be an interesting read. I wasn’t wrong.
On a personal level, I was certainly caught in the allure of slot cars in the 1980s. I remember my morning cartoons being interrupted by the occasional Tyco slot car commercial and me being transfixed with how awesome it all was. Cool sports cars flying around the track?!? Cool sports cars flying off the track?!? Oh yeah, I needed some of that! Unfortunately, my dad didn’t see things that way. But at least I got to play with electric trains. Although none of them went flying off the track.
I’m glad to see that other types of modeler like to tinker and improve their models. If you are at all interested in slot cars, check out the Miniracing site, its full of products and information.
Well, without further ado, here is George with: “Create your own slot car chassis using this straightforward design process.”
Abstract:
Today, there are numerous slot car body kits available, offering slot car enthusiasts various options to build their own functioning slot cars (such as Scalextric cars). Some kits feature detailed models, while others are simpler, yet all require a chassis to be fully assembled and operate on the slot car track. This article covers the process of creating such a chassis.

Introduction
There is a wide variety of suppliers, both large and small, offering 1:32 scale slot car body kits, many of which are crafted from resin. Most of these kits come with windows and interiors, while the finest ones also include metal trim components, laser-cut details, and metal cast parts. The complete range is available, though building these kits often requires a level of modeling skill. Additionally, locating a 1:32 scale slot car chassis, wheels, and tires to make the model race-ready has always posed a challenge. Here, you’ll find all the information needed to create your own slot car chassis.
Building the Basic Structure
Key elements for a slot car chassis include:
● Rear axle mounting
● Front axle mounting
● Motor mounting
● Guide blade mounting
● Fitting the slot car body
● Mounting a Neodymium magnet for Magnatraction (if desired)
While it may seem straightforward, it’s crucial to ensure that gears are properly aligned and axles are positioned to achieve the correct ride height for the wheels, tires, and slot car model. We began by using 2mm plasticard, which is sturdy, easy to work with, and bonds well with superglue, as the base material for the chassis.
We also chose to use standard Scalextric parts, including:
● Axle diameter
● Motor (Mabuchi S can with brush-end drive)
● Motor pinion gear
● Rear axle contrate gear
● Guide blade, pins, and wires
● Wheels
● Tires
This approach minimizes design work and allows slot car enthusiasts to utilize readily available parts, making it easier for those with an existing Scalextric car to repurpose components. Our next focus was to prevent the rear axle from detaching from the chassis. For durability, we opted for plain holes for the front and rear axles rather than the open clip setup commonly found in Scalextric and similar slot cars, as these clips can sometimes disengage during use. Typically, Scalextric cars have interior extensions to secure the rear axle bearings, but these are absent in resin kits, so we addressed this by using plain holes for a more reliable fit—especially important when adding a Neodymium magnet for Magnatraction to the chassis.
The image above illustrates the formation of the chassis’ basic structure. We began by positioning the motor mount and the rear axle. Here, you can see the initial setup of the motor mounts, rear axle bearings, cutout for the contrate gear, and the chassis side supports.

At this stage, we’ve added more detail to the rear of the slot car chassis and refined the motor mounting. The basics of the front section are also in place, including the guide blade mount and front axle bearings. This image also shows the motor installed, along with the body mounting, which is set up and being adjusted.
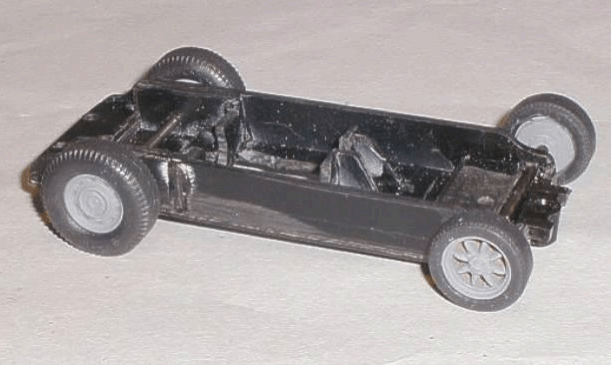
This image displays the chassis with an initial test of the chosen wheels and tires. Initially, there are two wheel options: a road-style wheel on the rear and a Minilight-style wheel on the front. Both wheel types share the same form factor, allowing them to use the same Max Grip tire range. The image above illustrates the largest and smallest tires compatible with these wheels.

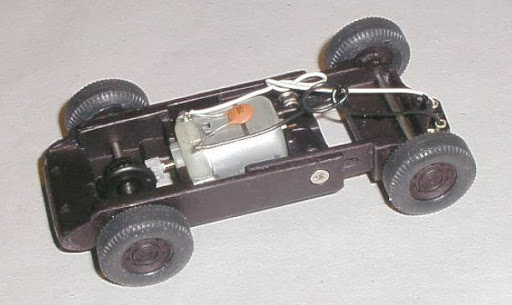
This picture shows the fully assembled and slightly refined chassis. The guide mount and side sections have been neatened up, and the motor is mounted at a slight downward angle. This setup allows the rear axle to sit lower, making it possible to use smaller diameter wheels and tires. The original idea was to enable the use of Scalextric’s small Superslix wheels and tires if desired.

Here, you can see the underside of the fully assembled chassis. This image highlights the motor and rear axle setup, along with the guide and body mounting solution. The chassis will be attached to the slot car body with three self-tapping screws—two at the rear and one at the front. Since this chassis is designed to run close to the track, the screw heads are recessed into the chassis surface.
Making the Chassis Adjustable
At this point, we have the basic structure of the slot car chassis with a fixed 75mm wheelbase. However, this isn’t very practical unless your slot car body has the same wheelbase. Therefore, the only solution is to make the slot car chassis wheelbase adjustable.

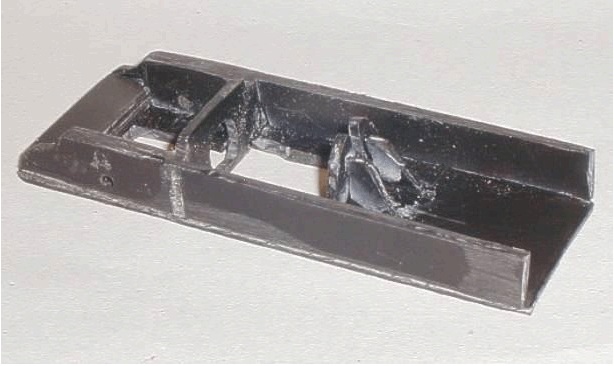
And now for the challenging part. Obviously, all cars, including their slot car counterparts, have varying wheelbases, which is the distance between the front and rear wheels. Therefore, any universal slot car chassis must be designed for adjustable wheelbase. This involves cutting the chassis into two sections and incorporating a method to adjust and secure the wheelbase. This image displays the front and rear chassis pieces, along with the beginning of the sliding mechanism.
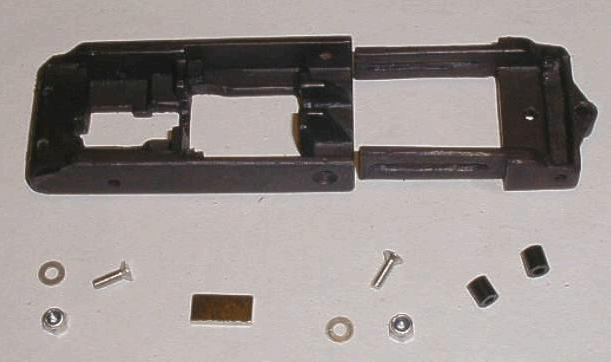
To produce this slot car chassis in larger quantities, we needed to ensure a consistent surface finish. Some parts had a glossy plasticard surface, while others featured a superglue finish or were sanded and filed. Additionally, there were minor surface imperfections resulting from the extensive machining used to create these master parts. To eliminate these imperfections, we spray-painted the slot car chassis with primer and then sanded it down. This process was repeated until the surface flaws were removed. In this image, you can see the two master chassis pieces prepared and ready for molding, along with the master wheel models and the selected screws, washers, and Nyloc nuts.
Into Production
Creating a single chassis is great, but the goal is to produce numerous chassis kits for slot car enthusiasts. As a result, the two master slot car chassis pieces need to be duplicated many times. We employ a low-volume molding method to make copies of the original parts for the slot car chassis kits.
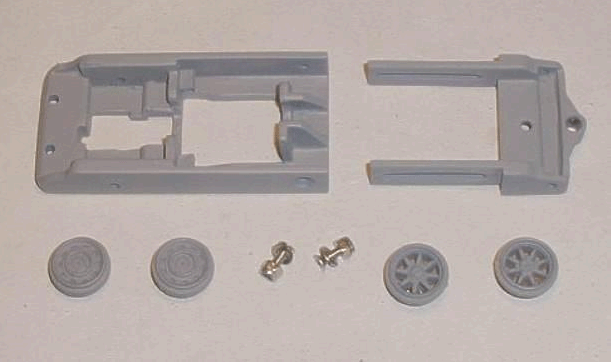
Above is the complete slot car chassis kit. This plastic-molded chassis kit is perfect for many of the 1:32 scale resin and plastic slot car body kits currently available. The kit includes:
● Rear chassis piece
● Front chassis piece
● 2 stainless steel screws
● 2 stainless steel plain washers
● 2 stainless steel Nyloc nuts
● 2 front axle spacers
● Neodymium magnet (optional)
Dimensions:
● Overall width: 33mm
● Height (without motor, axle, and guide): 12mm
● Overall length (minimum): 92mm
● Overall length (maximum): 112mm
● Minimum wheelbase: 64mm
● Maximum wheelbase: 84mm
● Recommended minimum tire outside diameter: 16mm (small Superslix tires)
This chassis is designed to use the following standard Scalextric parts:
● Mabuchi S can motor
● Rear axle (black or yellow contrate gear) with a 3/32″ diameter
● 9z motor pinion gear
● Front axle with a 3/32″ diameter
● Guide blade, pins, and wires
● Wheels
● Tires
The slot car body is attached to this chassis using two fixing points located behind the rear axle and one fixing point located behind the front axle. This setup follows the standard form factor for the readily available resin and plastic body kits

Very interesting article and would probably work for those who might want larger models or their 43 scale car cousins move.
I’ve had two slot car tracks and three HO train layouts.
The first was a “tin plate” O scale train on an three rail oval loop by Marx. My first slot car set was an Model Motoring HO set by Aurora. Those cars were driven by a vibrating motor.
I wish I had kept all those sets but like most toys, they were assigned to the dustbin of time.
LikeLiked by 1 person
My dad built me a simple double oval layout with 2 turnouts. He put it on a piece of plywood and I played with that all christmas break one year. Eventually we built a 5×9 layout and he wired it. I will never forget those days – we had fun. I did want a slot car set though – that would have been fun too.
LikeLike