
It was the morning of September 2009. This was the day I was going to step outside of my little basement fiefdom of model building and enter into a more social model-building arena. I was going to enter one of my builds into a contest! Apprehensive? Yup. Not so much that I wouldn’t win anything. I just didn’t want to make a fool of myself.
See, I had been to a contest before. Two years before, to be precise. There I saw models finished at a level I had no business even considering to be within my talent bracket. Those guys and girls did stuff that, well, I had no idea how they did it. But I fully intended to find out how. I marched into that vendor room and got myself two arm-fulls of Tamiya model magazines. Yup, I applied all those secrets and tips to my builds with varying degrees of success. After two years I was as ready as I could be to display something in person and subject it to judging glances.

As I finished placing my pride and joy onto the contest table I noticed another contest participant carefully placing his beauty of an F-18. It was as big (1/32) as it was gorgeous with all the bombs and missiles and drop tanks perfectly aligned. I couldn’t help but wander over for a closer look. Having recently figured out a decent panel line wash method I was immediately drawn not only to the wonderfully weathered paint but to the subtle but effective panel lines on this Hornet.
They were perfect. I mean perfect.
I turned to this master modeler and asked: “That is a gorgeous F-18. I really, really like the panel lines. Do you mind telling me how you did them so well?”
Now, there have been a few times when I’ve run into the unexpected. Stepping into a fire ant mound in a Thai jungle… that was unexpected. Finding myself very alone in the middle of the Washington mall some 10 minutes after dark… that was unexpected. Seeing a student pilot turn onto the runway seconds after the tower cleared me for landing… that was unexpected. What could go wrong with asking a fellow modeler about a technique at a scale model show?
He did not answer my question. Instead, he gave me a look of both disgust and horror, quietly packed his things, and quickly made an exit from the contest room.
You’d have thought I kicked his dog.
Repeatedly.
While laughing.
So, that too was unexpected. Though nowhere near as painful as those fire ants.
I tell this story mostly for the humor and maybe a little for the lesson that some of us are just a little more special than others. I don’t think it has flavored my impression of my fellow scale modelers but I will say this: I am less likely to ask someone for advice. I am far more likely to attempt something and fail multiple times before I get it right. Over the years this has meant that I have struggled a little to develop some skills. But in almost every case I get there eventually.
With one exception: those damn decals.
You see, I have been burned by these things many, many times. I can rarely get them to work as they should and I have been known to strip a model a few times because of wrinkled or non-conforming decals. I’ll readily acknowledge that it has been my technique. Or maybe I should say a lack of technique. Up until now, I’ve applied decals with more of a creed. A hope creed*. I’ve pretty much left it up to the gods of modeling to grant me perfectly “painted on” decals.
It’s amazing how ‘hope’ has consistently ended in disappointment.
Yes, I’ve had better luck with aftermarket decals. Especially the stupid expensive ones. But even they can have a mind of their own and not conform no matter what elixirs and potions I’ve desperately thrown at them. And believe me, I’ve tried them all.
Luftraum72: The Decal Whisperer
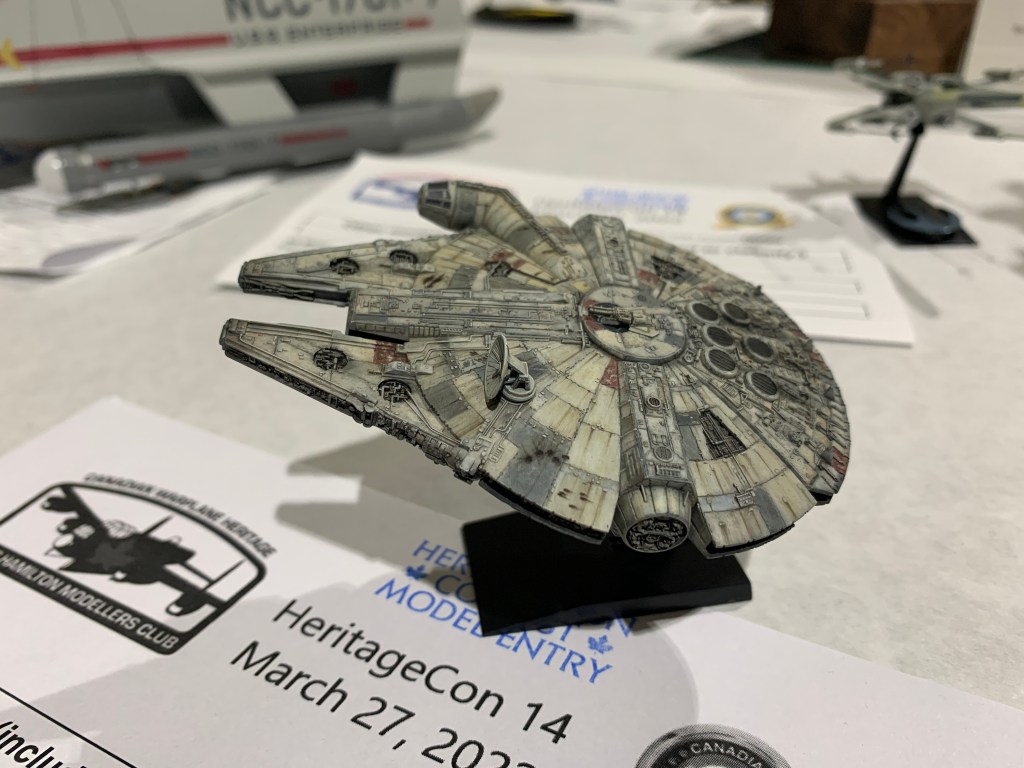
Well, that’s enough of that. I decided to seek some advice from one of the best out there. My model buddy Kris, who has a wonderful site at Luftraum72 seems to be some sort of decal guru. Ok, he builds at a completely different level but he’s definitely a decal whisperer. Kris isn’t afraid of decals. Nope, he tames them. I first fawned over Kris’s stuff when I saw his virtual entries over at WrightCon2020 and I saw some in person at HeritageCon2022.

Luckily for me, our paths have crossed a few times and I really enjoy speaking with him on all things model related. But this was different; I was hesitant to ask for advice. I’m not sure why. I did not think he’d pick up his things and run away but maybe I was afraid of something unexpected. Or maybe I was afraid he’d say ‘no’ and there would be that very awkward silence.
Turns out, Kris was more than accommodating. His explanation was more like coaching and his insights got me to rethink my previous ‘application-centric’ ways. At the end of our exchange, I had a whole new appreciation of what ‘decals’ actually are and what we are trying to get them to do. You see, the trick is to see the decal as a stiff rubber-like material and the idea is to find ways to get it and keep it as pliable as possible while coaxing it over and into every possible detail. I had all the tools but I did not have that inside knowledge.
And I wouldn’t have gotten it if I had not asked. I am sure glad I did. I’m still not completely confident in my decal abilities but I have ditched the hope creed and I’m ready for more:

Last Thing
We model makers can be a strange bunch and it appears that aircraft modelers, in particular, have gotten a bad rap when it comes to approachability. Maybe some have truly earned this dubious reputation. But it isn’t all of us. I bet if you just reached out to most modelers and asked about a technique, product, or just some simple build advice, you’d be pleasantly surprised.
Just make sure to carry it on someday when you are asked for advice.
As for the decal strategy, this is what Kris coached me through:
- Use lots of very hot water to soften the decal. I use a baby bottle warmer turned all the way up. I kept each decal in there 20-30 seconds
- Use a medium brush to make a blob of setting solution on the model
- Slide the decal onto the solution. This will keep the decal film soft and pliable
- Carefully and starting from the center of the decal, work the decal into the surface detail with that same medium brush
- If the decal film starts to stiffen, use hair drier heat to keep the decal pliable
- Wipe the decal down and press it with a lint-free cloth dipped in hot water
- If necessary, brush on a coat of decal sol and hit it with the hair drier (just be sure not to touch it after you brush the sol on it)
* with apologies to Cedric the Entertainer

Thanks for sharing the technique. Decals have always been my least favorite part of modeling – something I really hate doing.
LikeLiked by 1 person
As usual, you have printed some extremely useful information. My son and I are sometimes disappointed with the way some of the decals on our projects turn out. So this is excellent stuff that we will use right away! Thanks so much!
LikeLiked by 1 person
Use a hair dryer with caution, it also expands the plastic and can open up the seam line between fuselage halves. I apply decals atop a wet layer of Future Klear and use a hair dryer at low or cold heat level to speed drying. Atop this I apply another layer of Klear. You can dilute the Klear with water. If you have white appear, apply another layer of Klear.
Happy modeling,
Yoav Efrati
LikeLiked by 1 person