A Little History
Lockheed began developing the P-38 Lightning in 1937 and in January 1939 the prototype made its maiden flight. The Lightning was a unique looking aircraft with tricycle landing gear, twin booms and a central pod bristling with guns. It had two 1600HP liquid cooled engines and fully loaded it weighed some 10 tons or about two a P-51 Mustangs.
The Lightning was sleek and fast but it was complex to manage the engines and fly combat for even experienced pilots. In addition, several engine issues led to many losses in the skies above Europe.
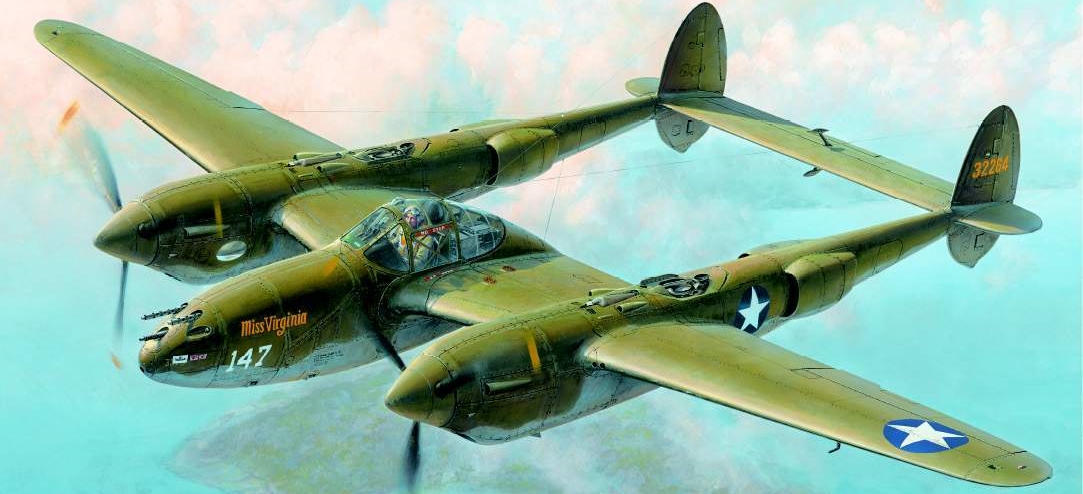
However, it’s twin engines and long range made P-38s ideal for the South Pacific Area of Operations. In early 1943 Guadalcanal was secure and P-38s began to replace the performance-limited P-39s and P-40s in the Pacific. Shortly after their arrival at Henderson Field, sixteen Lightnings flew one of the most famous missions of World War II. In a previous blog post I discussed the story behind Miss Virginia and its participation in this mission.
The Build
I wrote about this kit soon after it was announced and available to a select few lucky modelers in the summer of 2019. Since then I have looked forward to building this kit and not just because of the excellent model that Tamiya has created.
Cockpit
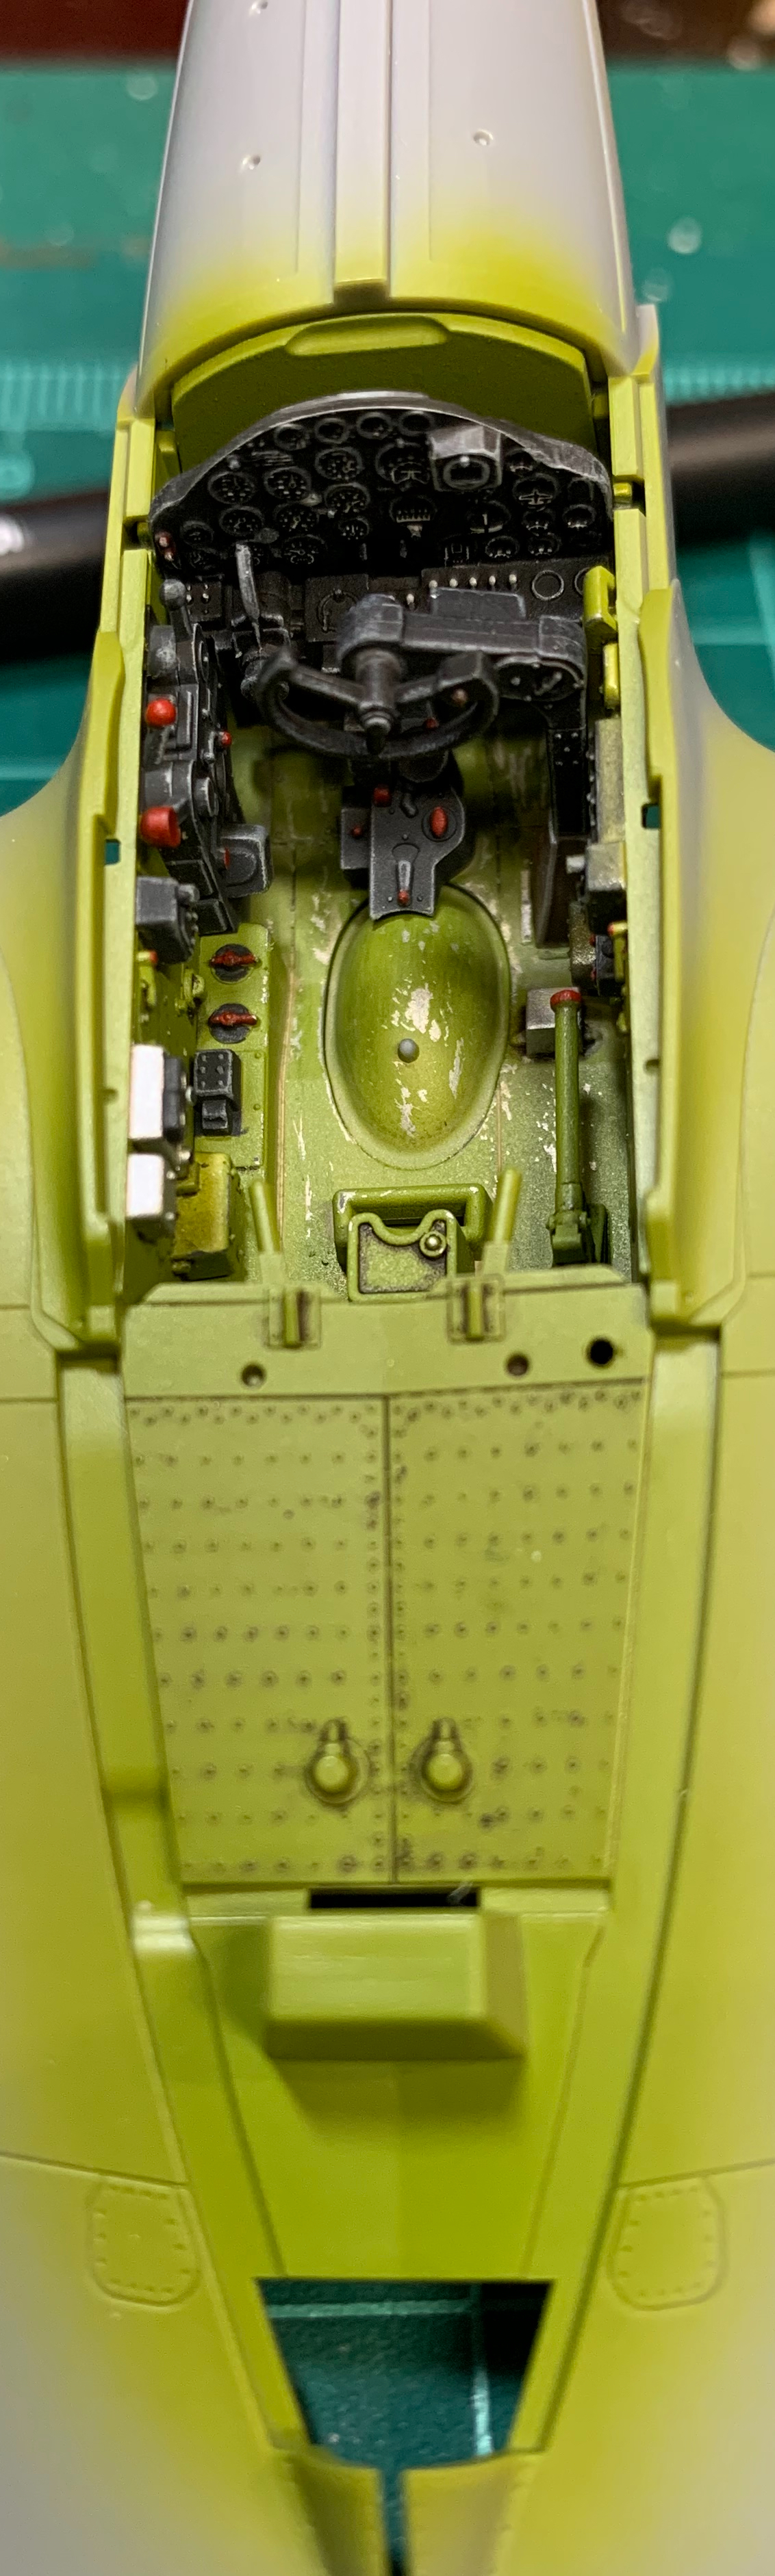
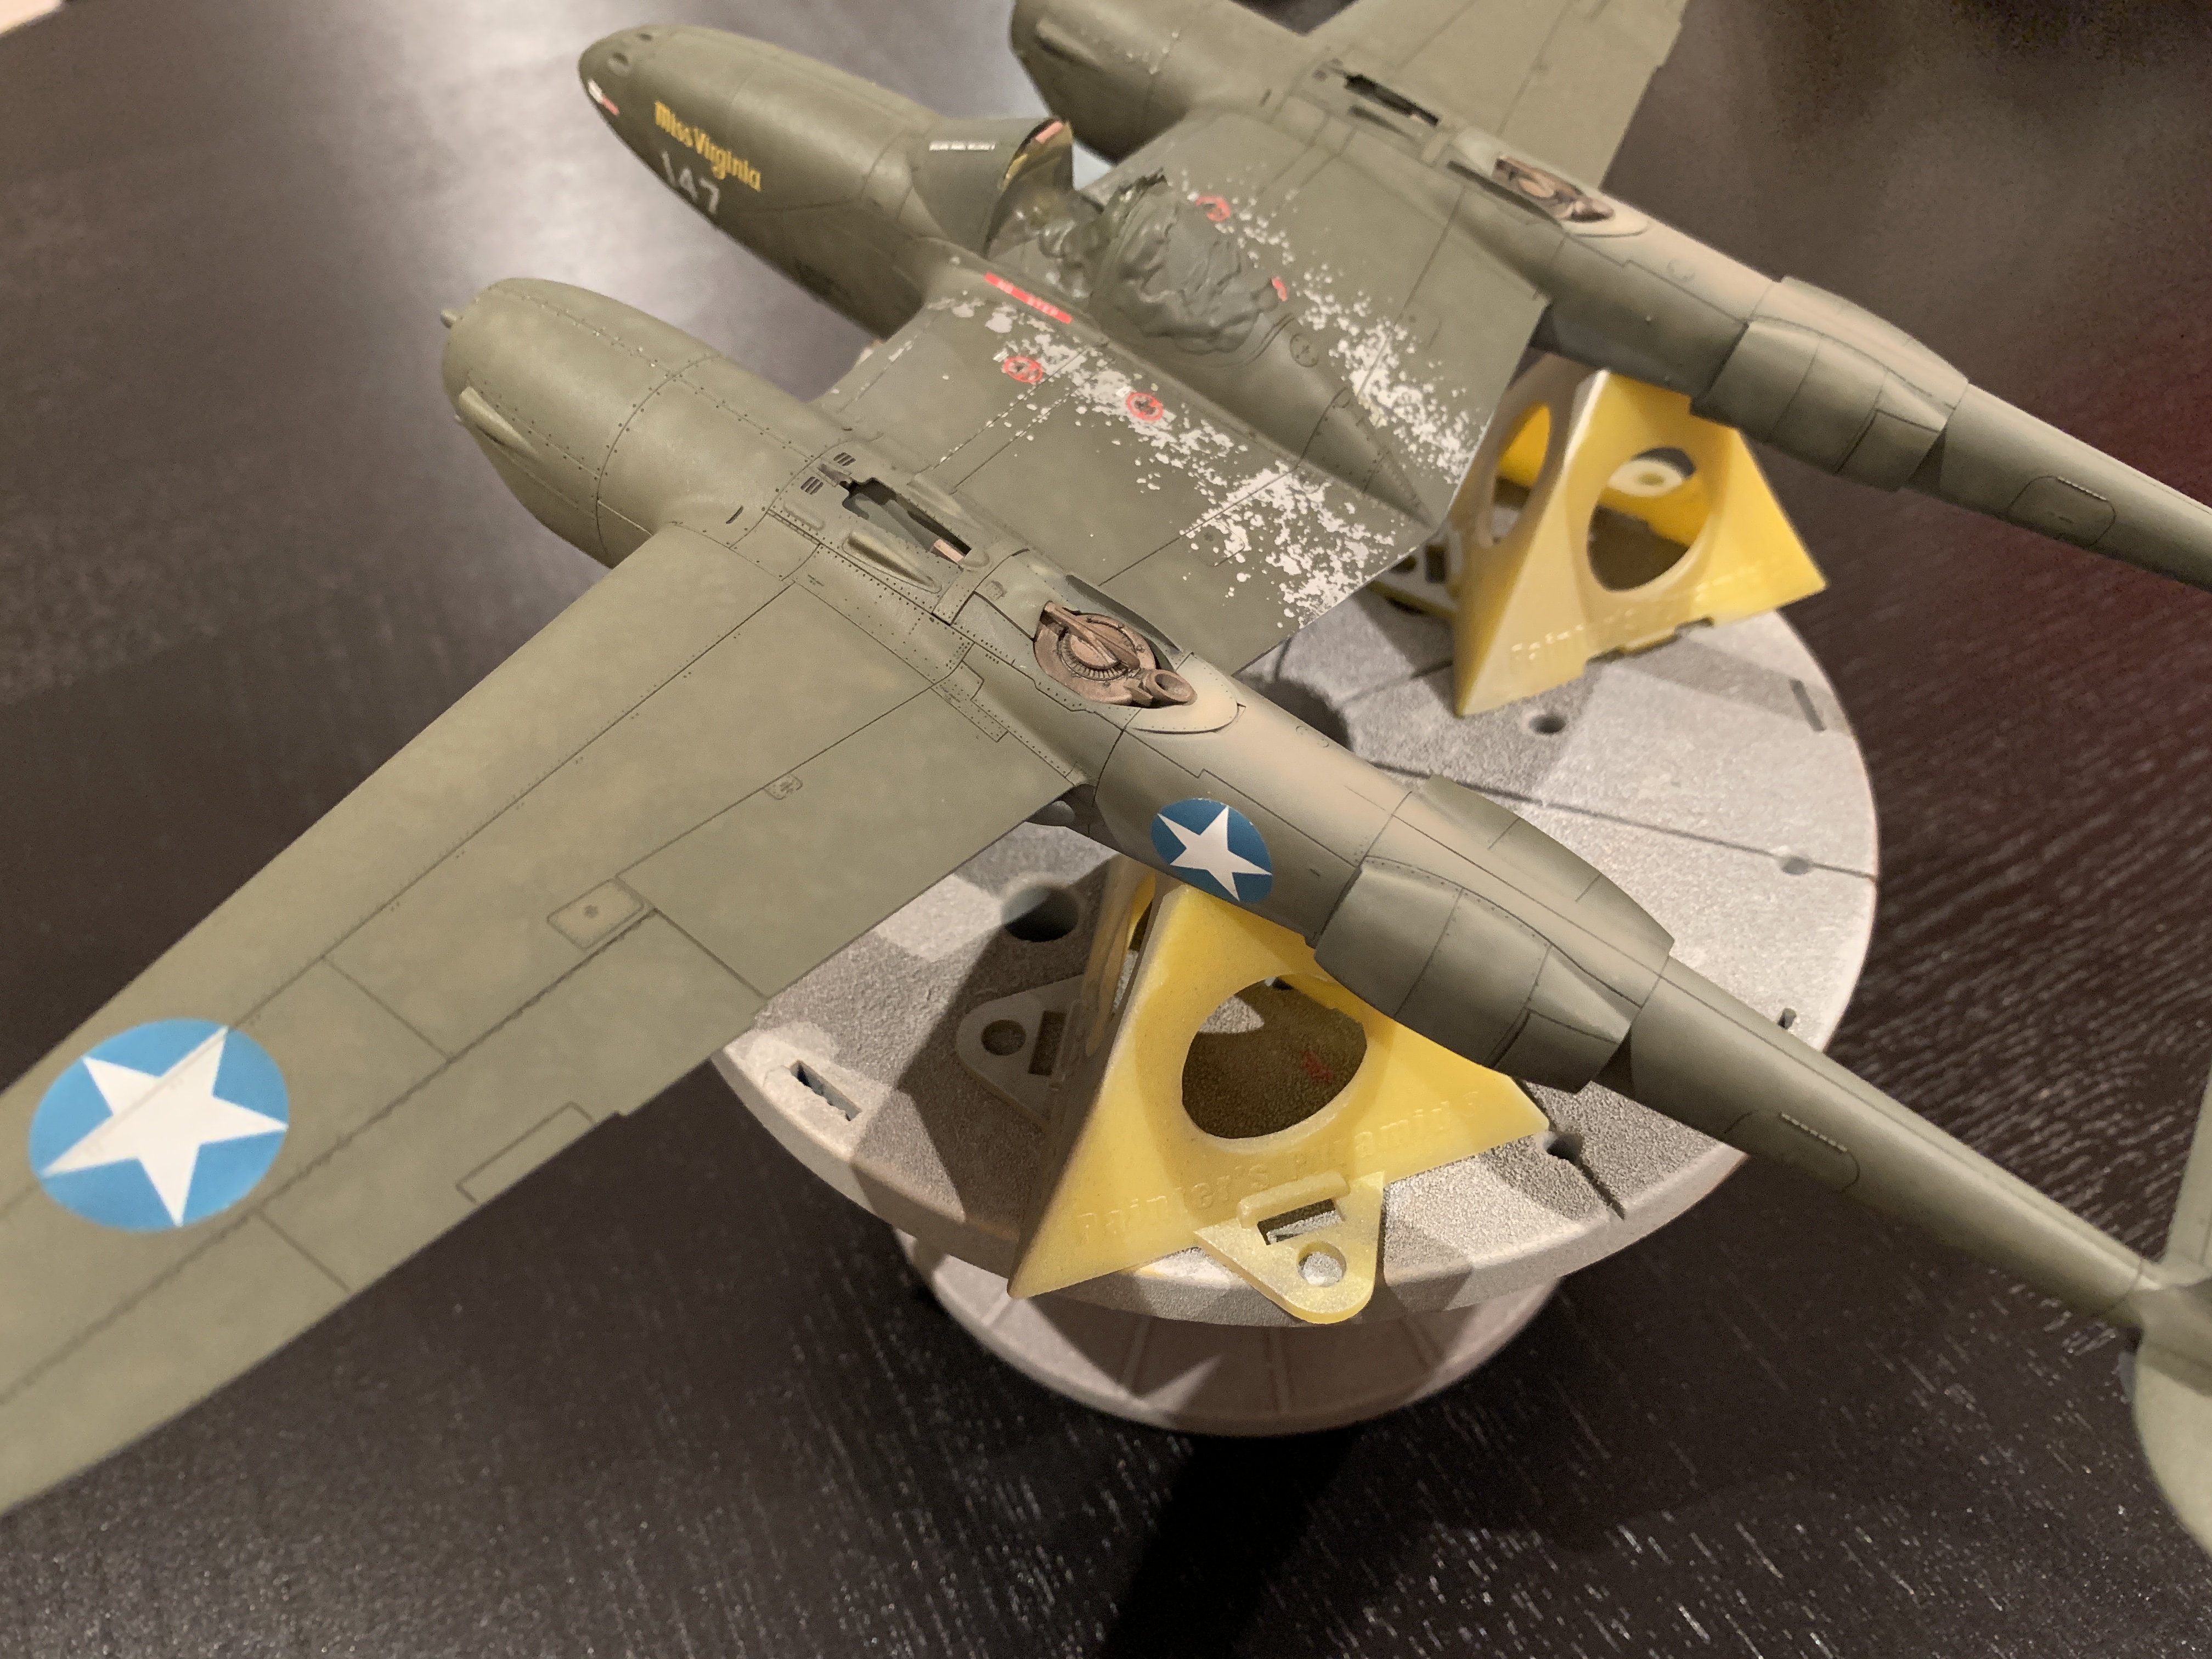
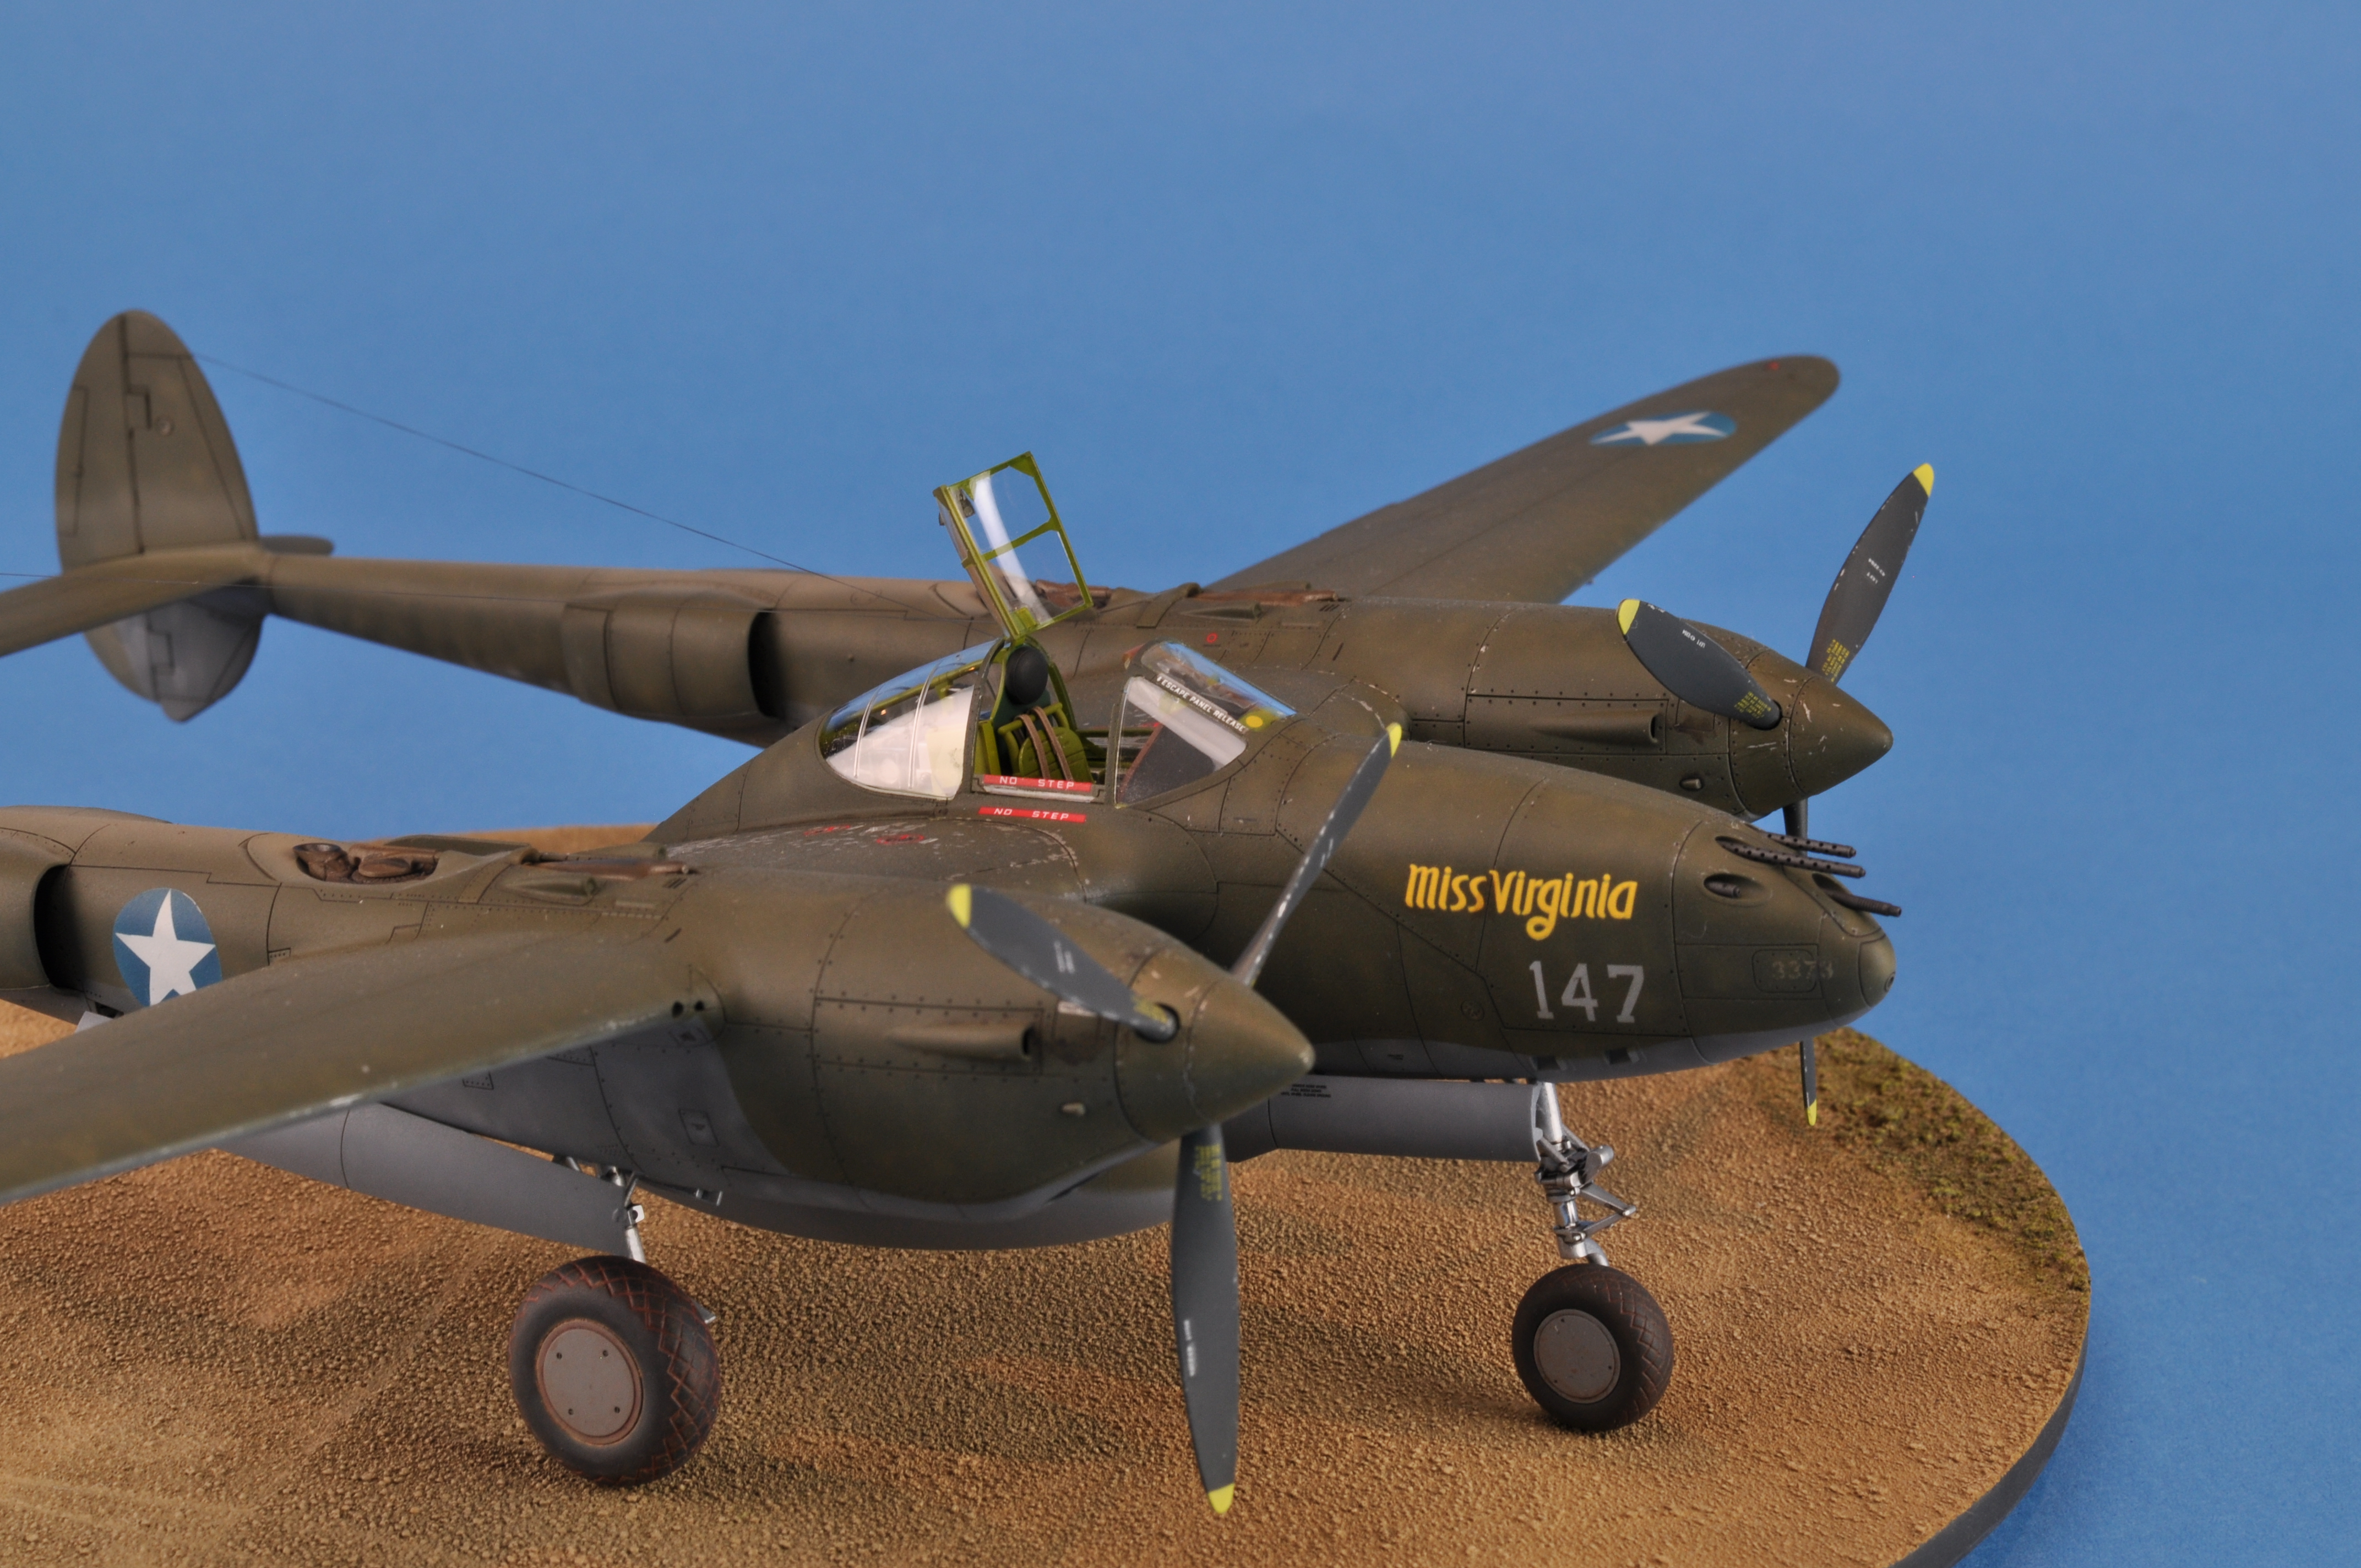
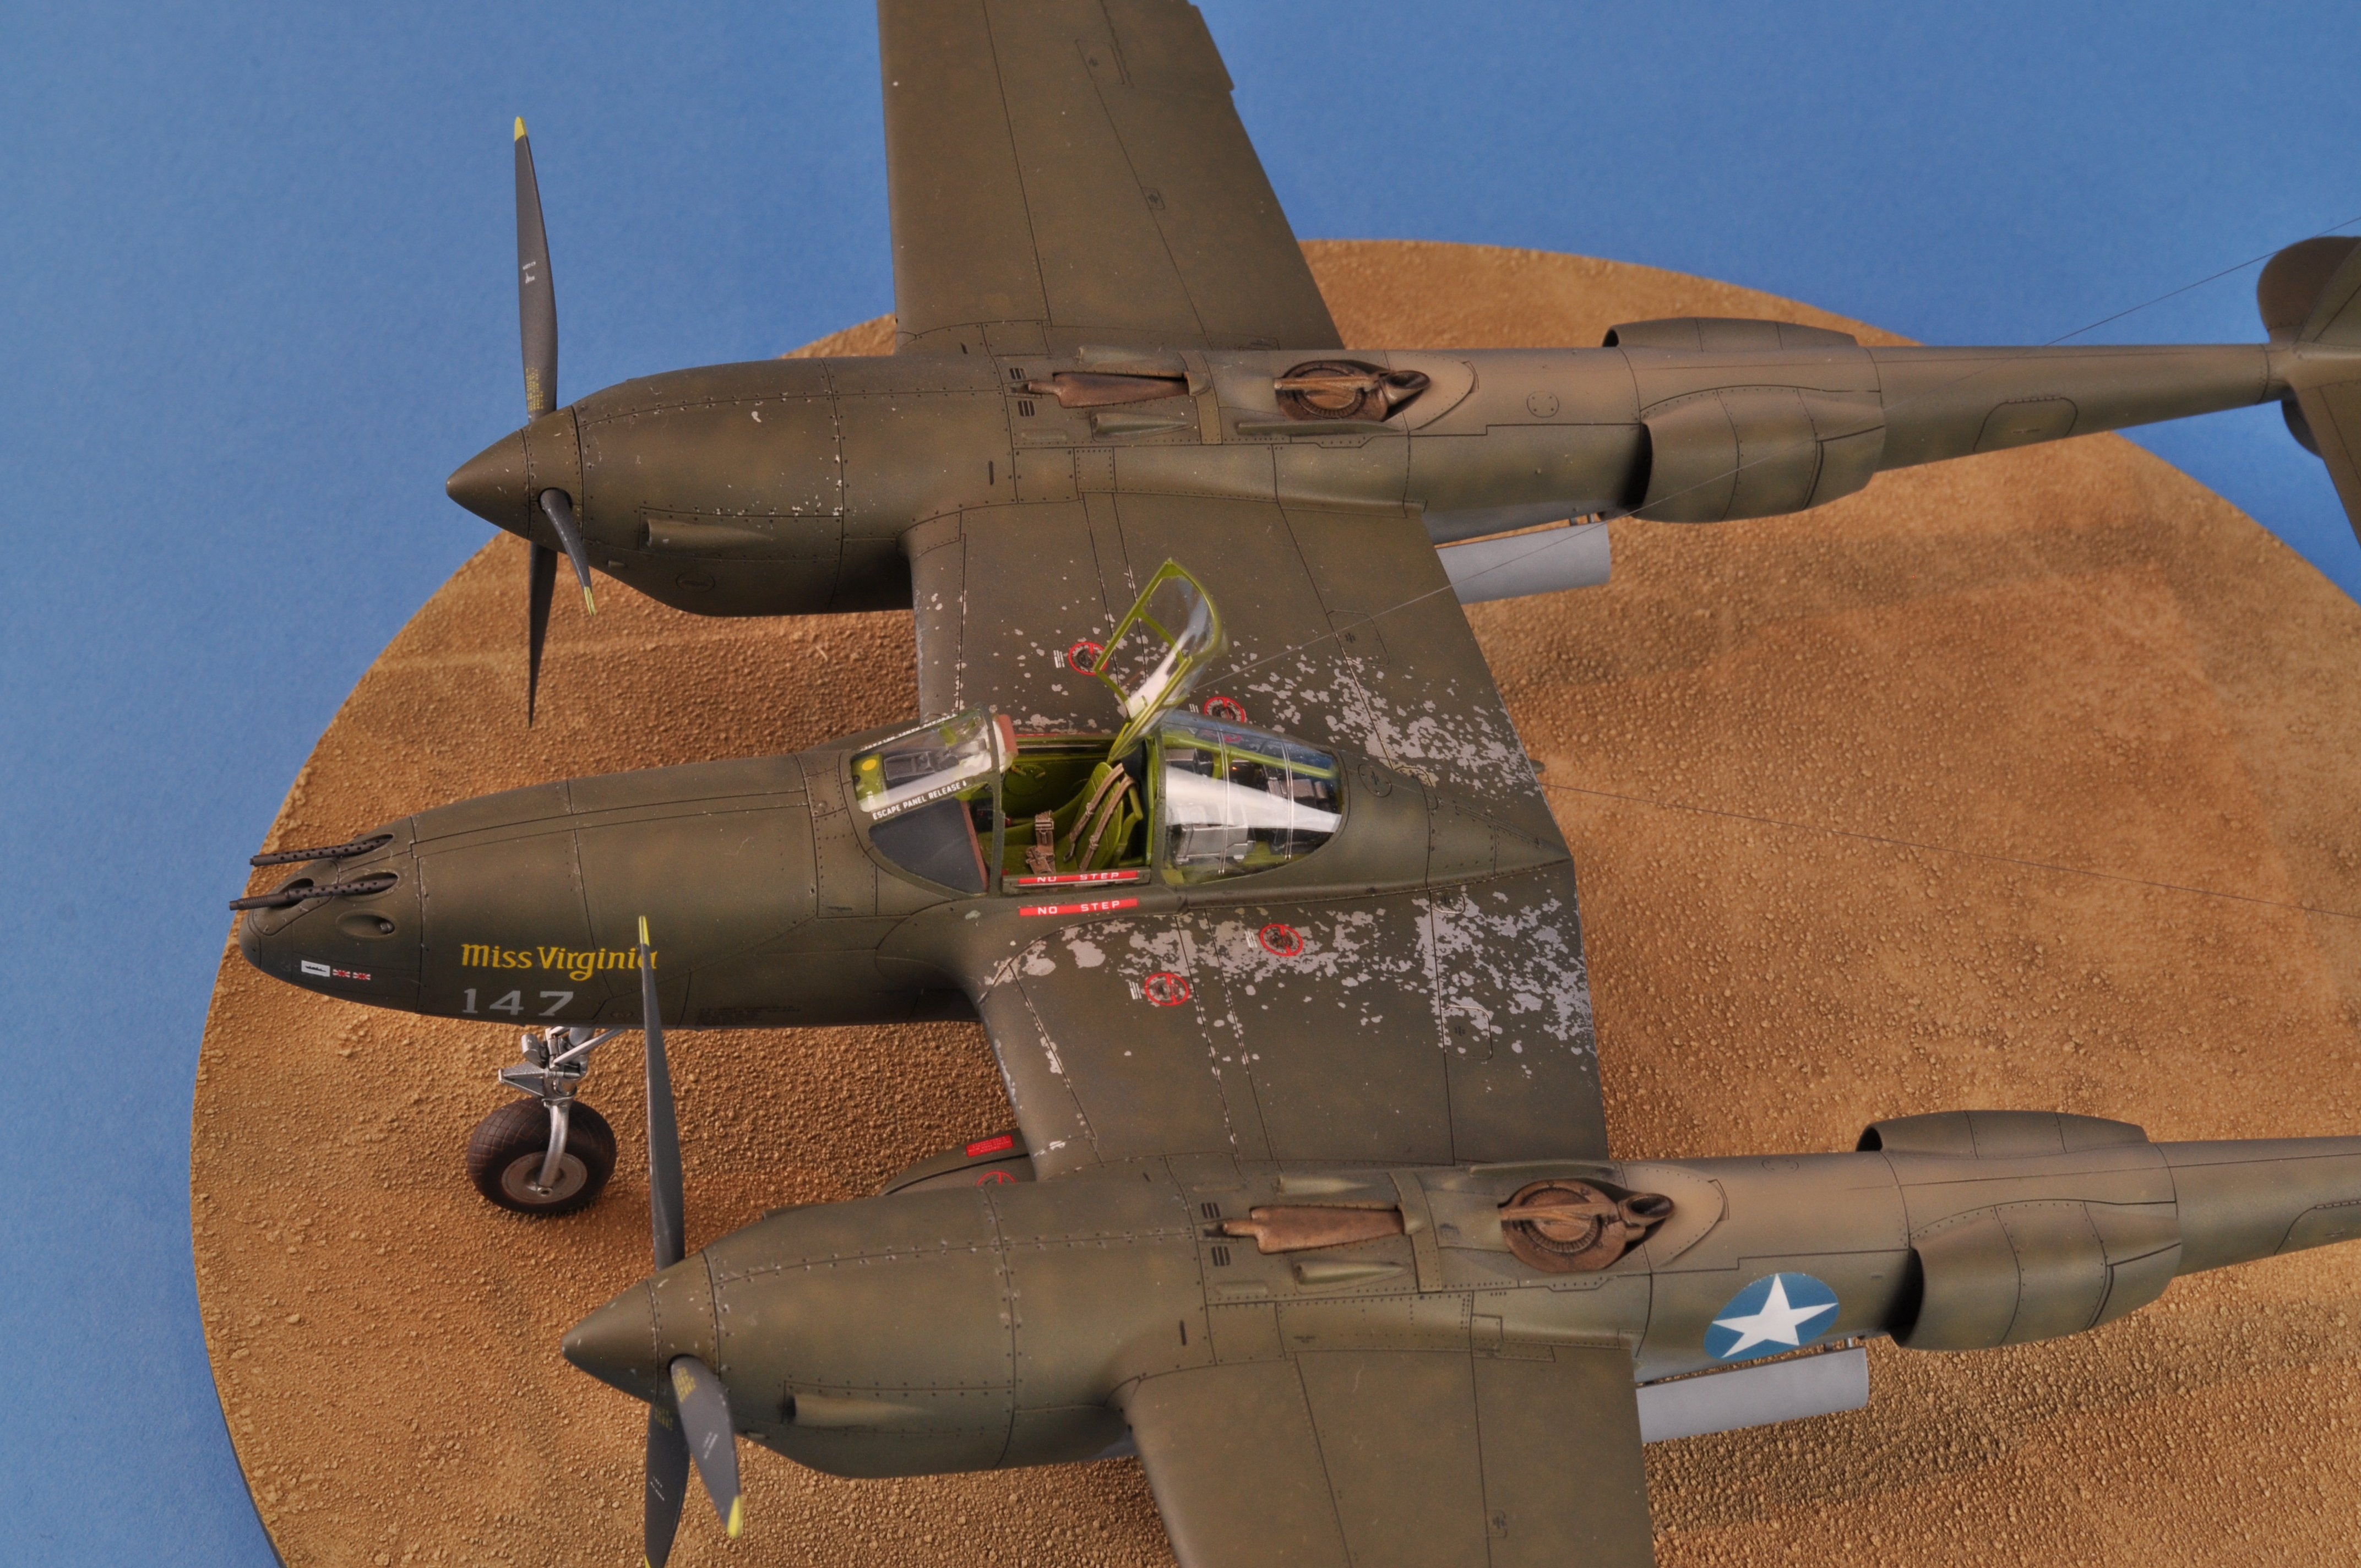
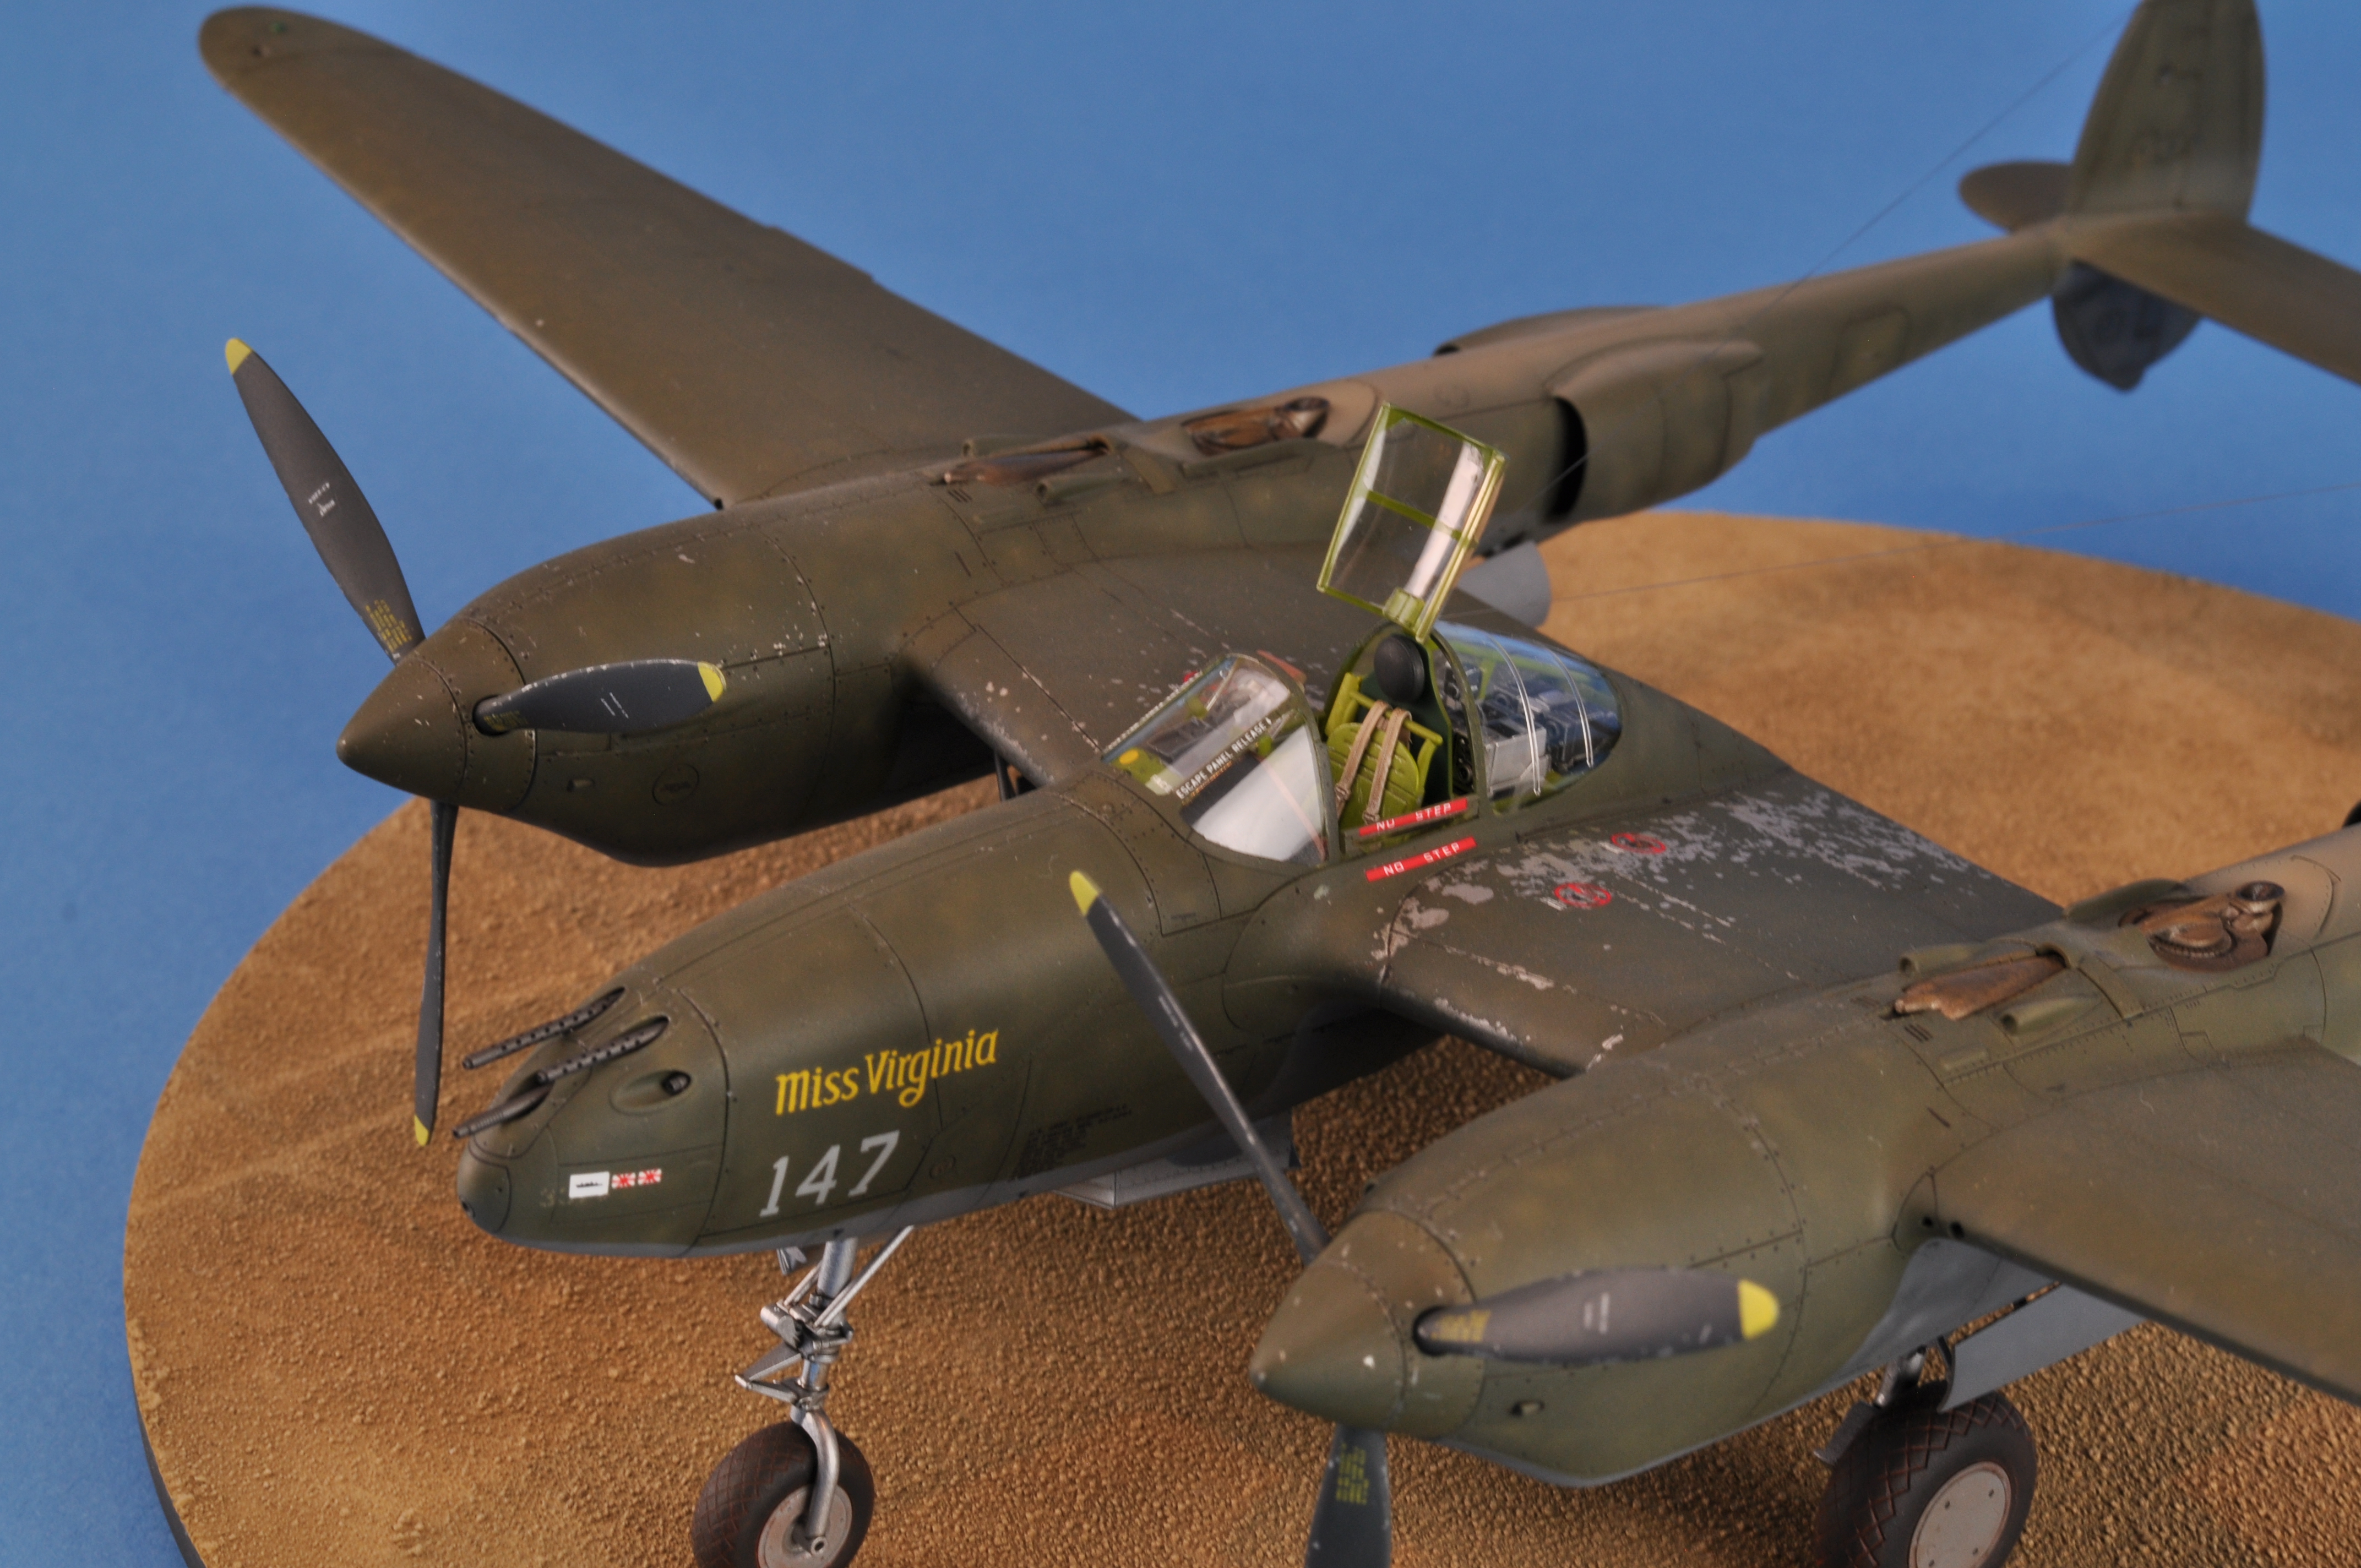
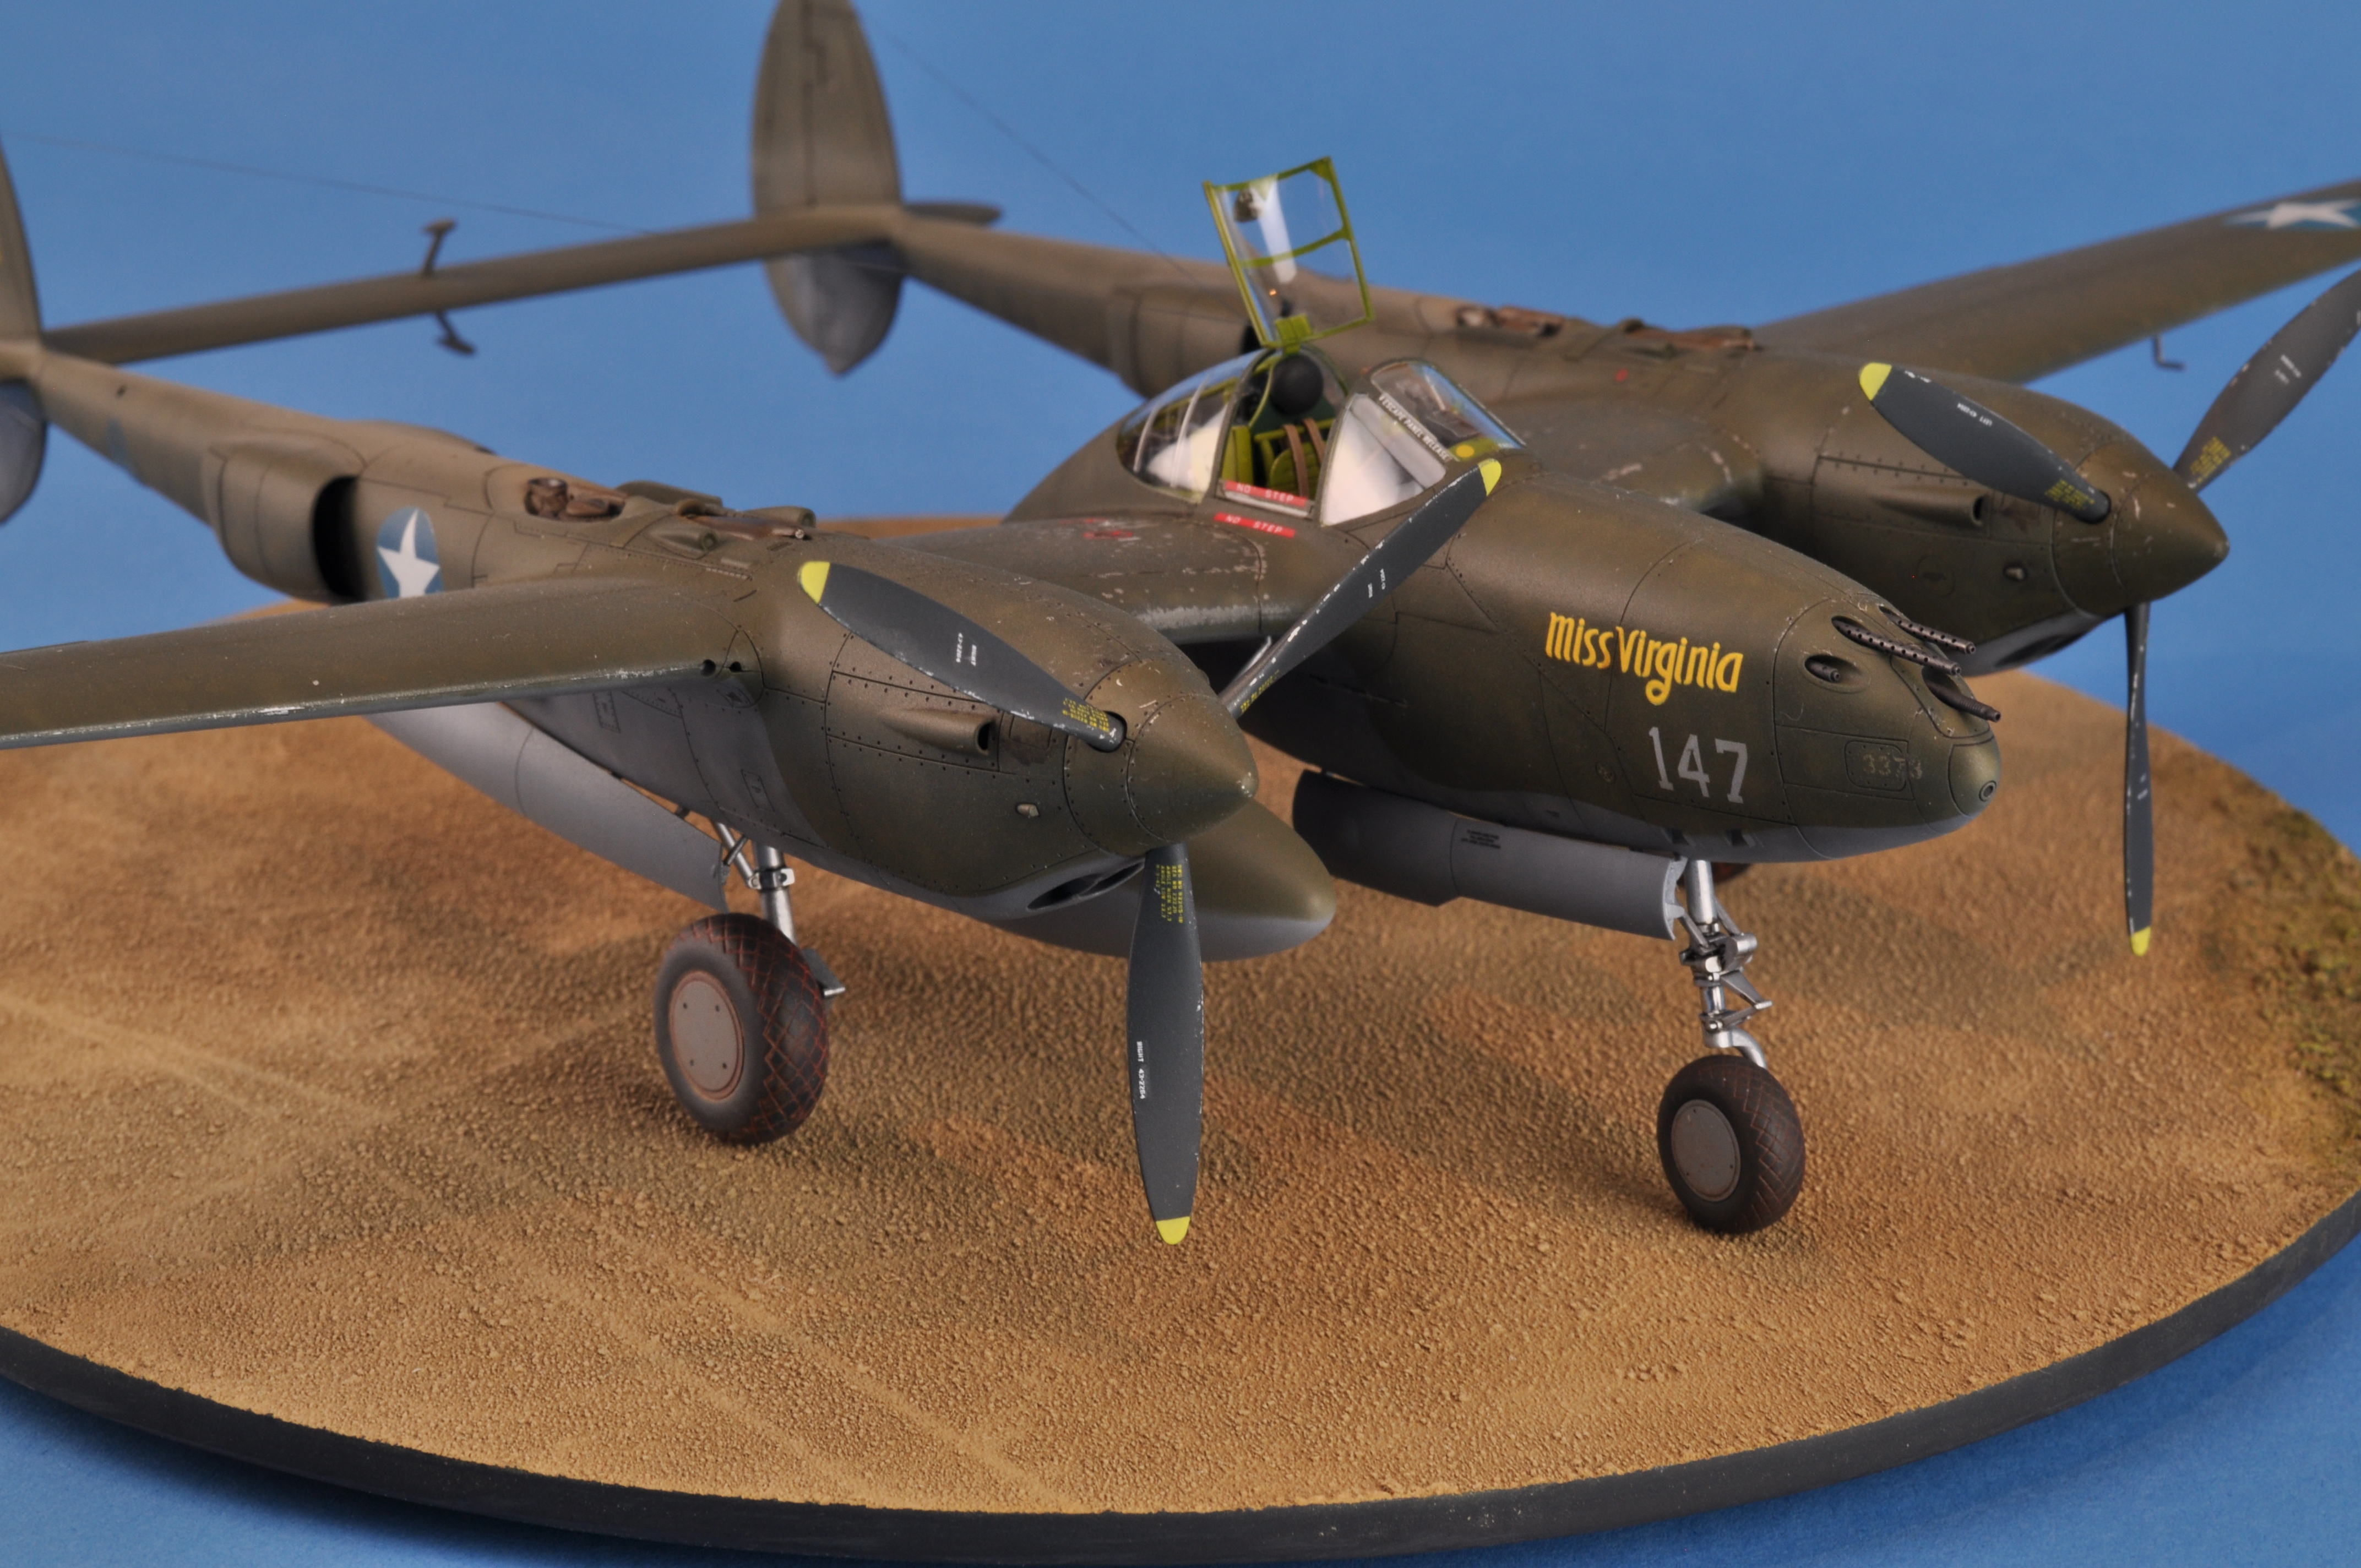
The P-38 Cockpit was a bit different from most WW2 fighter cockpits. For one, it used a yoke instead a flight stick. It also had a unique way for the canopy to open with “roll down” windows on the sides of the canopy.
The kit’s cockpit is well detailed and looks busy. There is a lot of detail under the rear canopy as well. I posted a step-by-step describing how I painted and finished the Lightning’s out-of-box cockpit in my post about Tips & Tricks for Cockpits. The addition of Fine Molds seat belts takes this a little out of the OOB category, but they look a lot more convincing than the decal option provided in the kit.

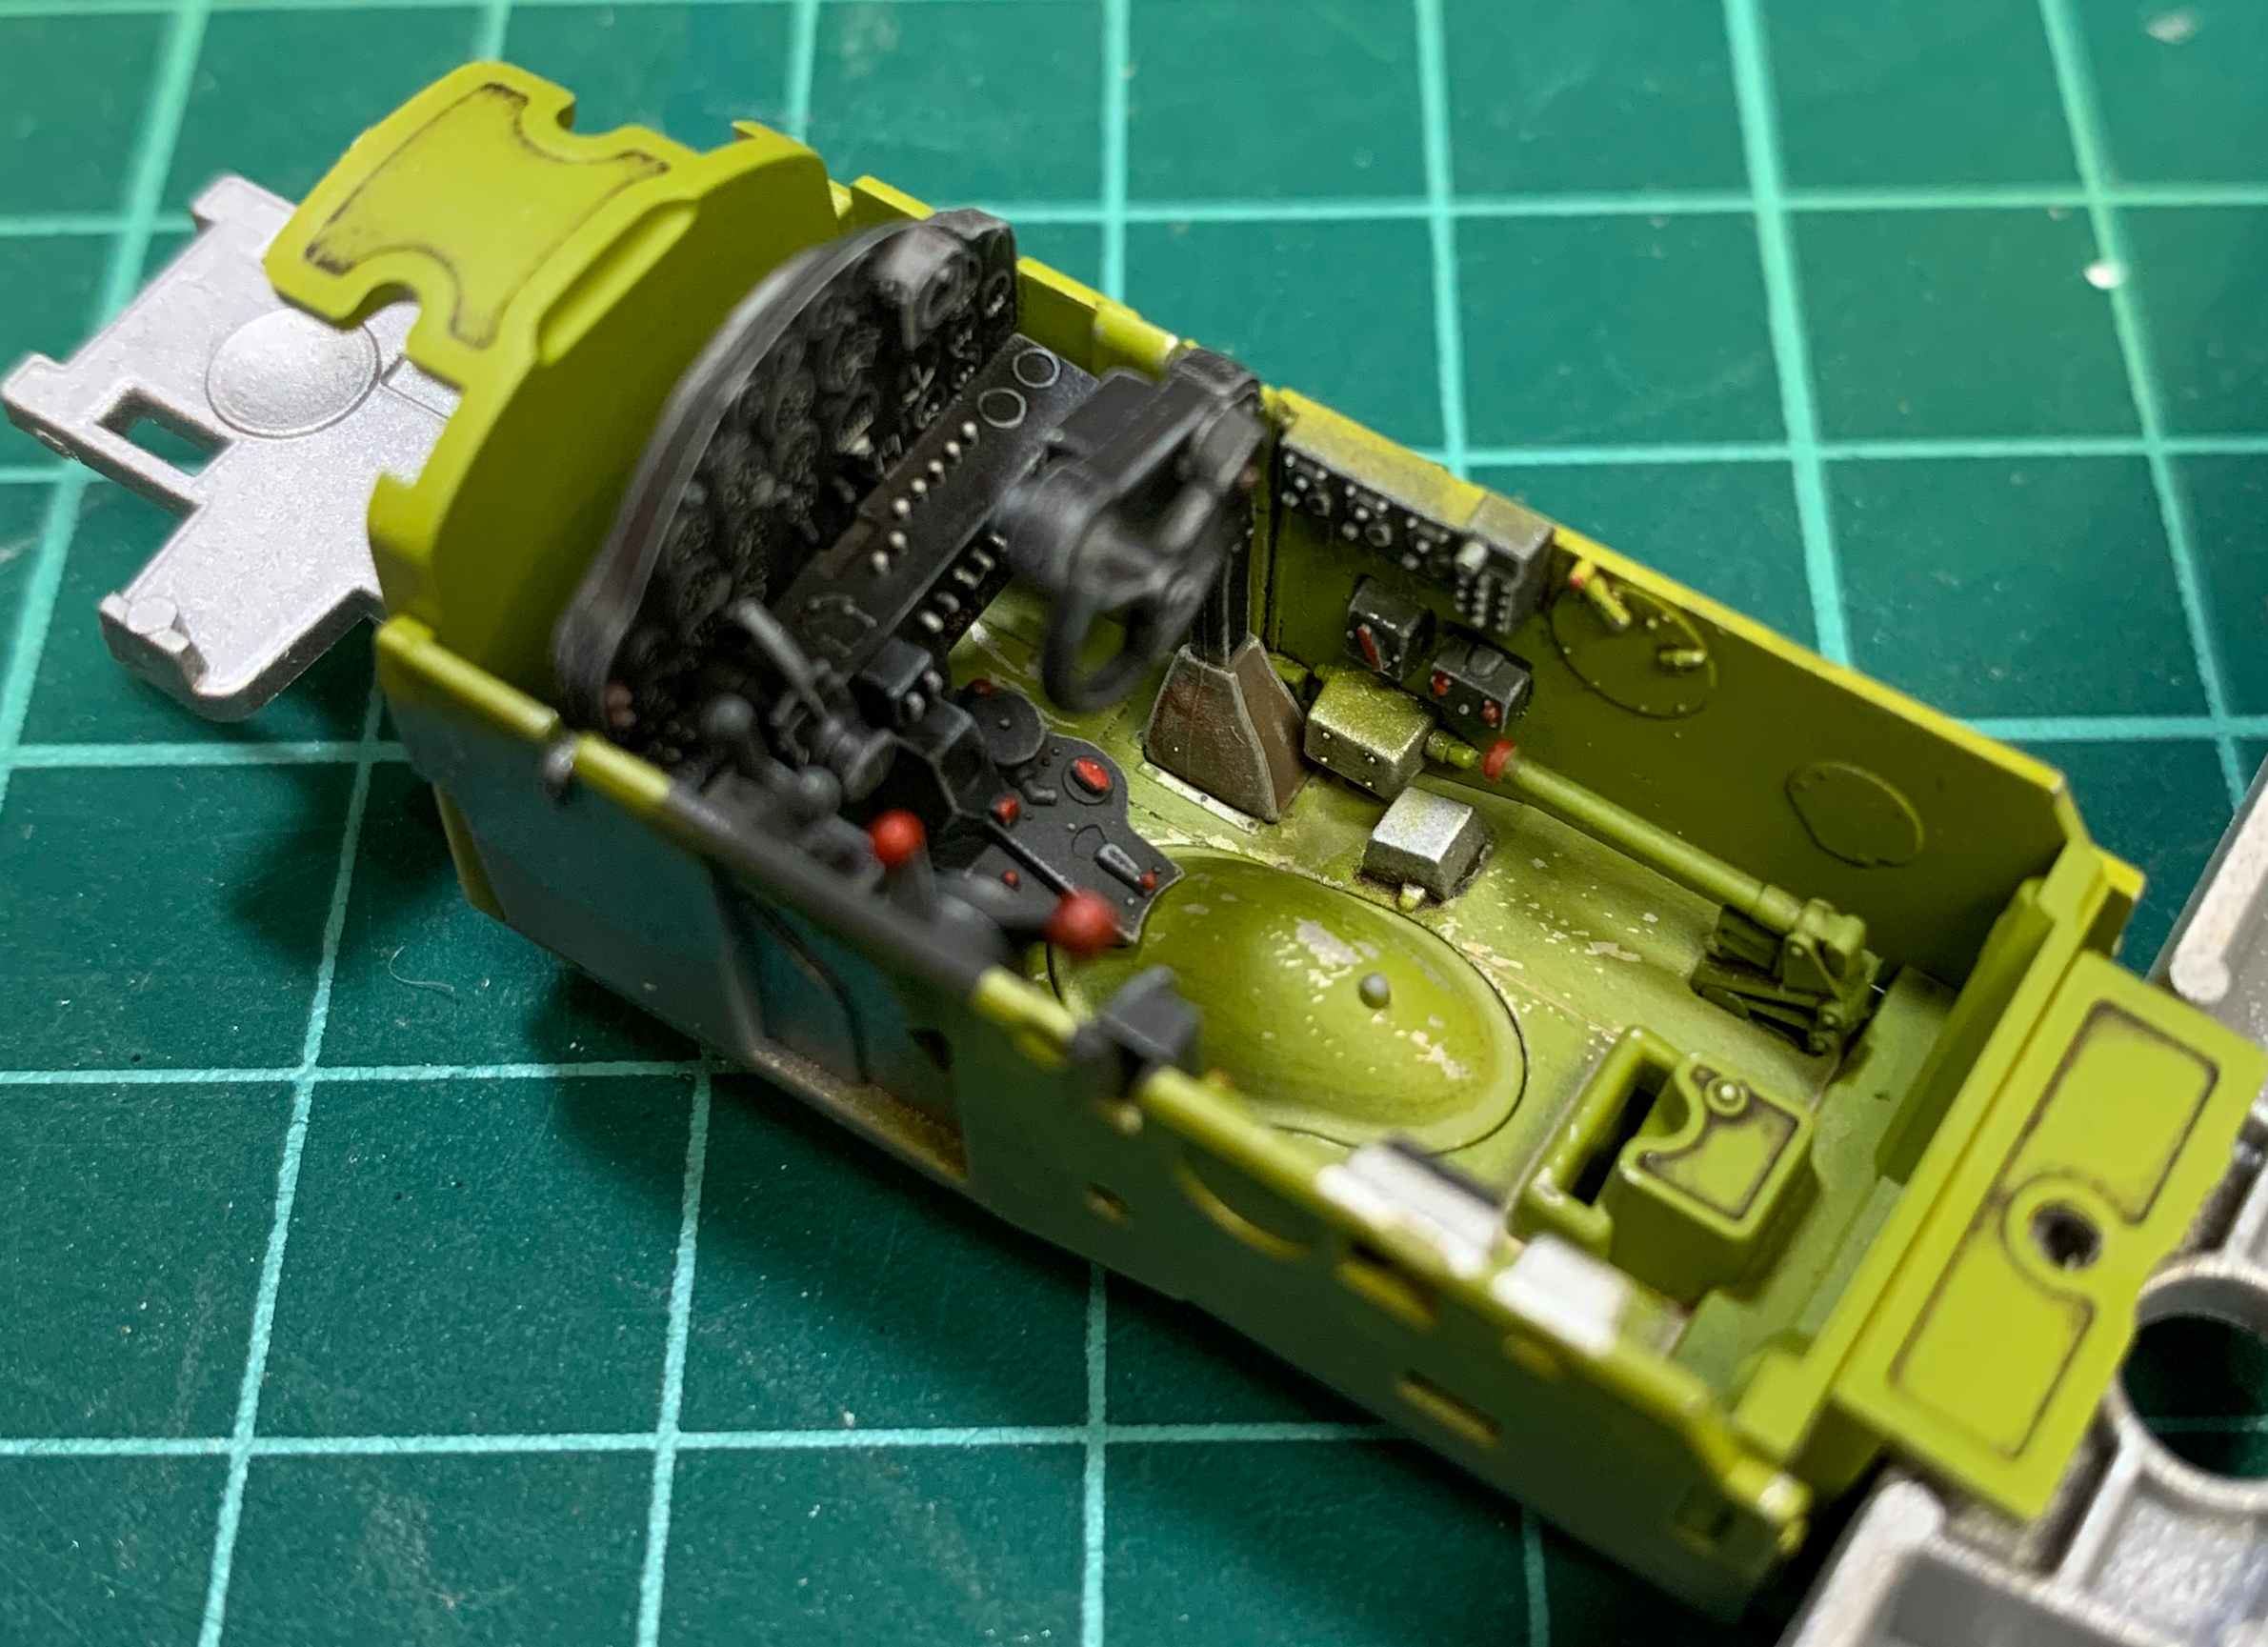
If you are interested in an in-depth look at completing this cockpit, I have a YouTube video that sets out several tips and techniques.
Finishing the Build
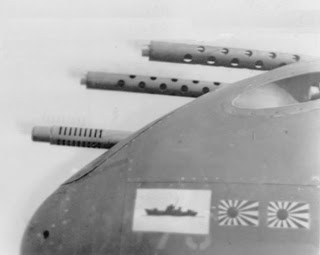
This fighter has in-line engines so there are no kit engines to complete. Therefore the build goes relatively quickly after the cockpit is done. In terms of after market, I added only some Master barrels to replace the machine guns and cannon. These were easily swapped for the kit pieces and really add to the detail of the kit. Tamiya came up with a clever kit design that does a few very important things at the same time:
- A simple way to prevent tail sitting (steel balls and a secure way to install them)
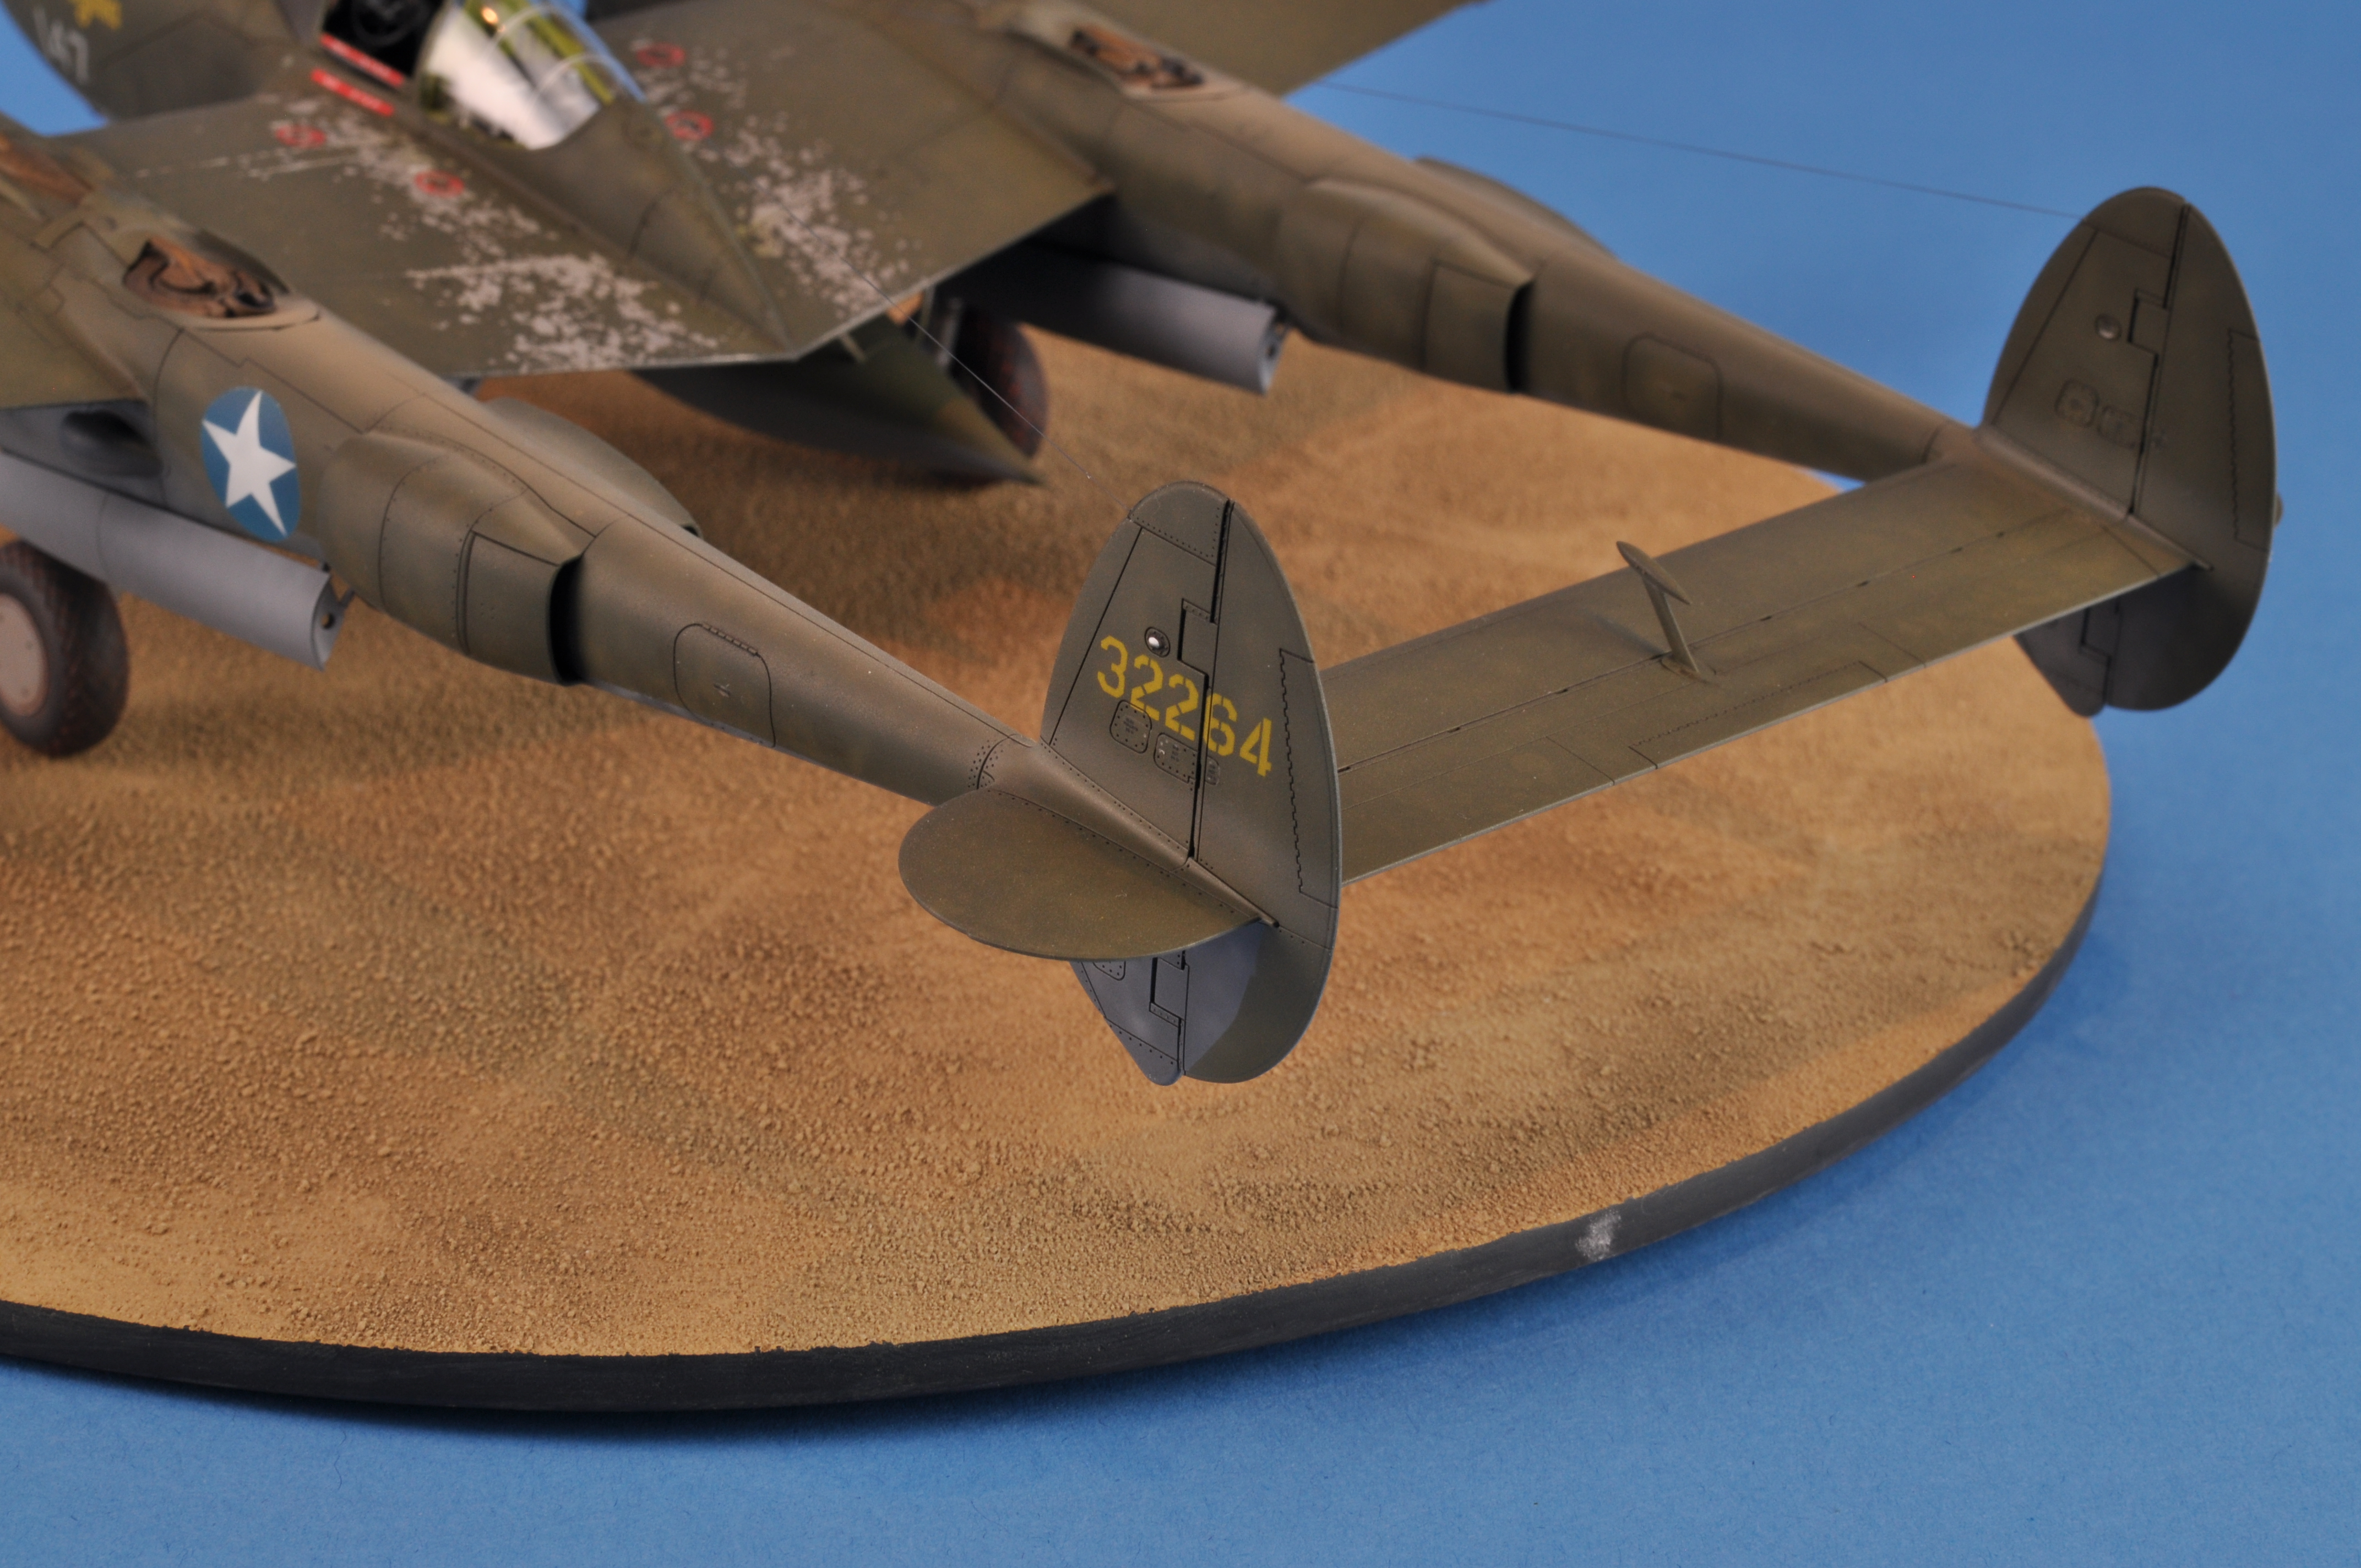
- An interlocked main gear bay that ensures the booms are strong and the gear doors have solid attachment points (actually they ‘slide’ into perfect alignment)
- The classic challenge of putting any P-38 together is alignment. To deal with this problem Tamiya has included a wing spar and integrated the main gear bays with the tail booms to make alignment a breeze.
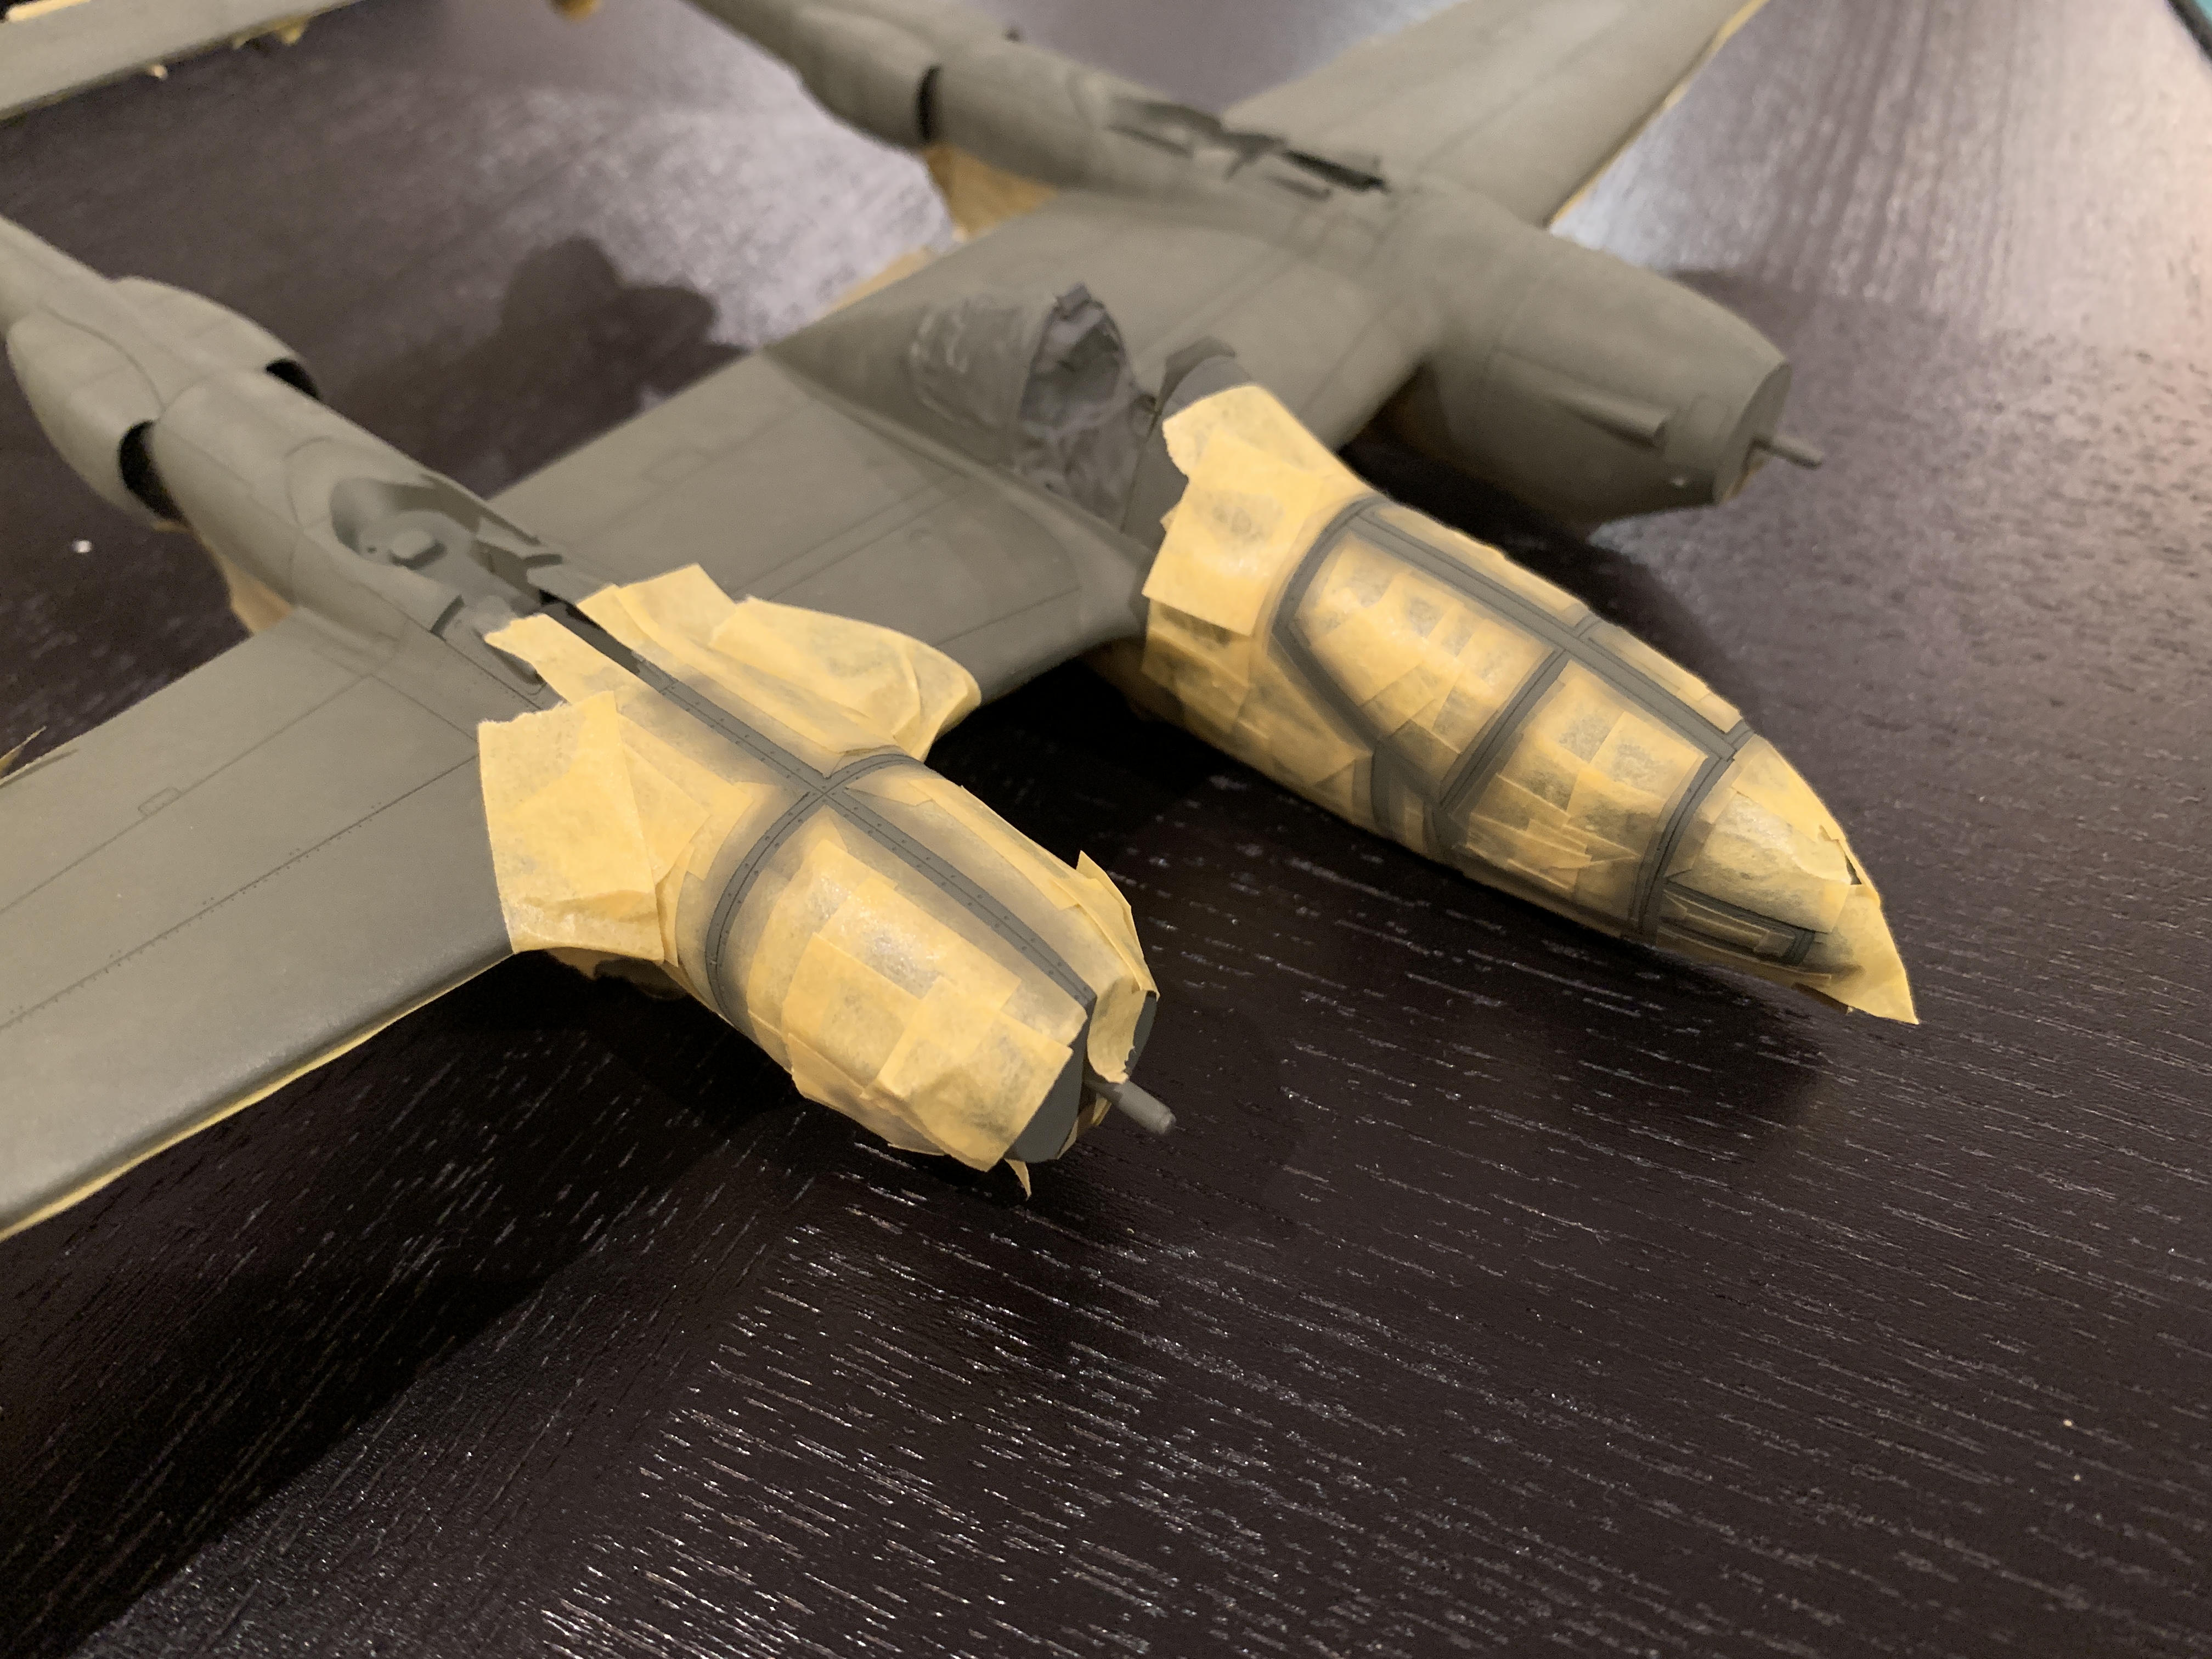
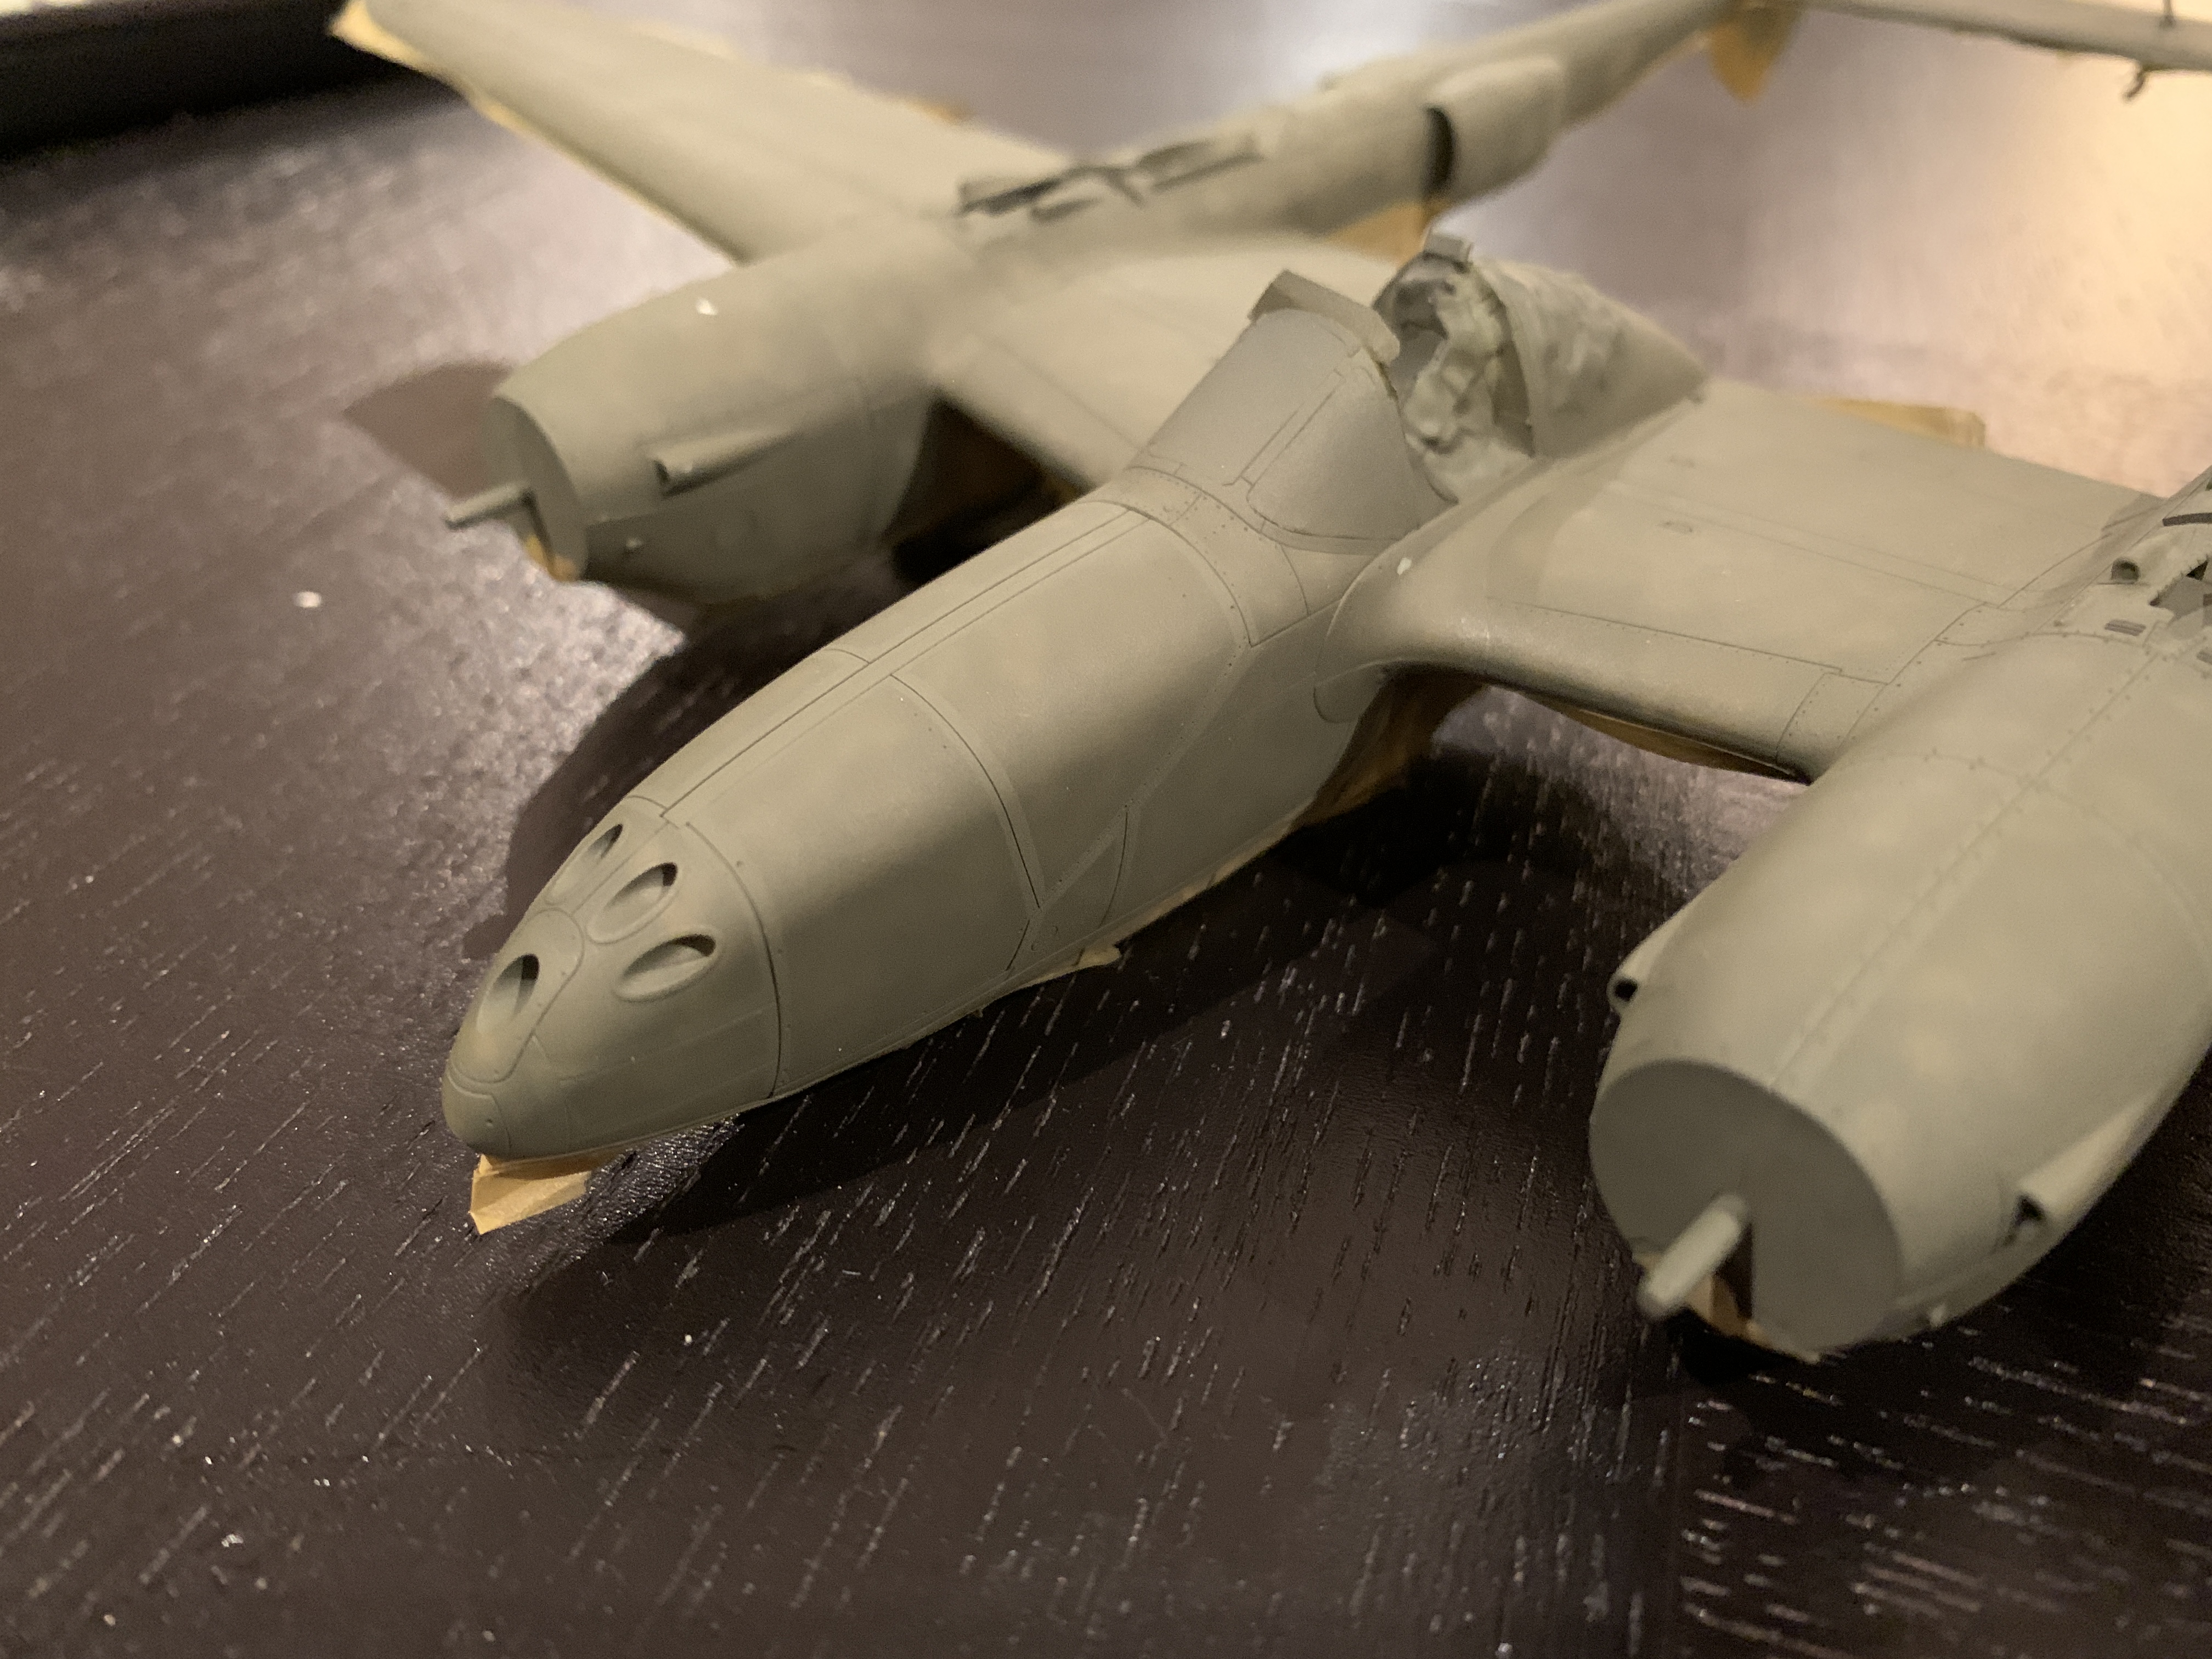
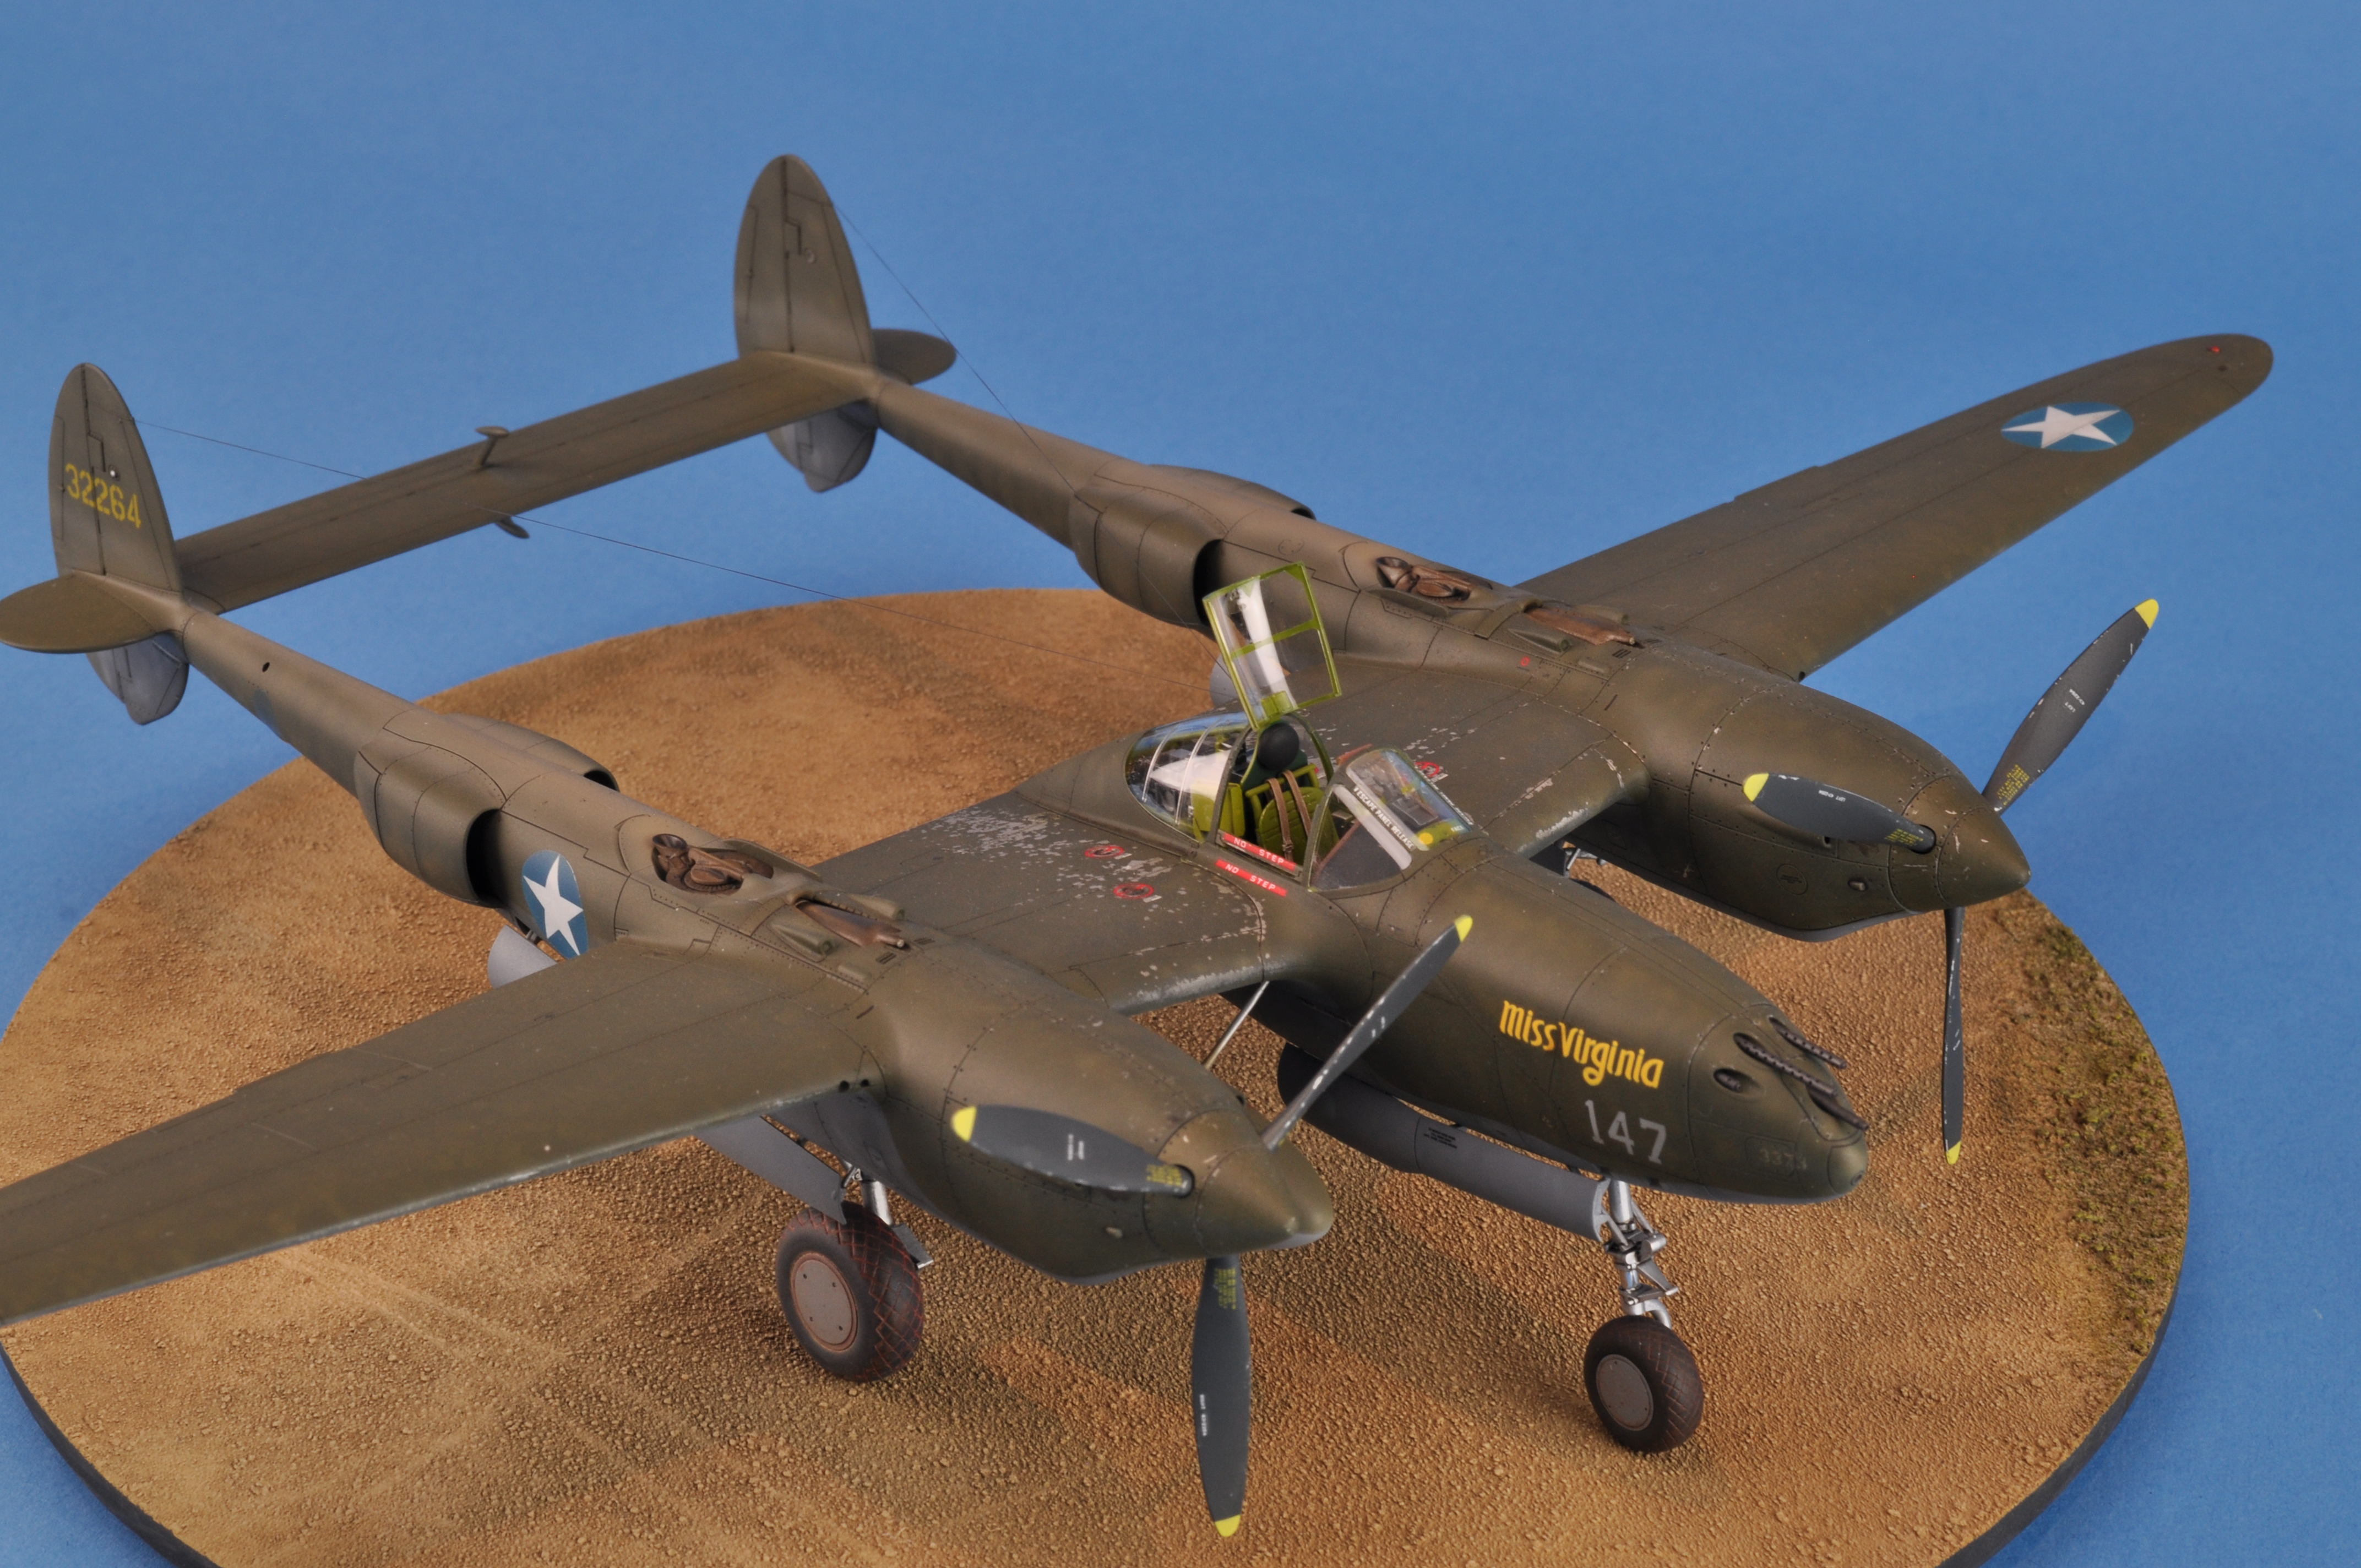
There is also separate interiors and exteriors to the landing gear doors which makes for simple painting. Speaking of which, there is a masking sheet for the canopy that, if carefully cut, will provide perfect masking for all of the clear parts. Lastly, Tamiya has included the ‘larger’ drop tanks that were used on the Miss Virginia during it’s most important mission.
This is not an inexpensive kit. However, the items I list above make the kit worth the money.
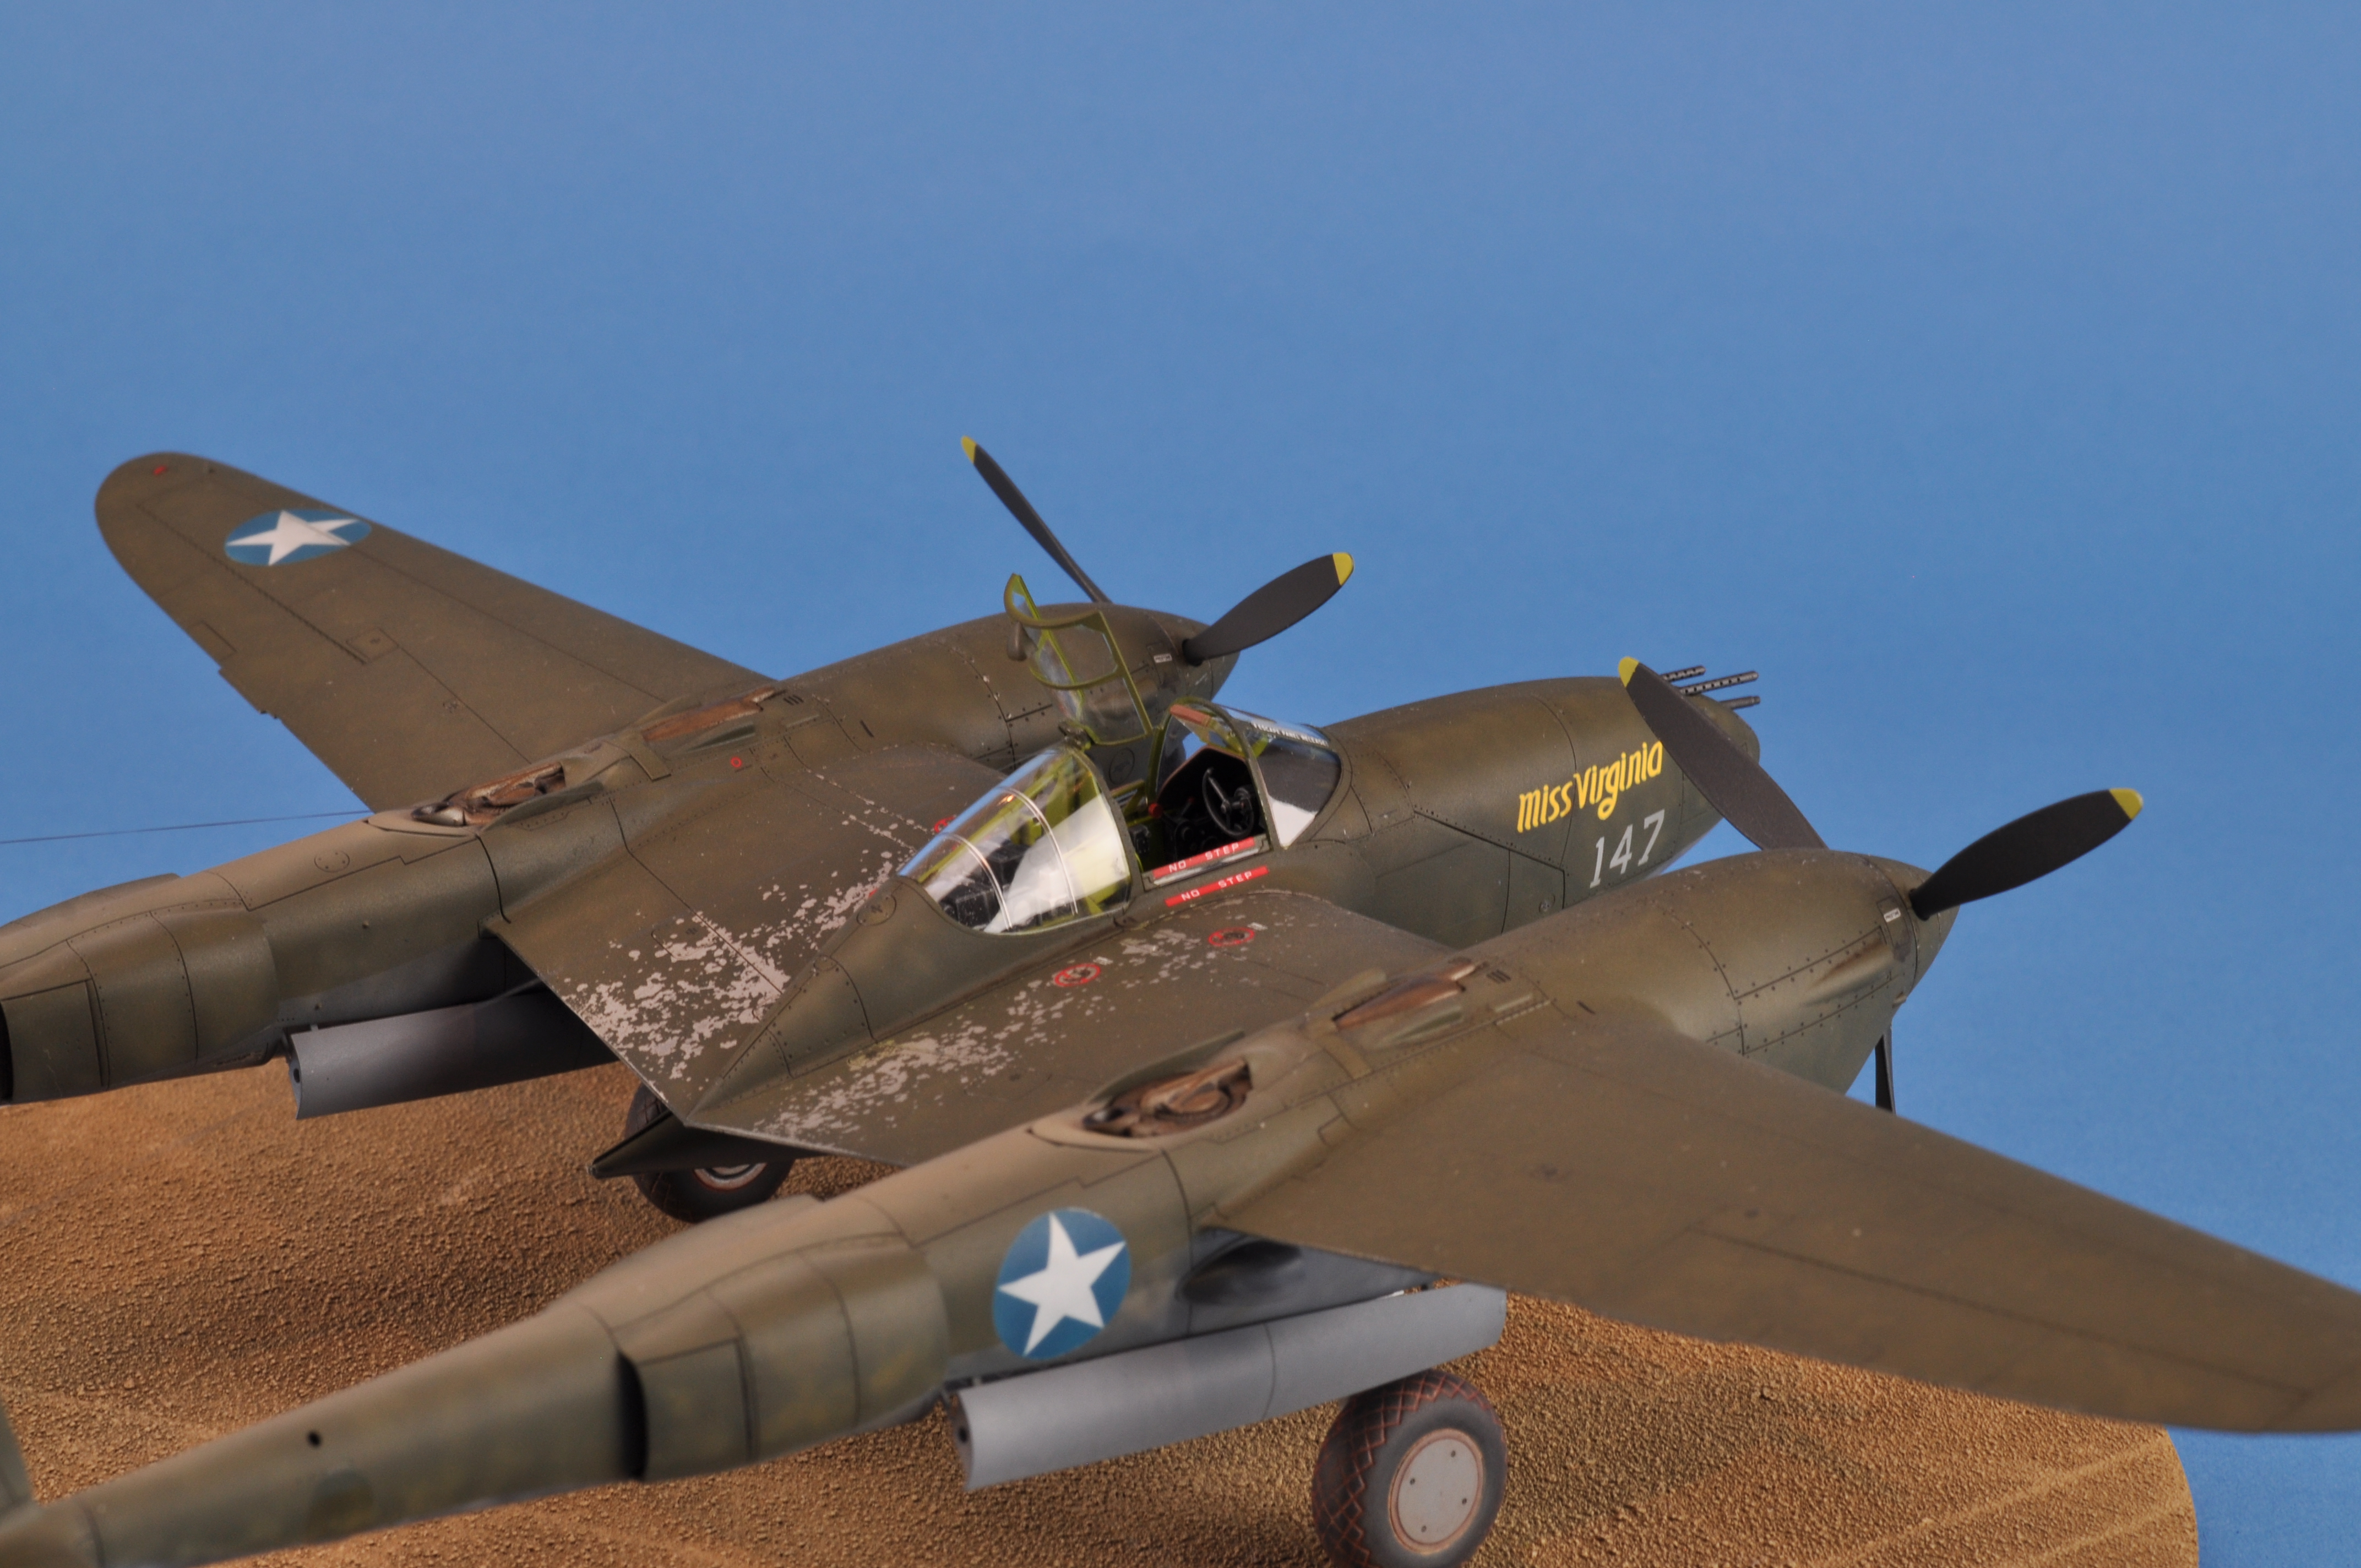
Painting Miss Virginia
I decided it was time to do some actual weathering on this build and this was going to be done using a few techniques that I have tried recently:
- Black base & paint “mottling”
- Scratching the paint using chipping fluid
- Airbrushing exhaust stains
- Dirtying up the cockpit and tires
- Airbrushing and fading the markings
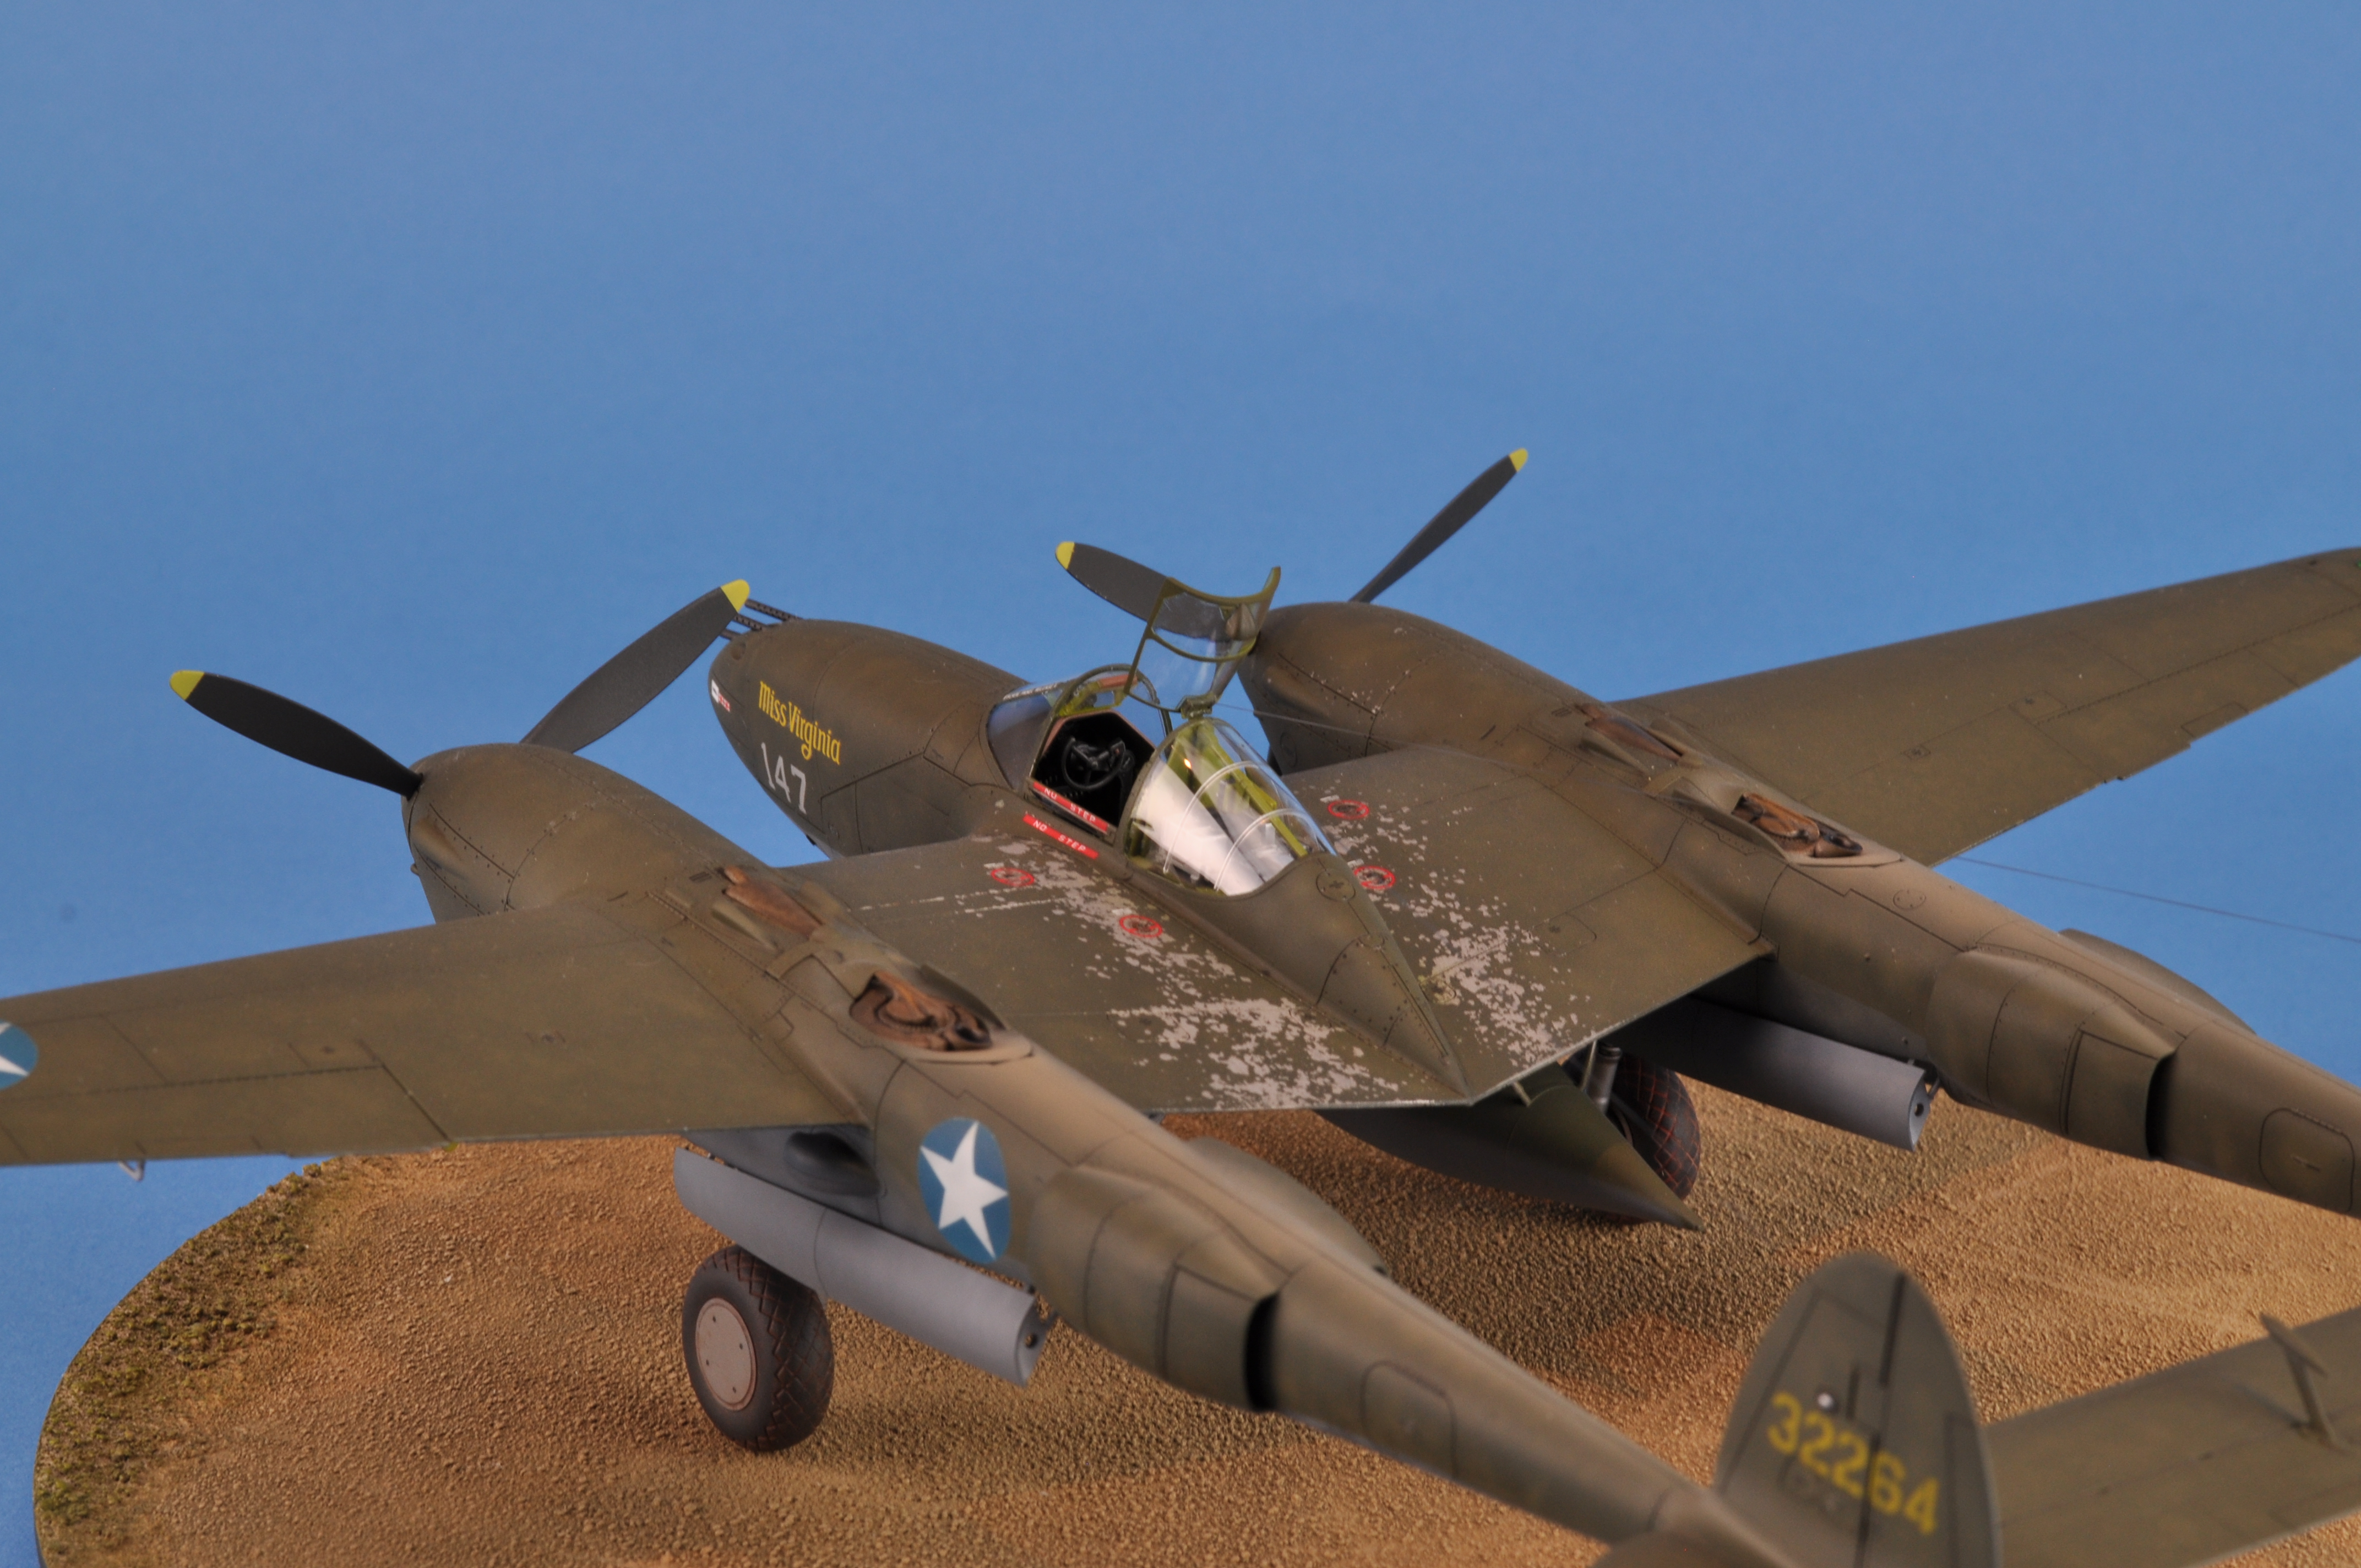
Ultimately the plan is to put this on a base that would best represent Miss Virginia at home on Guadalcanal. In addition, I was also going to replicate the ‘tape marks’ these pacific Lightnings were known to have. The tape was placed on various panel lines to seal the inside of the fuselage from contamination during sea transport. The tape adhesive seemed to have either discolored the paint or attracted dust and grit because these tapelines were prominent on some Lightnings. I’m not sure when these shots were taken of the actual Miss Virginia but they definitely show the tape marks on the front fuselage:
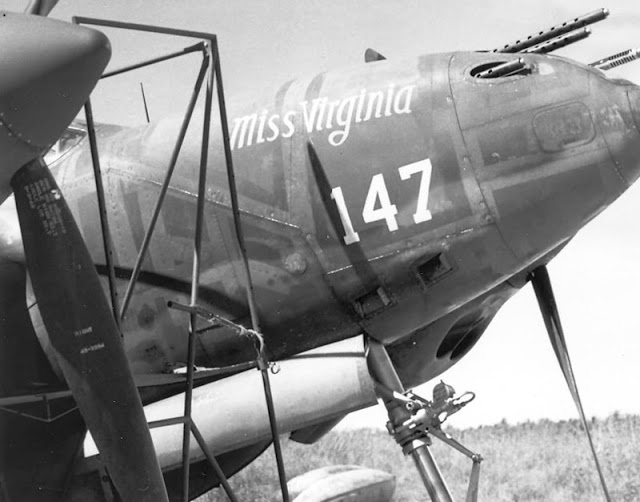
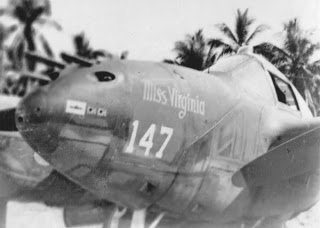
They look a lot more prominent in these shots than on my P-38 but who knows whether these were in ideal lighting conditions or if the photographs were manipulated. It does appear that the “Miss Virginia” and “147” markings are very bright, or at least not faded like the rest of the plane.
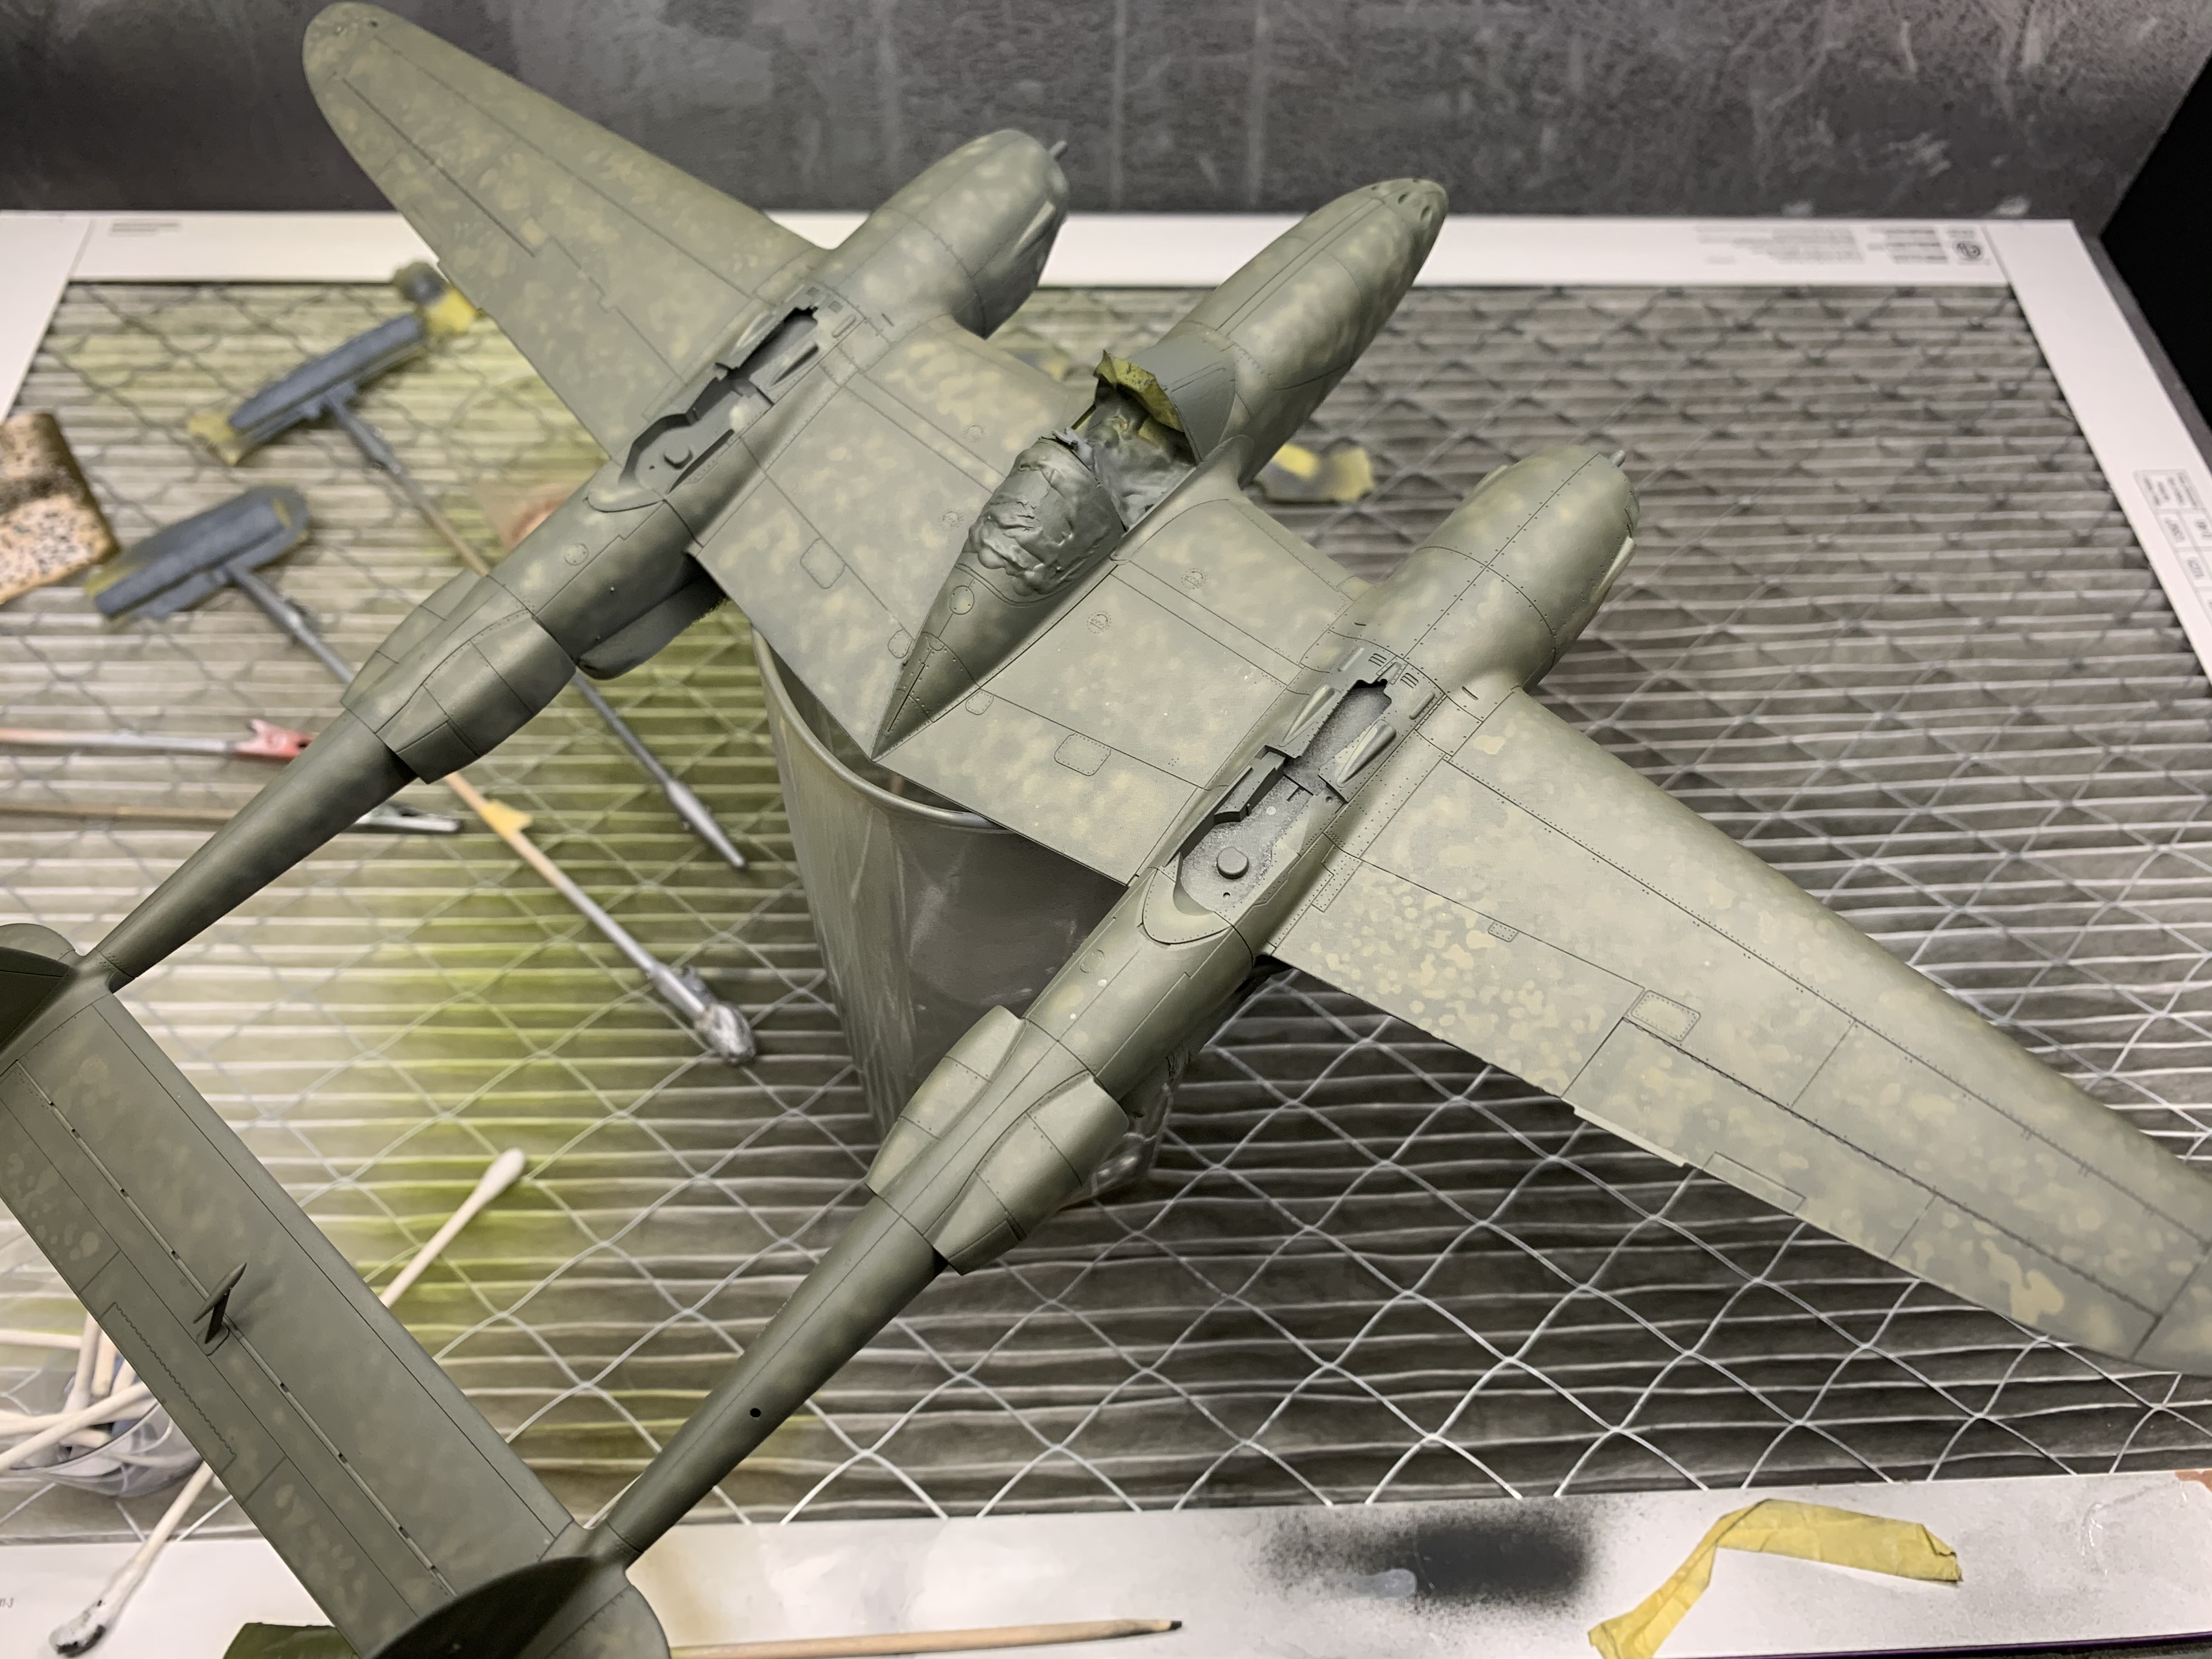
I wanted to replicate the scratches and chipping that was standard on Pacific Theater Lightnings so I started by spraying some aluminum lacquer on the tops of the wings around the cockpit area. I will describe the chipping exercise below. On top of the silver and the chipping medium I sprayed a black base in order to mottle or marble various greys and light browns. This was all done with a very fine tipped airbrush. I also gave one of those photoetch “mottling” masks a try but I found the patterns to be too defined. I fixed them but I think the next time I will have to hold the mask a bit ‘off’ the model.
Scratches and Chipping
Maybe I should have called this section “Chipping?” because I attempted to use chipping fluid without fully understanding how it works. My understanding was to start with the aluminium colour, then apply chipping fluid followed by the top paint. For me that was going to be black, followed by mottling and then the olive drab finish. Then, of course, life got in the way and maybe a week or two passed before I could chip the paint.
Apparently this is completely wrong! Before I attempted to chip the paint I found out that the technique works best when it is done within 24 hours of the chipping fluid being sprayed onto the model. Moreover, I found out that the more layers of paint, the less likely the effect would work.
Well, it kinda… sorta… worked:
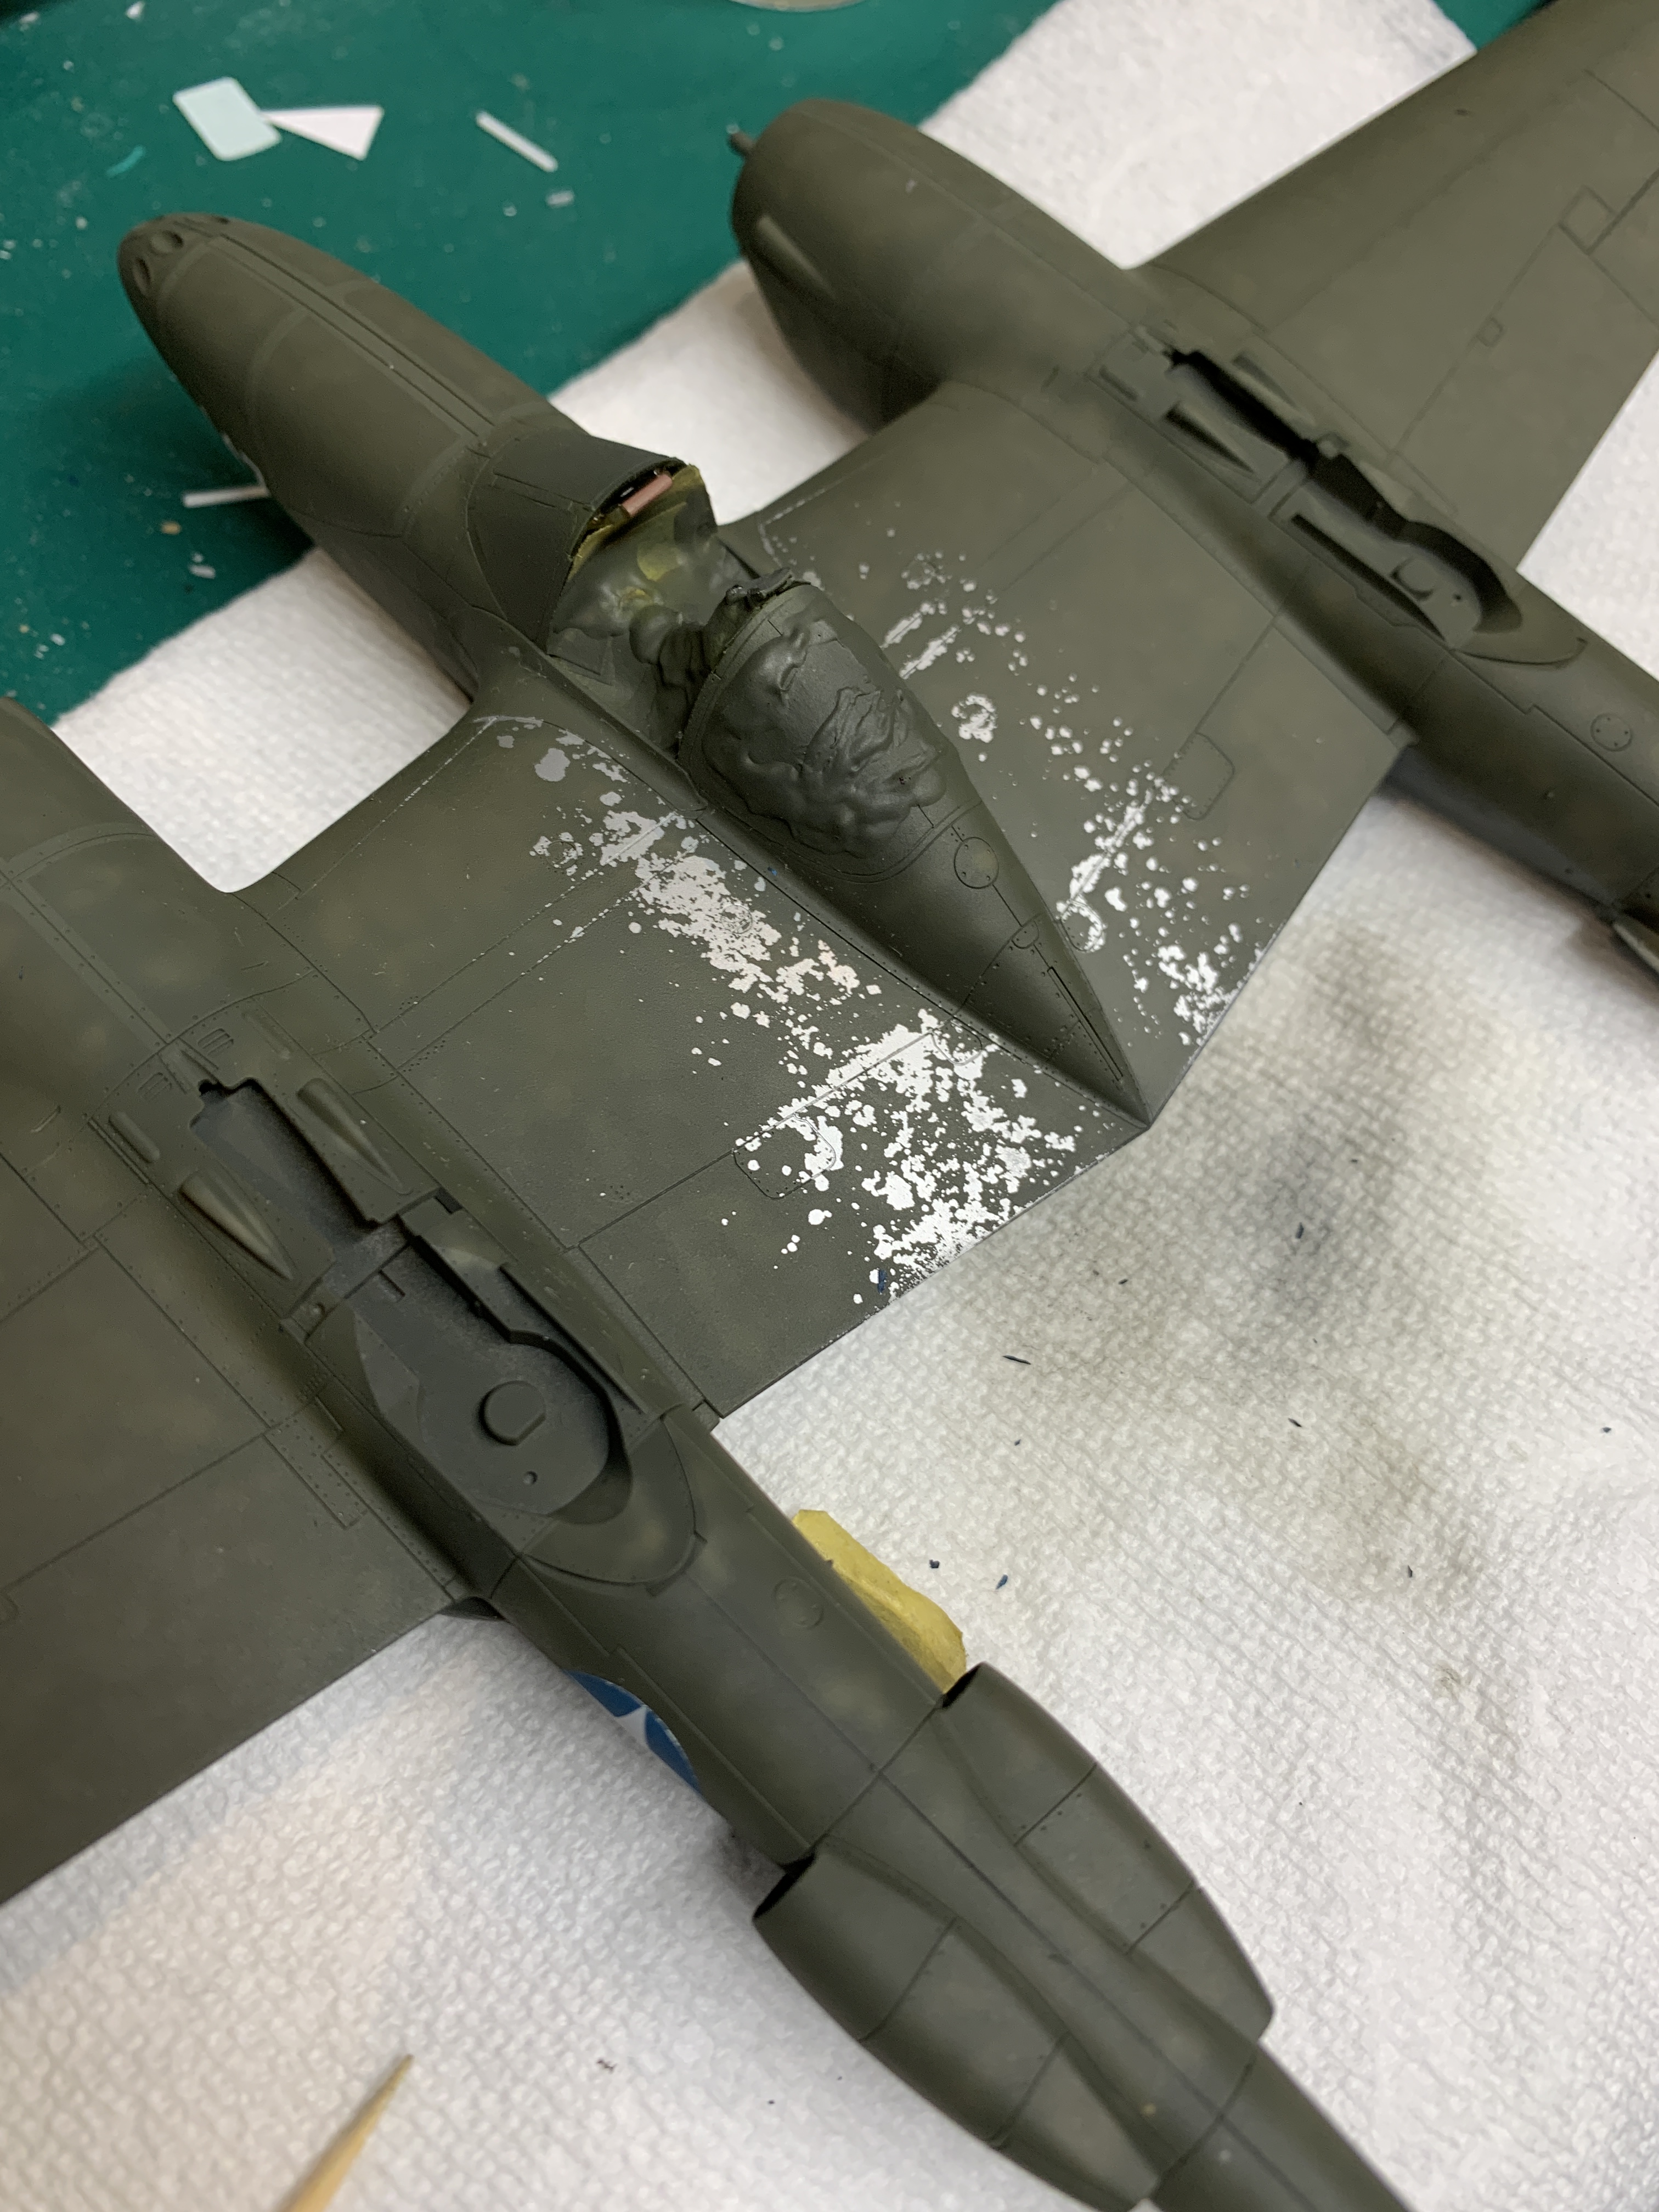
However, that took a lot of water, brushing, tooth picking and stiff brushing! Despite how long it took, I’m actually happy with it. It is definitely chipped and there are wonderful variations in size and shape. It really looks like it has been walked on and scuffed with boots.
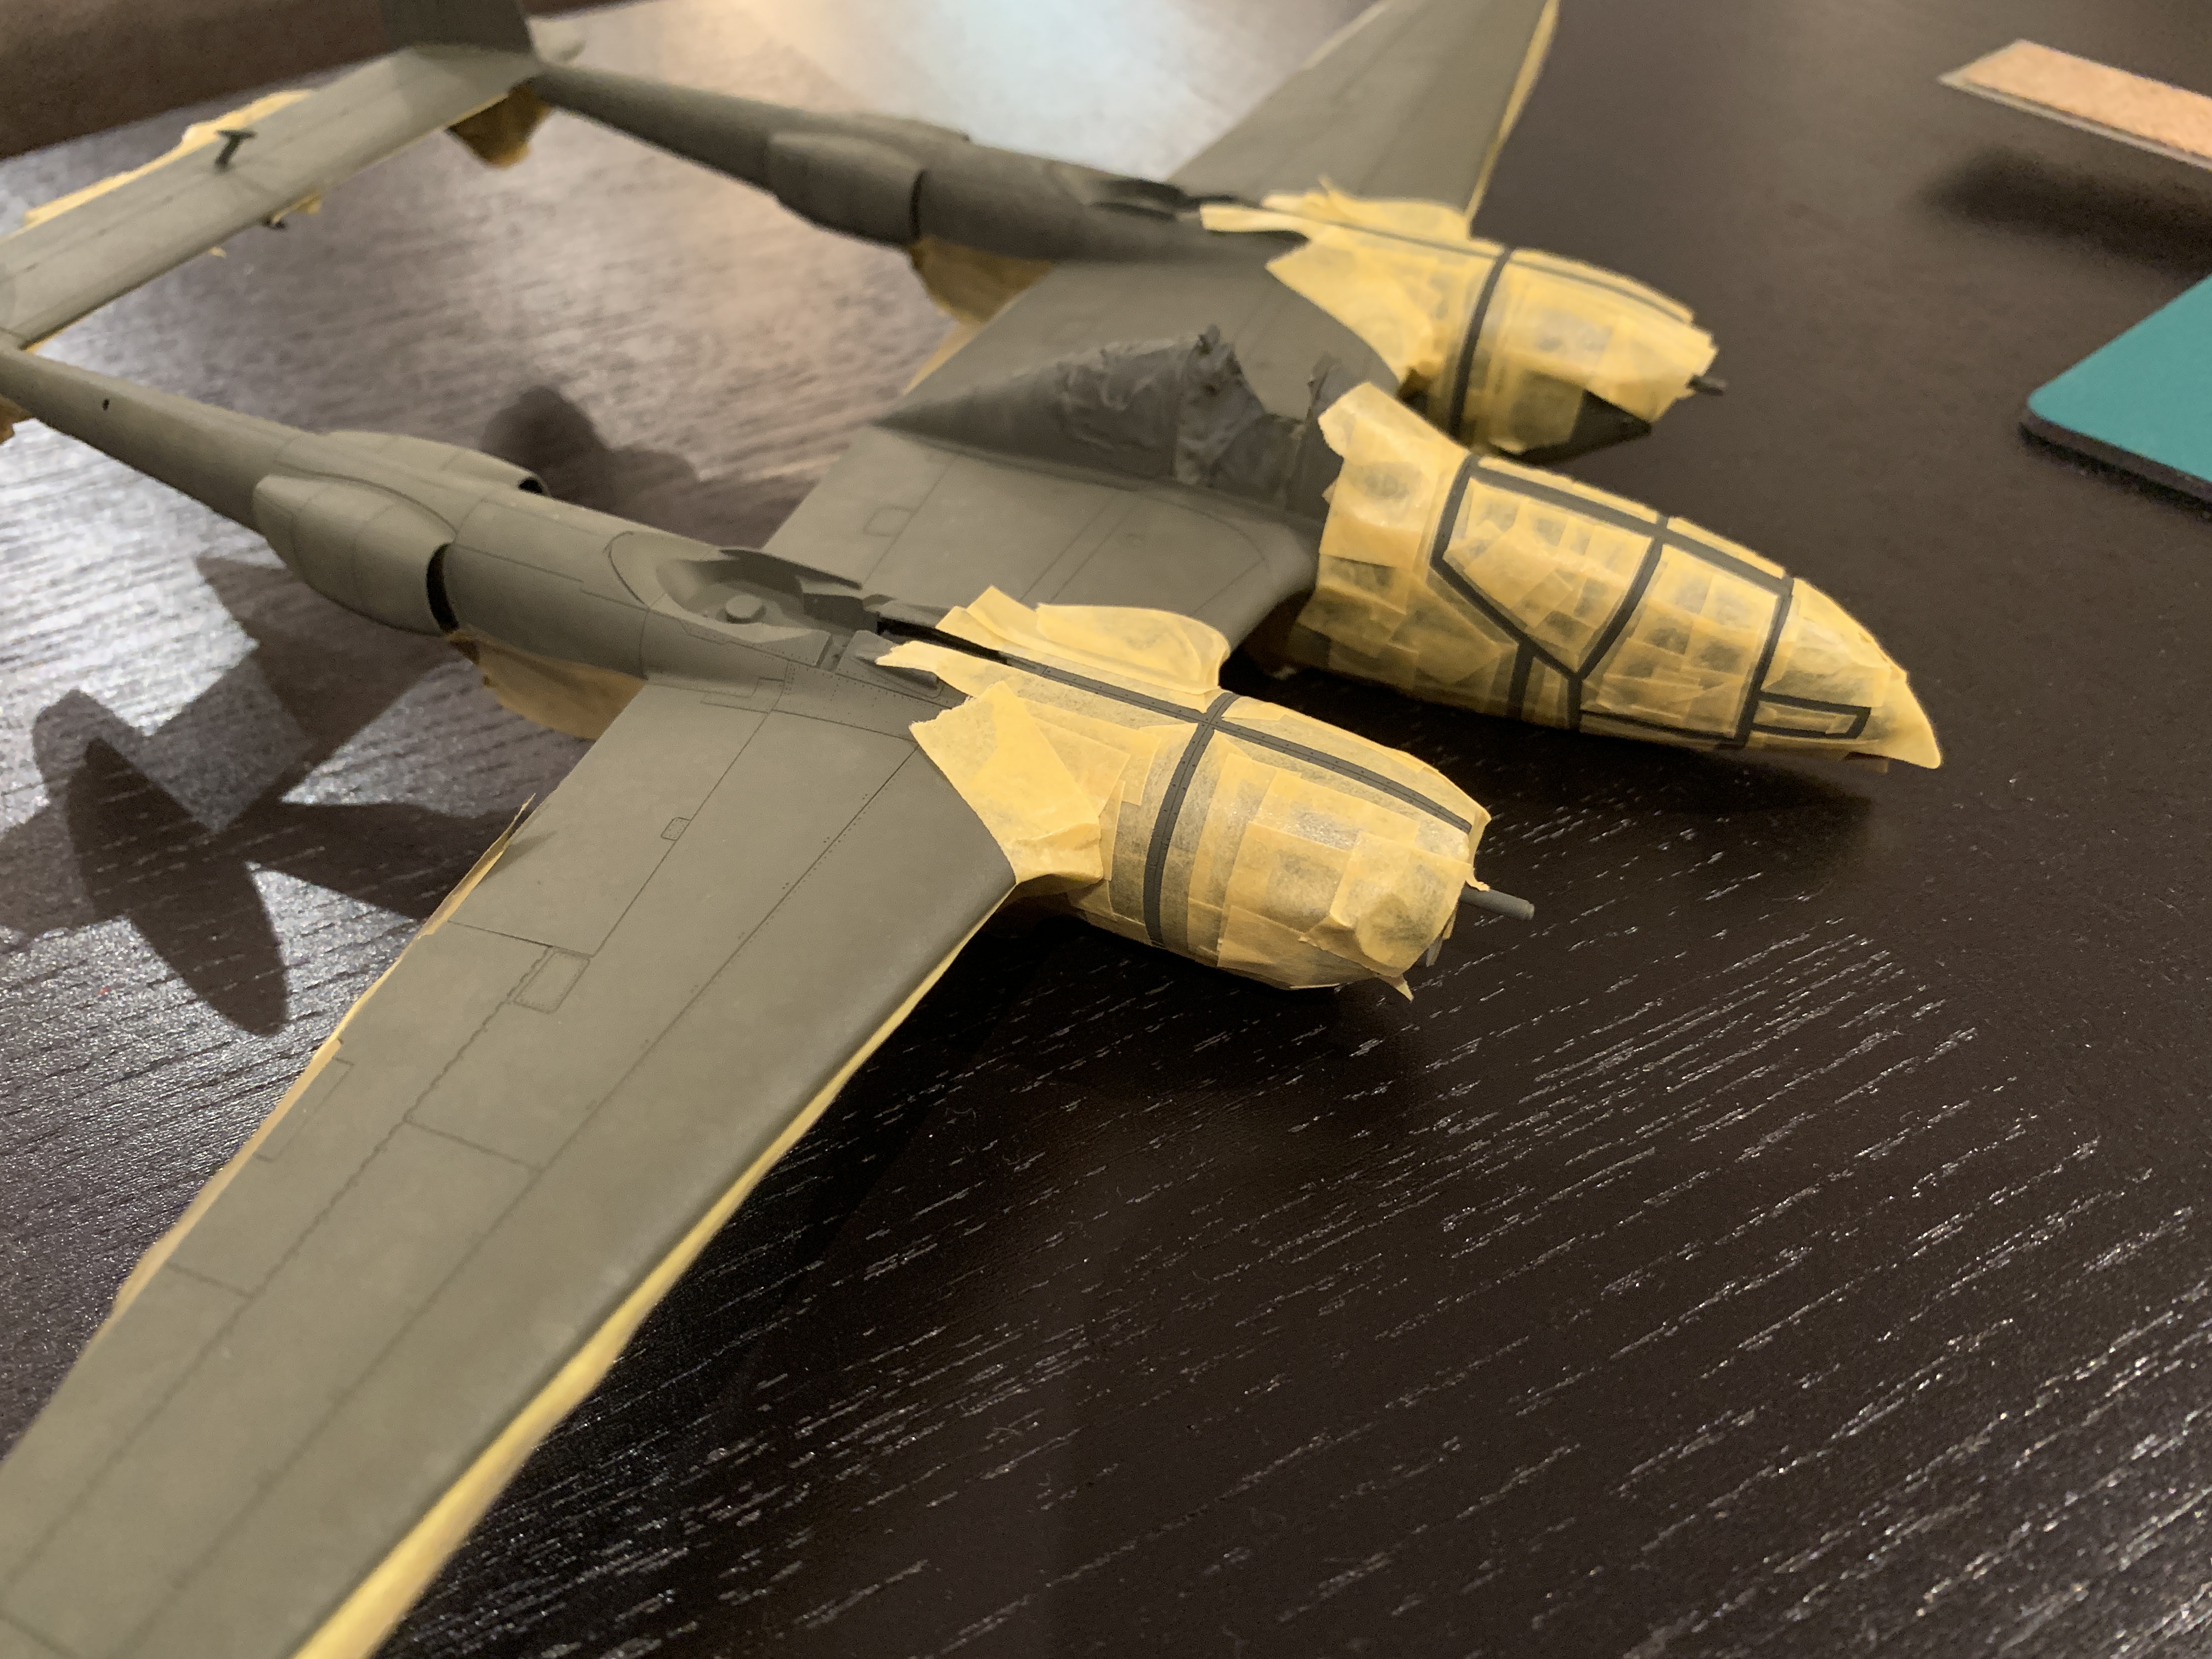
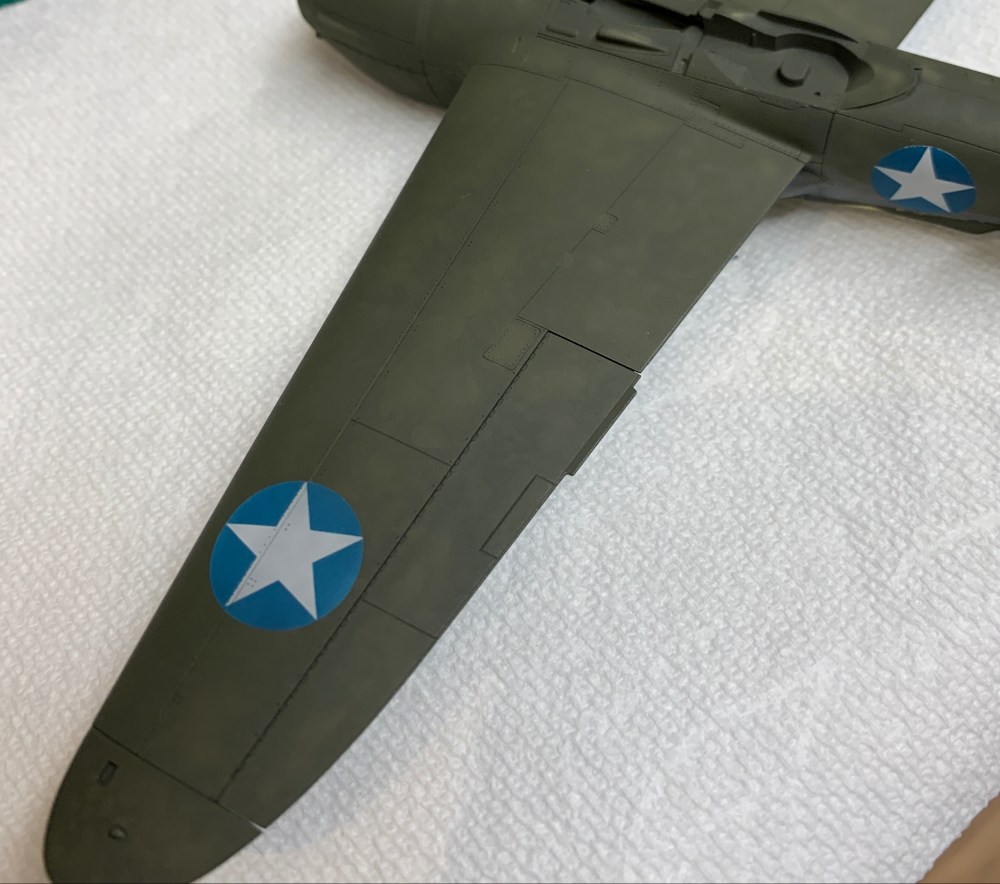
Next I used Montex Masks to mask the stars and numbers for painting. I normally avoid using vinyl masks but these were simple to use and worked wonderfully. I highly recommend these and I will be using more in the future. I made sure to fade the markings to match the fading of the overall paint on the top and sides of the model.
I then followed my usual course of glossing the model and adding decals. Now I am not a fan of decals at the best of times. I am less enthusiastic about Tamiya decals. I will say these went on without any issues but wow, there were a lot of them. Many stencils but all readable under a powerful microscope.
Next were the MIG Ammo panel line washes. I went with a dark brown for the upper surfaces and a dark grey for the lowers. Anything darker would have been too ‘stark’ a contrast with the painted surfaces and would have ruined the ‘sun bleached’ look I was after. These are my favourite washes because they come in a variety of colours and they are very forgiving. You just apply to the panel lines, wait about 40 minutes and then wipe away with a cotton bud or paper towel. Even an hour later the stuff will still come up.
Lastly, I wanted to replicate the exhaust staining for Lightnings stationed on Guadalcanal. It seemed to me the stains were more of a dirty brown than the grey/black standard we usually see on airplane models.

All that was left to do was to paint and install all of the bits and pieces that come at the end of the build. I made sure to weather the wheels with appropriate colored dust while not weathering the drop tanks as these would likely appear ‘newer’ than the beat up Lightning.

Final Thoughts
I finally got my Tamiya Lightning late last winter and started building it a couple of months ago. It is now done and I can confidently tell you this is the best P-38 Lightning model out there, and it is one of the best kits produced by Tamiya. In other words, as airplane model kits go, it would be very tough to beat this one.
This one did take a while to finish but it was not the fault of the kit. I had it together and ready for paint very quickly. However, I wanted to try some new finishing techniques and since I was just starting out they took a while to complete. As well, I find that the last 10% of the model build takes 90% of the overall time needed to complete a model. I think I can now say that I have finished my first ‘seriously weathered’ model and I am very happy with how this one turned out. I certainly learned a lot.

Looks good, I think your weathering experiments were a success! Another Tamiya kit to add to the list of projects they should scale down to 1/72.
LikeLiked by 1 person
Great work Chris. I have the same kit and after reading your review I will bring it to the top of my list.
I have a set of the Montex Masks but have set them aside to think about them for a while… maybe I’ll dust them off.
Cheers and stay safe!
LikeLiked by 1 person
I have an Eduard boxing of the Academy Lightning with all the bells and whistles. However, I am not sure I will get to it. After building the luxury model, it is hard to go back to the entry level kit.
LikeLiked by 1 person
Nice piece and fine model; I must find a way to get my hands on one of those!
LikeLiked by 2 people
Very nice weathering on this, quite realistic. As to the tape over the various panels for sea shipment, I had a late acquaintance who worked at Lockheed during the war, who told me the tape was applied, and then “overpainted” with a glue to seal it for shipment. It’s this “overpaint” of glue that makes the edges of the tape marks. Like applying a clear coat over paint, the glue changed the hue of the paint it was slopped over (neatness didn’t count), which is how the dark areas were created. I did my take on this phenomenon on my Tamiya P-38H reviewed over at Modeling Madness.
PS – you have a nice site here.
LikeLiked by 2 people
Excelente trabajo y muy bien logrado,sugiero que cuando tengas que hacer un desconchado, pintes con color aluminio, dejar secar 6 hs y luego barnizar con barniz transparente, luego pintar el color real y por ultimo una vez bien seco todo, desconchar con un bisturì o con viruta de acero, raspando donde queremos que se vea el aluminio, y otra tècnica; es pintar con aluminio luego dar barniz y por ultimo humedecer y poner sal gruesa, sobre el lugar a decapar y una vez seco todo raspar con un cepillo de cerdas duras asì de este modo, solo saldrà la sal y el resto quedara intacto dejando ver el anluminio del desconchado, te mando un gran abrazo modelista.-
LikeLiked by 1 person
Muchas gracias, Alfredo! I like the scalpel tip for chipping but I am afraid of the salt leaving unwanted stains on the model. It would be something I need to practice. Thanks for the tips!!
LikeLike