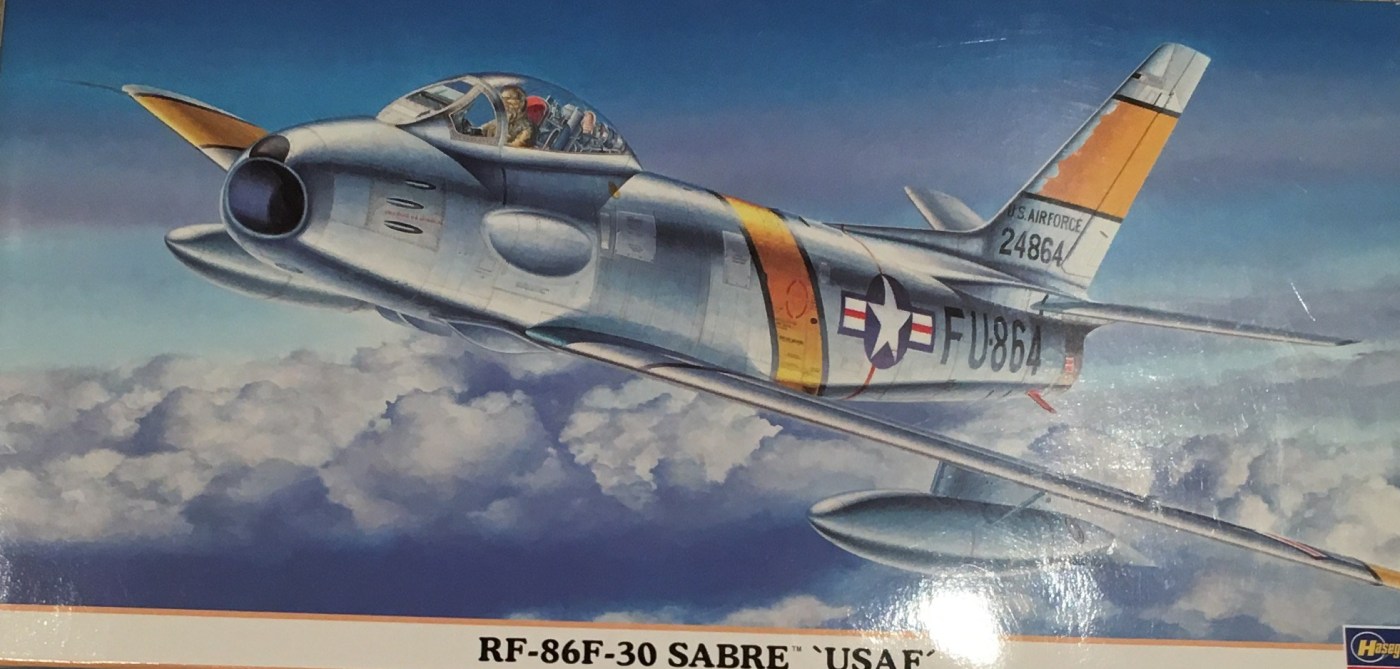
In the Spring of 2019 I made the trip to Dayton Ohio in order to attend WrightCon and to visit the Museum of the United States Airforce. My collective 6+ hours in the museum felt incredibly rushed because there is simply too much to look at. The report of my USAF Museum visit also seems incredibly rushed because I tried to fit it all into one post. I could easily make individual posts about the airplanes that stood out. One of those ‘stand out’ airplanes was the RF-86 “Haymaker” Sabre.
What is an RF-86 Sabre?
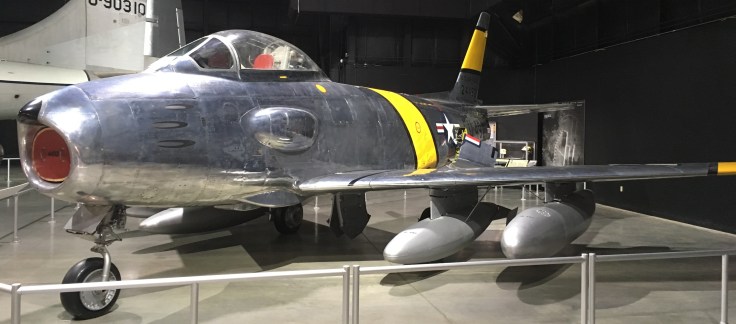
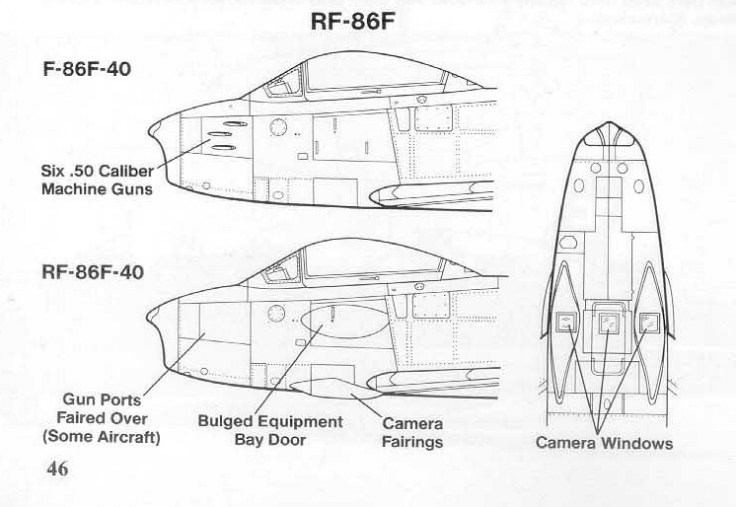
The RF-86 is a variant created from the F-86F Sabre. This was a conversion that turned a tactical fighter into a strategic reconnaissance aircraft. The guns and gun sight were removed and camera equipment was installed in the gun bay. Due to the size of the equipment and film canisters, some large fairings had to be used on the fuselage sides. There were some pretty convincing gun ports painted onto the fuselage. Other than that, and due to the long distances involved in these missions, there were provisions made to have four drop tanks fitted to the Sabre instead of the usual two.
The RF-86 is located in the ‘Cold War’ hangar at the USAF Museum. In a sea of amazing airplanes, this one is featured with a nice display containing information about the airplane and its role. I was told the tanks used on the museum aircraft are probably not accurate but are used to illustrate the uniqueness of this Sabre:


What does “Haymaker” mean?
The description at the USAF Museum says the following:
“The RF-86 filled an important gap until more capable reconnaissance aircraft became available. The Sabre, originally built as a day fighter, was first modified for reconnaissance during the Korean War. USAF personnel custom-fitted cameras to about a dozen F-86 fighters (known as ‘Honeybuckets’ or ‘Ashtrays’) to replace the slower RF-80 for missions in northwestern North Korea – “Mig Alley” – and into Manchuria
After the Korean War, a handful of F-86Fs received more capable cameras under Project HAYMAKER….
In the Mid-1950s, RF-86F pilots of the 15th Tactical Reconnaissance Squadron flew vital, top secret missions over the Soviet Union and China. The photographs they took helped US leaders accurately gauge Soviet and Chinese capabilities and intentions during the Cold War….”
These planes were also modified to fly much higher than typical F-86s. Missions were planned for altitudes where the two ship formations would not make contrails (this was anywhere between 42,000 to 54,000 feet).
Haymaker missions involved sending multiple mission capable RF-86s to an initial point. Everything was dependent on attaining the right altitude and with as full an internal load of fuel as possible. If one of the designated Sabres was mechanically incapable of continuing, then another Haymaker Sabre would take that spot. Otherwise these ‘spares’ flew back home.
Over 40 missions were flown and the Haymaker Sabres brought back pictures of airfields, sub pens and other similar targets near Vladivostok as well as areas over North Korea and China.
Keep in mind, these flights were made without radio calls, accurate charts, GPS or any other navigational aid. As well, they flew completely unarmed. On occasion pilots snapped pictures of fighters attempting to intercept but unable to attain enough altitude.
The success of these flights led to the development of purpose designed reconnaissance aircraft such as the U-2. However, these flights also showed gaps in the Soviet air defense system and likely led to an acceleration in surface-to-air missile development.
Building the 1/48 Hasegawa RF-86
The Pacific war is my model focus but occasionally I venture to other things. I have always liked the look of the Sabre and one of my last models as a kid was an attempt to do a Canadair Sabre 6 from the Hasegawa kit. I remember messing it up rather badly. I think it was the join of the nose to the intake piece and the paint colours I chose were way off.
This kit is a ‘limited edition’ within Hasegawa’s line of Sabres. It comes with the correct wings and it has a bag of resin for the specific Haymaker Sabre parts. Aside from some minor surgery, the build will be no different than any other Hasegawa Sabre.
Model Construction
I started this project in order to participate in an IPMS weekend blitz build. In hindsight it is hilarious that I thought I could complete this model over a long weekend. Take it from me: If your project involves resin and reworking various structures, you won’t have it done in 3 days! I am glad I started it because I was able to get almost all of the model construction done during the blitz build.
The Hasegawa cockpit is basic but looks the part except for the seat. That kit part really needed a replacement. So, I used the seat from a KMC resin cockpit set for the F-86. I went online to find some pictures of the RF-86 cockpit and it seems that it is a mid grey colour.
I somehow remember the model’s intake to be a problem part of the build. I used a KMC resin intake that had the nose piece integrated. I knew there would be a good chance for gaps and steps with the fuselage and I was not wrong. It seemed the fuselage was just a touch narrow to have the nose fit cleanly. So, I glued in a thin evergreen shim to widen the front of the fuselage just slightly. Everything fit perfectly after that.
Blanking the machine gun holes was done with half round evergreen strip and some gap filling CA. I timed the drying of the CA to about 45 minutes. Doing that ensures it is hard enough to sand and polish but not rock solid and needing rasps to tame. A couple of small holes remained but they were dealt with using Mr. Surfacer and wet sanding.
Unfortunately, those who want a Haymaker have limited options. The Haymaker camera equipment was made of resin in this limited issue Hasegawa kit. These resin parts are very rough. At one point in time a company known as Veteran Models marketed a complete RF-86 conversion, including extra drop tanks. I can’t vouch for the quality of these conversion kits but they do look good in the pictures I have seen. Sadly, these conversion kits are extremely hard to find. If you get one, count yourself lucky.
The side blisters were chunky and I wet sanded them down using 400 grit sanding paper. The real blisters are more ‘integrated’ with the fuselage but I feared sanding these resin bits too much and ruining the parts. However, under a coat of silver, they look much better. The camera ports required significant surgery on the bottom of the fuselage to install but they blended in a little better.
Lastly, the Haymakers used 4 drop tanks. I have a couple of Academy Sabres in the stash and one donated its drop tanks. All that was needed was some careful drilling into the wings for the mounts as well as making the inboard mounts ‘taller’ using evergreen strip.


Painting
When you build Korean war aircraft, you have to be prepared to do natural metal finishes or bare metal finishes (BMF). I have tried various methods to paint BMF and lately I have found success with decanting Tamiya AS-12 and spraying it with my airbrush. This time I tried using LP-11 Silver from the new Tamiya lacquer paint line.
Wow, this stuff is amazing and I highly recommend it so long as you use a good respirator and a paint booth. It sprays smoothly, it covers perfectly and it also blends perfectly if you have to touch up a slight blemish.
Instead of using decals for the broad yellow stripes, I decided to measure and carefully mask them. This is a time-consuming step but when done well, the result is far better than any decal could do.


Finished Model
I used Microscale Decals (48-0166) which I am pretty sure are out of print but they must have made millions of them because they are widely available on the internet. Most of them conformed very well with the surface but, oddly, they did not like Microsol. I think this is the first time Microscale decals ever behaved like this on me. I blame their obvious age for that surprise.


Final Thoughts
I have to say, the WrightCon show is a good time and is extremely well organized. As I was leaving Dayton last year I already decided to go back again sometime. Of course, the 2020 show got affected by the pandemic but the organizers have postponed it to November 2020. I certainly hope they hold the show and it goes without a hitch.
As well, 6-7 hours in the USAF museum is what I would call a “good start” for anyone who is interested in things that fly. As I said, there were a few planes that made an immediate impression on me, especially this Haymaker, and I resolved to build one right away. It ended up taking a year for me to start it, but hey, that’s life.
Overall, I’m happy with this model. This is the first time I have built a model of a museum airplane and I really enjoyed making it as ‘authentic’ as possible. The Hasegawa Sabre did not have any build challenges. There is also a ton of aftermarket bits available for those who want to go all out. I used some pieces from KMC which are no longer available. However, I think these parts are now being made by Squadron.
That said, the kit alternatives for the 1/48 Sabre are getting long in the tooth and I think it is time for an updated kit or kits.
I’d like to know if a museum visit has prompted you to build a specific model? What was your experience in getting pictures/references? I wonder if the museum staff would have let me ‘crawl’ over, or at least around, the plane if I asked nicely? No matter what, the USAF museum has excellent reference shots of their planes including these Cockpit 360s.
Lastly, I found myself fascinated with the story of the Haymaker missions. If any of you are interested in these missions, here are some book and article options:
- Tactical Reconnaissance in the Cold War by Doug Gordon
- Spyplanes: The Illustrated Guide to Manned Reconnaissance and Surveillance by Norman Polmar
- Flight Journal Article – Shooting Blanks

Great post.
LikeLike
Reblogged this on My Forgotten Hobby III and commented:
Too good for not sharing…
LikeLike